

Chunky Honeycomb Scarf Knitting Pattern — Cozy Step-by-Step Guide
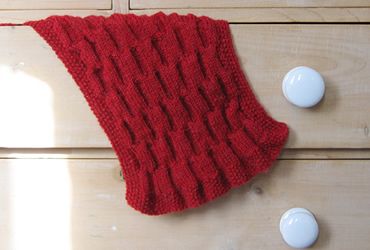
Stay warm in style with this Knitted Chunky Honeycomb Scarf — a plush, textured accessory that pairs easily with any winter outfit. The honeycomb cable motif gives the scarf an elegant, three-dimensional look while the chunky construction provides extra warmth and a lovely drape. Below you'll find materials, gauge, full pattern instructions, and finishing tips to make your own.
Materials
- Original call for 9oz of Patons Moorland Double Knitting
- Example shown is knitted in Phildar Brisants
- One pair of No. 6 (5mm) needles
Tension (Gauge)
Equivalent to 20 sts and 26 rows to 4 inches (10cm) measured over stocking stitch.
Finished Size
- Width: 12 inches
- Length: 46 inches
Notes on yarn and substitution
This pattern is written for double knitting (DK) yarn. Moorland DK was slightly heavy-weight. The sample was knitted in vintage Phildar Brisants (a fine DK). Because the cabling tightens the fabric, the pattern recommends UK No. 6 (5 mm) needles — two sizes larger than usual for a DK. If you prefer a chunkier result, use thicker yarn and decrease the number of stitches proportionally (the pattern repeat is worked over 12 sts). Swatch first to match tension.
Instructions
Cast on 73 stitches.
First row: K1, * p1, k1; repeat from * to end.
Repeat this row for the moss stitch border 8 times more.
10th (increase) row: Moss 8, (increase in the next st, moss 6) 8 times; increase in the next st, moss 8. [82 sts]
Change to pattern rows as follows:
1st row: moss 5, p3, *k6, p6; repeat from * to last 14 sts; k6, p3, moss 5.
2nd row: moss 5, k3, *p6, k6; repeat from * to last 14 sts; p6, k3, moss 5.
Repeat the last 2 rows 4 times more.
11th row: moss 5; *slip the next 3 sts on to a cable needle to the back of the work; k3, p3 from cable needle; slip the next 3 sts on to a cable needle to the front of the work; p3, then k3 from cable needle; repeat from * to last 5 sts; moss 5.
12th row: as first.
13th row: as second.
14th row: as first.
Repeat the 13th and 14th rows 4 times more.
23rd row: moss 5; *slip the next 3 sts on to a cable needle to the front of the work; p3, then k3 from cable needle; slip the next 3 sts on to a cable needle to the back of the work; k3, p3 from cable needle; repeat from * to last 5 sts; moss 5.
24th row: as second.
These 24 rows form the pattern. Continue straight until the work measures 46 ins, ending with a 12th or 24th pattern row.
Next (decrease) row: moss 8 *k2tog; (p1, k1) 3 times; p2tog, repeat from * 3 times more; k2tog; (p1, k1) 4 times. [73 sts].
Work 9 rows moss stitch over all stitches.
Cast off.
Finishing
Press work very lightly, taking care not to spoil the texture of the pattern. Cut the remaining wool into 7½ inch lengths; take 3 lengths of wool together each time, fold in half, and, with a crochet hook, knot through short ends to make a fringe. Trim fringe to even length.
Additional tips
If using a different yarn, make a gauge swatch and adjust needle size or stitch count so the pattern repeat (12 sts) is preserved. If your finished width is narrower than desired (as happened with the sample), use larger needles or a heavier yarn to reach the target width.