

How to Knit the Foxgloves Stitch — Step-by-Step Pattern, Abbreviations & Tips
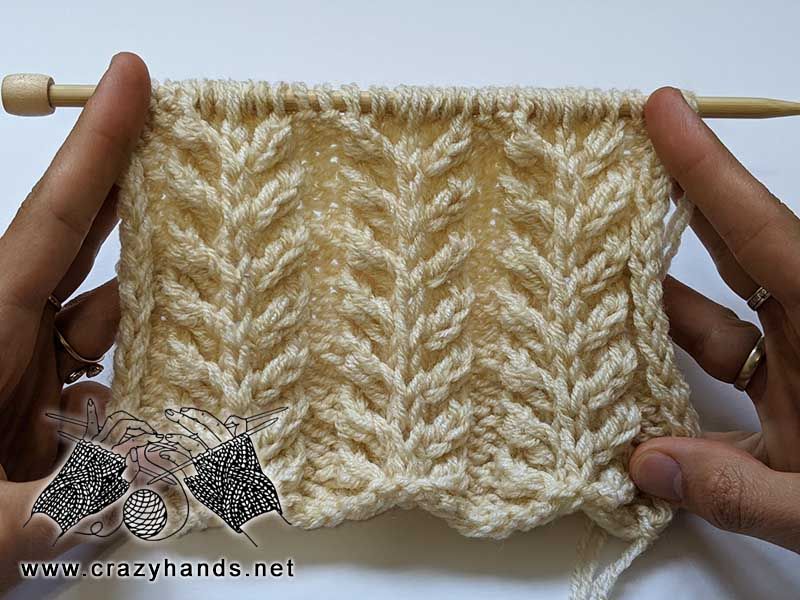
The Knitted Foxgloves Stitch creates a pretty, petal-like textured motif that resembles foxglove flowers. It adds an elegant, lacy texture to scarves, trims, panels and accessories. Below you'll find a clear materials list, common abbreviations and the complete 4-row stitch repeat so you can try this charming pattern yourself.
Knitting materials and tools:
- DPN 5 mm (US8/UK6).
- Schaffhauser Wolle SUPERSTAR yarn – 83% Acrylic, 17% Viscose, Color #82, 50 grams – 100 meters.
Common abbreviations of knit stitches:
- k – knit
- p – purl
- st(s) – stitch(es)
- sel s – selvage stitch: always slip the first stitch purlwise, work to the last stitch, purl the last stitch
- ryo – reverse yarn over: bring the yarn to the front over the top of the right needle.
- C2(3)B – Slip 2 stitches to the extra needle and hold in back of work, k3tog from the left hand needle, k2 from the extra needle.
- C3(2)F – Slip 3 stitches to the extra needle and hold in front of work, k2 from the left hand needle, k3tog from the extra needle.
- pt – petal: knit first stitch and do not slip it off the needle, ryo, knit one more time the same stitch and slip it off the needle.
Foxgloves knit stitch pattern:
Cast on a multiple of 9 sts plus 2 extra sts and plus 2 selvage stitches. In my example 31 stitches.
Row1 (RS): sel s, p2 *k2, pt, k1, pt, k2, p2 – repeat from *, sel s.
Row 2: sel s, k2, *p2, slip next 7 sts to the right-hand needle holding working yarn in front, (count ryo as one stitch), p2, k2 – repeat *, sel s.
Row 3 (RS): sel s, p2, *C2(3)B, k1, C3(2)F, p2 – repeat from *, sel s.
Row 4: sel s, k2, *p3 slip next st to the right-hand needle holding working yarn in front, p3, k2– repeat from *, sel s.
Repeat Rows 1-4 as many times as needed.
Tips:
- Work a small practice swatch to get comfortable with the pt (petal) and the cable-like transfers (C2(3)B / C3(2)F) before starting a large project.
- Use a lifeline when working several repeats so you can easily rip back to the last good row if needed.
- Blocking a finished piece will help open and define the petal motifs for a clearer floral effect.