

Cozy Viola Cable Knit Hat — Step-by-Step Pattern & Materials
Stay warm and stylish with the Viola Cable Hat — a folded-rib beanie featuring an eye-catching cable panel and a playful pom pom. This pattern provides materials, stitch abbreviations, gauge, and clear round-by-round instructions to knit a hat that fits a 52–54 cm head circumference.
The Knitted Viola Cable Hat is the perfect accessory for colder months. With its intricate cable design and soft texture, this hat adds a cozy touch to any outfit. Whether you're out for a winter stroll or hitting the slopes, the viola color gives a vibrant pop to your winter wardrobe.
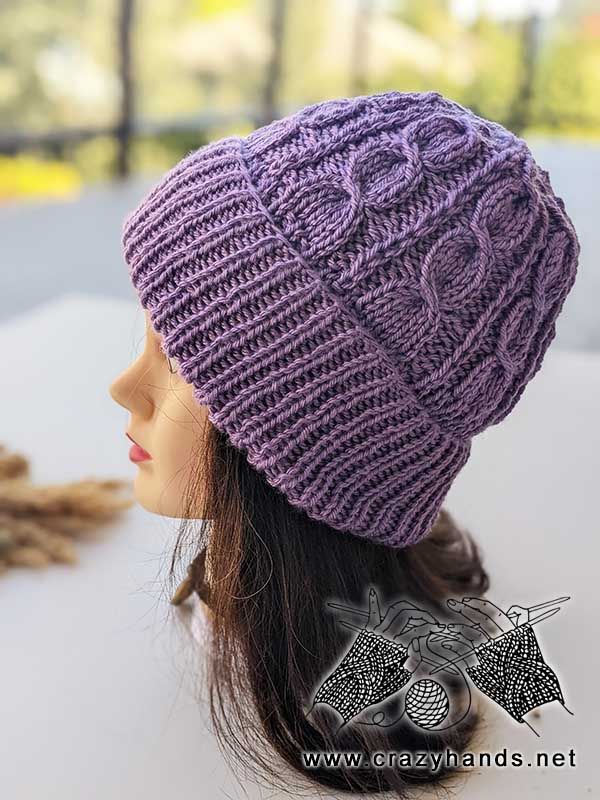
Viola Cable Hat with folded ribbing and a faux fur pom pom — the cable panel runs vertically for a classic textured look.
Knitting materials and tools:
- Double-pointed or circular knitting needles 4 mm (US 6/UK 8) for the ribbing, 4.5 mm (US 7/UK 7) for the main part
- Red Heart, Soft – 100% acrylic yarn. 141 g – 234 m per skein. Color of your choice.
- Weight Category – 4. Quantity – less than 1 ball.
- 2 cable needles, yarn needle.
- Pom pom – black/white/purple color. Material – natural fur / faux fur / yarn pom pom. Size – 15–17 cm.
Viola cable knit hat size:
- Head circumference: 52–54 cm
- Number of stitches: 86
- Stitches to add after the ribbing: 4
- Gauge: 17–18 stitches = 4 inches in stockinette
Common abbreviations of knitting stitches:
- K – knit
- P – purl
- Pm – place marker
- inc – knit the next stitch through the front loop, then knit the same stitch through the back loop
- C1/3 – Cable1/3: slip next stitch to the 1st cable needle and hold it in front, then slip next 3 stitches to the 2nd cable needle and hold them in back, k1 from the left-hand needle, k3 from the 2nd cable needle, k1 from the 1st cable needle
- skpo – Slip, Knit, Pass Over: Slip one stitch to the right needle knitwise, knit in the next stitch and drop this stitch off the left needle, insert the left needle into the slipped stitch, pass it over the knit stitch
- K2tog – knit two together
- K3tog – knit three together: slip next stitch to the right needle knitwise, k2tog, insert the left needle into the slipped stitch and pass it over
- P2tog – purl two together
- st(s) – stitch(es)
Viola cable hat knitting pattern:
Knitting the ribbing
Using the long-tail cast-on method and 4 mm needles, cast on 86 stitches. Place marker and join to knit in the round. Work K1, P1 rib until the piece measures 14–17 cm. Change to 4.5 mm needles for the body.
Knitting the body
After the ribbing, add 4 stitches to reach a final number divisible by 10.
Next Round: [k20, inc] – repeat four times, k2. (90 sts)
Round 1: [p2, k1, p2, k5] – repeat to end of round.
Round 2: [p2, slip next stitch holding working yarn in back, p2, k5] – repeat to end of round.
Round 3: [p2, k1, p2, k5] – repeat to end of round.
Round 4: [p2, slip next stitch holding working yarn in back, p2, k5] – repeat to end of round.
Round 5: [p2, k1, p2, k5] – repeat to end of round.
Round 6: [p2, slip next stitch holding working yarn in back, p2, k5] – repeat to end of round.
Round 7: [p2, k1, p2, C1/3] – repeat to end of round.
Round 8: [p2, slip next stitch holding working yarn in back, p2, k5] – repeat to end of round.
Repeat Rounds 1–8 two more times. After that repeat Rounds 1 and 2. At this point the hat measures approximately 20 cm (with the brim folded).
Shaping the crown
Round 1: [p2tog, k1, p2tog, k5] – repeat to end of round.
Round 2: [p1, slip next stitch holding working yarn in back, p1, k5] – repeat to end of round.
Round 3: [k2tog, p1, k5] – repeat to end of round.
Round 4: [slip the next stitch holding working yarn in back, p1, k5] – repeat to end of round.
Round 5: [k1, p1, C1/3] – repeat to end of round.
Round 6: [slip the next stitch holding working yarn in back, p1, skpo, k1, k2tog] – repeat to end of round.
Round 7: [skpo, k3tog] – repeat to end of round.
Break yarn and leave a 10–15 cm tail. Thread the tail through the remaining stitches and pull tight to close the crown. Fasten securely and weave in all ends.
Attach a yarn, faux, or real fur pom pom to finish.