

Top-Down Baby Vest with Cables — Free Knitting Pattern (12–18 months, Sport Weight)
This sweet top-down baby vest features textured 2x2 cable panels and a V-neck, worked from the shoulders down so you can adjust the fit as you go. It makes a lovely handmade gift and is warm yet breathable thanks to a sport-weight cotton/modal blend. The pattern below describes materials, sizing, gauge and step-by-step shaping notes as used for a 12–18 month size.
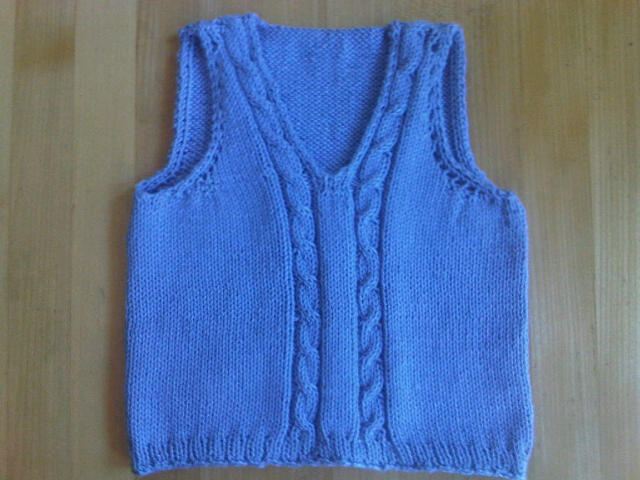
Caption: Hydrangea top-down baby vest with cable panels — worked in Shine Sport, ready to wear at 12–18 months.
Materials
- US 5 circular needles and US 4 for the ribbed edge
- 2 skeins of Knit Picks Shine Sport Weight, in Hydrangea (60% cotton, 40% modal; washable)
- Approximately 220 yards total used for this vest
Size: Intended to fit approximately 12–18 months
Finished measurements: Length about 12", Chest about 22", Armhole about 5", Crossback about 8"
Gauge: 5.75 stitches, 7 rows per inch
Abbreviations
- k = knit 1
- p = purl 1
- st = stitch
- PM = place marker
- k1f/b = increase by knitting 1 in the front and back of the stitch
- M1 = an increase between two stitches that creates a small decorative hole
- RS = right side of the work
- WS = wrong side of the work
- inc = increase
Overview & Notes
This vest is worked top-down. The pattern includes a non-roll edge (first and last 3 sts of RS rows in p,k,p; WS edges k,p,k) around neck and arms, cable crosses every 8 rows on RS, and increases to shape the V-neck and add width so the front and back can be joined and worked in the round. Increases on the V-front are M1s (decorative hole); you may substitute k1f/b if you prefer no hole.
Instructions
Cast on 46 sts on US 5 circular needle.
Knit in stockinette with non-roll edges as described, until the piece measures 4" ending after a WS row. For the non-roll edges, the first and last 3 stitches on each RS row are p,k,p (WS edges k,p,k).
Transfer these live stitches to another circular needle or to waste yarn to keep on hold for later (this is the back).
Go back to the top edge and pick up 13 sts on both shoulders, lining up with the 1st and last 13 sts. Use a new ball of yarn, working from both ends because you will need a different live yarn for each side of the front until you join in the round. (The 20 bound-off sts in the center are the back neck.)
Pick up sts working right to left with the tails on the right. Now starting on the wrong side, keeping the non-roll pattern (WS = k,p,k) on the edges of the neck and sleeves, complete one WS row. Add 2 PMs as you do this WS row, one after the first 3 sts and the other before the last 3 sts. These markers remind you to keep the non-roll edging and mark where you will increase.
On a RS row you will begin the cable pattern. Everything stated for RS will be opposite on WS to stay in pattern. Increases for the V-neck happen only on RS and (initially) on every OTHER RS row. All increases are M1 unless you choose k1f/b.
RS pattern for the first 13 sts (right shoulder):
P k p, PM p p k k k k p , p k p
And for the second 13 sts (left shoulder):
P k p, p p k k k k p PM, p k p
On this first RS row, inc with a M1 after the first PM and again before the second PM (the PMs should remain 3 sts from the edges).
Left shoulder WS example:
K p k, PM k p p p p k k p, k p k
Next WS row with no inc looks like this:
K p k, PM p k k p p p p k, k p k (notice there are 14 sts)
Continue in pattern, increasing every other RS row (M1s) to create the shaping of the V-neck. When you want to widen the front panels faster you can increase every RS row for a while (this is an option if you are comfortable adjusting).
First cable cross: on the next RS row you will cross the cables toward the center front. Cross cables every 8 rows on RS (or your chosen consistent interval). This is a 2 + 2 cable set off by 2 purl sts on both sides (reverse stockinette). Because it’s only 2 sts, a cable needle is optional.
Example for cable crossing on the shoulders: hold the (k k) sts forward on one side and knit after the next two knit sts; on the other shoulder hold the (k k) sts to the back and knit them after the next two knit sts to cross the cable in the opposite direction. (Refer to a 2x2 cable tutorial if needed.)
Continue building the pattern and increasing until you have 40 front stitches (20 + 20). Then begin increasing on EVERY RS row until you reach 23 + 23 (46 total stitches) so the front matches the back panel stitch count. At that point the front panel length should be almost 4.5" and ready to be joined into one front panel.
When you are at the beginning of a RS row with the 23 + 23 sts, cut the yarn (leaving a tail to weave in) at the left side and join the two sides of the V neck together. The front should measure about 5" long now. You will continue armhole shaping by continuing to M1 every RS row at the markers (the same shaping will be mirrored on the back).
Stitch counts and planned increases
At this stage you have 46 + 46 sts unjoined (92 sts total). For a 22" chest the target is 126 sts around, so you will need to add stitches before or as you join in the round. The method used here adds extra stitches during the armhole shaping on both front and back so fewer increases are needed after joining.
On the RS row shown in the original notes, the author did an M1 at each marker plus k1f/b twice on the next two knit sts to add extra width. Also, when joining the center front the two center purl stitches were changed to knit and each made into k1f/b to add stitches at the center front. Follow the same sequence of increases as described above to reach the desired stitch counts (the original method added 8 total sts to the front on that row, and additional increases across the front as described).
Return to the live sts on the back (from waste yarn), place them on size 5 needles, purl a WS row and then start the armhole shaping to match the front. Add a row or two of stockinette if needed so back and front lengths match before shaping. On the back you will mirror the front increases: on the first RS increase row do (m1, several k1f/b), then a WS row with no increases, then another RS increase row similar to the first, then a WS row. After these back increases you will have added a total of 14 sts for armhole shaping on the back and the chest will be approximately 22" when you join in the round.
Join front and back in the round. Example counts given: after the described increases there were 60 sts on the back and 60 on the front (120 total). To reach 22" chest you may need a few more sts — the author added k1f/bs under the armholes (8 sts total, 4 under each armpit) to arrive at 128 sts and then joined the work in the round. Place a marker at the first purl that begins the cable pattern to keep track of the cable placement as you continue.
Now that the piece is in the round, the body is mostly stockinette (knit every round). Continue knitting until the total garment length measures about 11.5" or your desired length. Adjust with a k2tog if necessary to get the stitch count down to 127 to work with the ribbing sequence described next.
Switch to US 4 needles and work 4 rounds of k2, p1 ribbing.
Bind off in pattern on the 5th round. Weave in ends and block the vest to measurements.
Done — a cozy, cable-accented top-down baby vest!