

Cozy Knitted Adorable Cardigan — Full Pattern, Sizes XS–3X & Finishing Tips
This knitted adorable cardigan pattern gives you a cozy, versatile sweater with a charming cross-over yoke and removable ribbon-mounted buttons. The instructions below include sizes XS–3X, yarn and needle recommendations, gauge, pattern notes, full directions for body, sleeves and yoke, plus finishing tips so you can assemble and block the cardigan to the correct measurements.
Imagine cozying up in the softest, most charming knitted cardigan — the perfect blend of warmth and cuteness. A knitted adorable cardigan is like a warm hug on a chilly day, wrapping you in comfort and style. Whether you're out for a casual stroll or enjoying a lazy day indoors, this delightful garment adds a touch of whimsy to your outfit. Its intricate patterns and lovely details make it a versatile piece that you can dress up or down effortlessly. Embrace the snuggly charm of a knitted adorable cardigan and let its coziness elevate your wardrobe with a touch of sweetness.
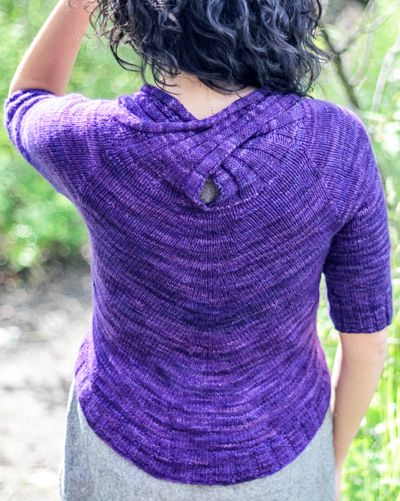
Sizes
For women's garments: XS [S, M, L, 1X, 2X, 3X]. Shown in size S with 2 inches of negative ease.
Finished measurements
Bust Circumference: 28 [32, 36, 40, 44, 48, 52] inches
Body Length, center front to top shoulder: 16 [16.5, 17, 17, 17.5, 17.5, 18] inches
Body Length, center back to top shoulder: 22.5 [23, 23.5, 24, 24.5, 25, 25.5] inches
Materials
Yarn: Malabrigo Rastita [100% Merino Wool; 310 yds/285 m per 100g skein]; color: 141 Dewberry — 3 [3, 4, 4, 5, 5, 6] skeins.
Recommended needles: use a needle that gives the listed gauge. 1 set US #3/3.25mm double-point needles and one 48-inch US #3/3.25mm circular needle.
Notions: stitch markers, stitch holders, eight 4mm diameter buttons, approx. 10 inches of satin ribbon, yarn needle, sewing needle and thread.
Gauge
20 sts / 32 rows / rnds = 4 inches in stockinette stitch, blocked.
Pattern notes
The buttons are small enough to fit through the knit fabric, so buttonholes were omitted. To make button removal easy for washing, sew the buttons onto a strip of ribbon rather than directly onto the sweater. The yoke may appear shallow when first knit, but the overlapping strips will deepen the yoke by about 3 inches once grafted.
To adjust fit, note where key lines fall: the front bust line will be about 4 inches below the top of the body section, and the center-back bust line about 4 inches into the yoke. The front waistline will be about 1 inch above the cast-on edge; the center-back waistline about 9 inches into the body. These placements mean custom shaping is possible but requires careful measurement and calculations.
Rastita is a single-ply yarn that blooms fully, producing a soft, cushy fabric at this gauge. If you use a more tightly plied sport-weight yarn, 20 sts = 4 inches may look too loose — consider a heavier yarn with a ball band suggesting 20 sts = 4 inches.
Directions (excerpt)
The full pattern below provides row-by-row instructions for the BODY, SLEEVES and YOKE, with size-specific notes and shaping. Follow gauge and materials above and use the markers and stitch holders indicated in the pattern. (The original pattern continues in full with detailed rows and repeats — keep the charted rows and size brackets as you work.)
BODY
With longer circular needle, CO 162 [182, 202, 222, 242, 262, 282] sts.
Row 1 [RS]: Sl1, p1, (k3, p2) 31 [35, 39, 43, 47, 51, 55] times, k3, p1, k1.
Row 2 [WS]: Sl1 wyif, k1, (p3, k2) 31 [35, 39, 43, 47, 51, 55] times, p3, k1, p1.
Repeat last 2 rows 7 times more.
Row 17 [RS]: Sl1, p1, (k3, p2) 3 [3, 3, 4, 4, 5, 5] times, k6 [11, 16, 18, 23, 26, 31], pm, rli, k2, rli, k10, pm, ssk, k31, pm, ssk, k2, ssk, k14 [24, 34, 40, 50, 54, 64], k2tog, k2, k2tog, pm, k31, k2tog, pm, k10, lli, k2, lli, pm, k6 [11, 16, 18, 23, 26, 31], (p2, k3) 3 [3, 3, 4, 4, 5, 5] times, p1, k1. 160 [180, 200, 220, 240, 260, 280] sts.
Row 18 [WS]: Sl1 wyif, k1, (p3, k2) 3 [3, 3, 4, 4, 5, 5] times, purl to last 17 [17, 17, 22, 22, 27, 27] sts, (k2, p3) 3 [3, 3, 4, 4, 5, 5] times, k1, p1.
(Continue following the pattern text as provided for Rows 19 onward, including all size-specific instructions for decreases and shaping.)
Sleeves
Using dpns or a long circular for Magic Loop, CO 55 [60, 65, 75, 80, 85, 90] sts and join in the round. Work 16 rounds in (K3, p2) rib. Knit until sleeve measures approx. 9" or preferred length; place underarm sts on holders as instructed and repeat for other sleeve.
Yoke
Return to Body sts with RS facing and follow the pattern for joining sleeves, placing markers and working the yoke rows. Sizes 1X–3X have a separate sequence; follow the row numbers and size brackets carefully.
Cross-Over Yoke Strips & Finishing
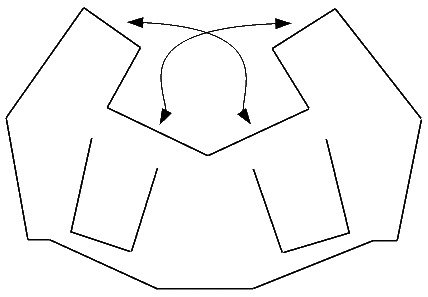
Follow instructions to set aside and later graft the Left and Right Pieces using Kitchener Stitch, crossing the Left Piece over the Right Piece per the diagram. See the diagram image below to guide grafting. Weave in ends and block gently to measurements.

Finishing note about buttons: Cut ribbon to measure approx. 8 inches after finishing ends. Sew buttons evenly spaced onto the ribbon; sew the buttons onto a strip of ribbon approximately 8 inches long with finished ends. Pop the buttons through the last rib on the left front, then button the right front on top, so buttons can be removed easily for washing.
Weave in ends, sew ribbon-mounted buttons, graft the yoke strips as directed, and block the cardigan to the finished measurements. Enjoy your cozy, adorable cardigan!