

Make This Adorable Reversible Double-Knit Scarf — Black & Yellow Check Pattern
This reversible double-knit scarf is an adorable, cozy accessory that’s worked in two layers at once to give you a neat black side and a neat yellow side. The finished piece is lightweight, warm, and reversible — perfect for chilly evenings or to add a pop of contrast to an outfit. Below are the full materials, gauge, pattern notes, directions and finishing tips to make the scarf shown.
Oh, let me tell you about this knitted adorable scarf I recently got my hands on! Picture the softest yarn in the most charming colors, all combined to create a cozy masterpiece. It not only keeps me warm during chilly evenings but also adds a pop of cuteness to any outfit. The intricate details and craftsmanship make it a real eye-catcher wherever I go. It's like wearing a warm hug around your neck!
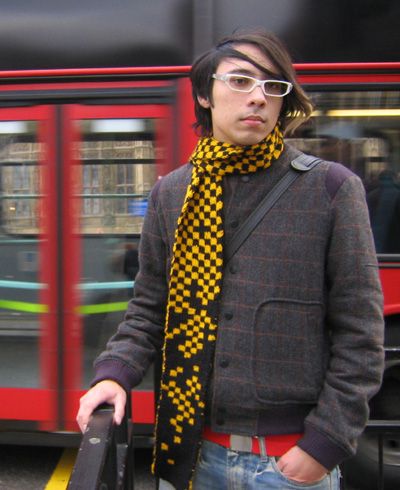
Caption: Finished reversible scarf showing the black-and-yellow checkered motif — one side reads predominantly yellow, the other predominantly black.
SIZE
One
FINISHED MEASUREMENTS
- Length: 64 inches
- Width: 5 inches
MATERIALS
- [MC] Robin Double Knit [100% acrylic; 328/300 per 100g skein]; color: Yellow; 1 skein
- [CC] Patons Diploma Gold DK [55% wool, 25% acrylic, 20% nylon; 131 yd/120m per 50g skein] color: Black; 2 skeins
- 1 set US #3/3.25mm needles
- Tapestry needle
GAUGE
25 sts/ 32 rows = 4 inches in stockinette stitch
PATTERN NOTES
This scarf is worked in double knitting. This technique forms two layers of fabric at once and is used here to make a reversible scarf with stockinette surfaces on each side: one side predominantly yellow (MC) and the other predominantly black (CC).
When working a two-color pattern in double knitting, it helps to treat one side as the 'Right Side' for consistency, even though both sides look good. Each visible stitch is made up of two underlying stitches: one on the RS in the pattern color and one on the WS in the opposite color. The pattern explains how to do this in detail.
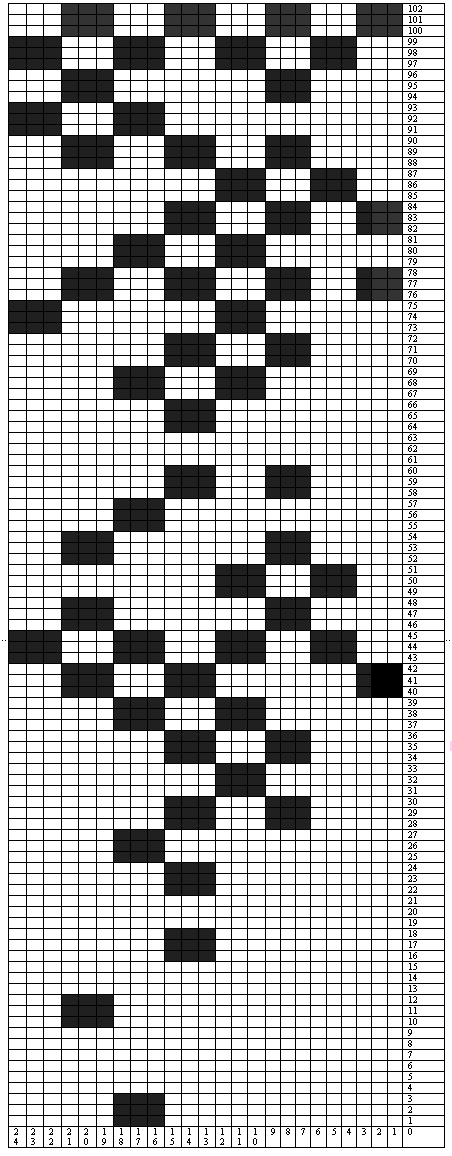
A chart is referenced in the directions; understanding the logic behind the pattern lets you write your own or work without a chart. The design is a form of decomposing check — you add odd squares one by one to build the checkered pattern. You can choose to add or remove squares as you go to vary the motif.
Be careful to maintain a firm tension when double knitting, as it’s easy to end up with loose fabric.
Caption: GIF illustration related to the double-knitting technique used for producing a reversible fabric (shown here for reference).
DIRECTIONS
Note: To make this pattern easier to understand, the predominantly yellow (MC) side will be called the RS, and the predominantly black (CC) side will be called the WS.
CO 48 stitches using CC. I recommend using a cable cast on, but a tubular cast on is also nice for double knitting.
Now it's time to add the second color, and work the first row. You will have to get used to holding both yarns at once. Throughout, you carry both colors forward or back between the needles before each stitch, though you are only knitting or purling with one color at a time.
The first row is worked entirely in MC on the RS, and CC on the WS. Knit the first stitch using MC. Bring both yarns between the needles to the front of the work. Purl the next stitch using CC, then bring both yarns between the needles to the back of the work. Knit the next stitch in MC. Continue working in this way to the end of the row.
You should have what looks like the first row of 1x1 rib, but with the purled stitches in a different color from the knitted ones. If you are using black and yellow too, it'll look pleasingly like a bee.
Turn the work, so the WS is facing. The last stitch of the previous row was worked using CC, so the first stitch of this row will also be worked using CC.
Bring the strand of CC up underneath the strand of MC, effectively twisting the strands around each other, and knit the first stitch using CC. Bring both strands of yarn between the needles to the front of the work and purl the next stitch using MC. Bring both strands of yarn between the needles to the back of the work and knit the next stitch using CC. Continue working in this way to the end of the row.
You have just worked 2 rows in double-knit stockinette stitch, with one side (RS) worked in MC, and one side (WS) in CC. Work 12 more rows in this way. Remember always to wrap the yarn for the first stitch of each row around the other yarn before working the first stitch.
Begin Chart Pattern:
When working from this chart, the odd-numbered rows will be RS rows, and the even-numbered rows will be WS rows. The MC (white) squares indicate that a MC stitch is worked on the RS, and a CC stitch is worked on the WS. CC (black) squares indicate that a CC stitch is worked on the RS, and a MC stitch is worked on the WS.
This means, for example, that if you are working a WS row, and you see a MC square, you would knit that stitch using CC, and purl it using MC, so that the stitch would be a MC stitch on the RS.
Work through all rows of the chart, then repeat rows 97-102 until the scarf is the desired length. Most of the scarf will be checkered, though you can always throw in the odd 'missing' patch if you feel it looks right. It breaks things up if you get bored and, as Uslan often says, consistency is overrated.
BO all sts using CC.
FINISHING
Weave in the ends. You will find it easier to weave into matching colors if you weave diagonally. You should be able to tuck the very end of the yarn neatly between the two layers of knitting.
The edges of double knitting can look a little unruly; you might want to neaten it up with a bit of spare yarn and a tapestry needle, or you can work a row of single crochet around the edges.