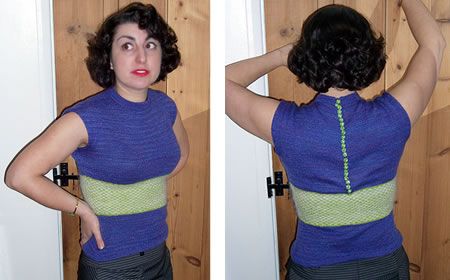
Knitted All Year Round Jumper
Imagine cozying up in a warm, stylish Knitted All Year Round Jumper that brings comfort to your day, no matter the season. This versatile wardrobe staple is perfect for those chilly winter days or cool summer nights. With its soft and breathable fabric, you can look effortlessly chic while feeling snug and relaxed. Pair it with your favorite jeans or a skirt for a casual day out or a relaxed evening at home. Embrace the charm of the Knitted All Year Round Jumper and stay fashionable and cozy all year long!
Materials
- Original materials called for: 5 ozs Patons Beehive Fingering 3ply in main shade (lipstick red) and 1oz each of grey and white.
- A pair each Nos 11 and 12 (3mm and 2¾mm) needles.
- A No 12 (2¾mm) crochet hook.
- 24 small buttons.
Tension
8 sts and 10 rows to an inch.
Size matters
Original sized for bust 33-34 inch bust;
length from top of shoulders: 20½ ins.
Abbreviations
- k2tog: decrease by knitting 2 sts together.
- k2togtbl: decrease by knitting 2 sts together through back loops, sometime called ssk (slip 1 knitwise, slip 1 knitwise, place 2 sts back on left needle and knit 2 slipped sts together through back loops)
Crochet abbreviations:
ch = chain
dc = double crochet
Remember these are English crochet instructions where dc is equivalent to US single crochet
A word on the wool.
Used Posh Yarn Diana 2 ply - about 600 yards for the main colour, and about 90 yards for the green contrast. For the white used Capricorn Yarns brushed mohair 4 ply.
Front
With No 12 (2¾mm) needles and main shade cast on cast on 120 sts loosely and work 24 rows in stocking stitch, starting with a knit row.
[Editor's note: To aid the fold of a hem, (which is what this is), a garter stitch row is sometimes inserted half way. So - you could knit 11 rows in stocking stitch, and then knit one row on the wrong side - then continue with the stocking stitch to 24 rows.]
Make a hem on the next row by knitting 1 stitch from needle together with 1 stitch from cast-on edge.
Purl back.
Change to No.11 needles and work 4 rows stocking stitch, then shape basque as follows:
Next row: k33, k2togtbl, k50, k2tog, k33
Work 5 rows straight.
Next row: k32, k2togtbl, k50, k2tog, k32
Work 5 rows straight.
Next row: k31, k2togtbl, k50, k2tog, k31
Work 5 rows straight.
Continue decreasing thus on next and every following 6th row until 108 sts. remain.
Work 5 rows straight.
Shape waist as follows:
Next row: *k8, k2tog; repeat from * to last 8 sts, k8
Next row: *p8, increase in the next st; repeat from * to last 8 sts, p8. [108 sts]
Begin working the check pattern, introducing the two contrast colours C1 and C2.
1st row (right side facing): * k2 C1, k2 C2; repeat from * to end.
2nd row: * p2 C2, p2 C1; repeat from * to end.
3rd row: * k2 C2, k2 C1; repeat from * to end.
4th row: * p2 C1, p2 C2; repeat from * to end.
Continue in pattern repeating the 4 rows as set above, increasing 1 stitch at each end of the next and every following 6th row. Incorporate the extra sts keeping the chack pattern correct.
When work measures 10 inches at centre....
[Editor's note: The check panel is approximately 50 rows, depending on your own tension.]
....change back to main shade and continue in stocking stitch, still increasing at side edge as before until there are 130 sts.
Work straight until front measures 13 inches at centre.
With right side facing, cast on 10 sts at the beginning of the next 2 rows for the sleeves, [150 sts].
Continue straight until sleeve measures 6 inches. With right side facing, shape shoulders and neck as follows:
Cast off 10, k50; turn and leave remaining sts on a stitch holder.
Now decrease 1 stitch at the neck edge on the next 10 rows; then, keep the neck edge straight, but at the same time cast off 5 sts on every alternate row at the armhole edge until all sts are gone.
Return to the remaining sts on the stitch holder; slip the centre 30 sts on to a stitch holder, and rejoin the wool to the remaining 60 sts.
Work to correspond with the first shoulder.
Back
Work as for the front to the end of the check pattern.
Work 2 rows in main shade, then divide for back opening.
Work on the first half of the stitches, leaving the remainder on a stitch holder.
Continue shaping side edge until there are 65 sts on needle, then work straight until side edge matches back to armhole.
With right side facing, cast on 10 sts at the beginning of the next row, then continue straight until sleeve measures 6 inches.
With right side facing, shape shoulder by casting off 10 sts at the beginning of the next row, then 5 sts on the following 8 alternate rows.
Cast off remaining stitches.
Rejoin the wool to the remaining stitches at the centre and work to correspond with the right half of the back.
To Make Up
Press work on wrong side under a damp cloth.
Join shoulder seams.
Neck: With right side facing, main shade, and No 12 needles, pick up and knit 90 sts all round the neck, including 30 sts from the stitch holder on the front.
Work 2½ inches stocking stitch, starting with a purl row.
Cast off very loosely using a bigger needle.
Fold neckband in half and catch down on wrong side; press.
Join side and under-arm seams; work 2 rows dc round each sleeve edge. Turn back 1 inch of sleeve to form a cuff and catch in position at shoulder and under-arm.
Make a chain to go round each sleeve edge, then work 1 row dc across this chain. Sew in position round sleeve just below crochet edgings.
Work 3 rows dc down left side of back opening, including neckband, then 3 rows down right side making 24 button loops in 3rd row.
Sew on buttons.
Press seams.
Adapting the size:
As with many of these 50s patterns, only one size is given: 33-34 inch bust. The sweater is designed to fit snugly, but probably will not fit most of us.
It is designed to be knitted in 3 ply at about 30 sts to 4 inches. You can gain some leeway by changing the yarn - this is a simple shape so it should cope with that - you should check the length you want and adjust the inches you knit accordingly.