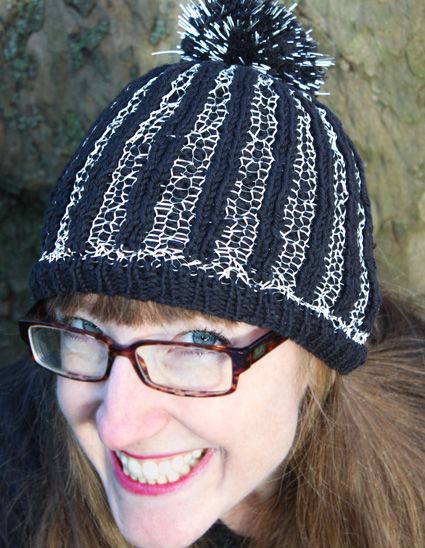
Knitted Beautiful Hat
The Knitted Beautiful Hat is a true masterpiece of coziness and style combined. The intricate stitches and soft yarn make it a delight to wear, keeping you warm and fashionable at the same time. The love and care put into creating such a lovely accessory truly shine through in every loop and knot. It's the kind of hat that not only keeps you warm but also brightens up your day with its charm. What a wonderful addition to any winter outfit!
SIZE
One
FINISHED MEASUREMENTS
Circumference: 18 inches
Depth: 8 inches
MATERIALS
- Yarn
- [MC] Brown Sheep Cotton Fleece [80% Cotton, 20% Merino wool; 215 yd/197m per 100g skein]; color: Cavern; 1 ball
- [CC] Retroglo Yarn [16% Polyester, 59% glass beads, 12.5% Phenolic Resin, 12.5% Urethane Adhesive; 43 yd/40m per 15g skein]; 1 skein.
- Recommended needle size
- [always use a needle size that gives you the gauge listed below -- every knitter's gauge is unique]
- 16-inch US #3 /3.25mm circular
- 16-inch US #4 /3.5mm circular
- US #4 /3.5mm DPNs, 2 circulars or 1 long circular for working closure
Notions
- scrap yarn for tubular cast on
- yarn needle
- pompom maker (optional)
GAUGE
22 sts/24 rounds = 4 inches in stockinette stitch in MC with larger needles
32 sts (16 "outer" and 16 "inner")/22 rounds = 4 inches in Vertical Stripe Pattern with larger needles
PATTERN NOTES
This hat requires a stretchy cast on, for which the tubular cast on is perfect.
M1: Use the backwards loop/e-wrap method to create a stitch.
Double knitting creates a double-faced fabric. The basic round goes as follows:
Move both yarns to the back, k1 with CC, move both yarns to the front, p1 with MC. The knit stitches form the outer fabric, the purl stitches form the inner fabric.
Double knit dec: To decrease for the crown, you need to work a double-layer decrease, knitting two ‘outer’ stitches together, and purling two 'inner' stitches together. To do this, rearrange the stitches to be decreased so that you have two consecutive outer stitches and two consecutive inner stitches. You can do this with the help of a cable needle, or as follows: slip the first 'outer' stitch onto RH needle, slip next 'inner' st off the needle and hold to the back. Slip the 3rd stitch onto RH needle, pick up the dropped stitch with LH needle, and slip 2 stitches from RH to LH needle. Stitches are now arranged with 2 'outer' stitches followed by 2 'inner' stitches. Working each decrease with yarn to match the stitches: bring both yarns to the back, k2tog, bring both yarns to the front, p2tog. 2 stitches decreased.
DIRECTIONS
With MC and smaller needles, CO 72 sts with tubular method.
Switch to larger needles. Join to work in the round, being careful not to twist.
Lower edge:
Ribbing round: [K1, p1] around.
Work 6 rounds of ribbing as set.
Rnd 7, increase: [K1, m1] around. 144 sts.
Body of Hat
Join CC.
Rnds 1-3: [K1CC, p1MC] around.
Rnd 4, the main pattern: ([K1CC, p1MC] twice, [K1MC, p1MC] twice) around.
Work 30 rounds total as set, or until hat measures 6 inches.
Decrease for Crown
Note: Change to small-circumference method when hat gets too small to work on 16-inch circular. See Pattern Notes for details on the Decrease.
Rnd 1: [Work 20 sts in patt as set, work decrease] around. 132 sts.
Rnd 2: Work Rnd 4, the main pattern, as above.
Rnd 3: [Work 18 sts in patt as set, work decrease] around. 120 sts.
Rnd 4: Work even in pattern as set.
Rnd 5: [Work 16 sts in patt as set, work decrease] around. 108 sts.
Rnd 6: Work even in pattern as set.
Rnd 7: [Work decrease, work 2 sts in patt] around. 72 sts.
Rnd 8: Work even in pattern as set.
Rnd 9: Work decrease around. 36 sts.
Rnd 10: Work even in pattern as set.
Rnd 11: As Rnd 9. 18 sts.
Rnd 12: As Rnd 11. 9 sts.
Cut yarn, and pull tail through remaining stitches to close.
FINISHING
Block to measurements and weave in ends.
Make pompom. The one shown was made with a template 3 inches in diameter.
Attach to hat.