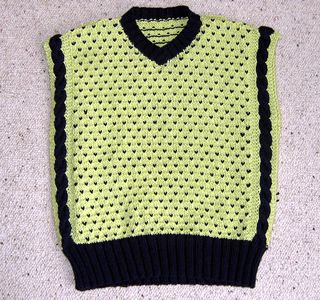
Knitted Sleeveless Sweater
A knitted sleeveless sweater is the perfect addition to your wardrobe for those in-between seasons when you want to stay cozy but not too hot. This versatile piece can be dressed up with a blouse and paired with a skirt for a chic office look or dressed down with jeans for a casual weekend outfit. The soft texture of the knit provides comfort while the sleeveless design allows for easy layering and movement. It's a fashionable, practical, and fun piece that you'll find yourself reaching for time and time again. Trust me, this sleeveless sweater will become a staple in your closet, adding a touch of style and warmth to any outfit.

Materials
- Pure wool double knitting 50g balls: 2 [3, 3, 4, 4, 4, 4, 5, 5] in main shade, and, 1 [1, 2, 2, 2, 2, 2, 3, 3] in contrast.
- A pair each of No 8 and 10 needles; (4mm and 3¼mm).
- Cable needle.
- 1 button.
Tension
22 sts x 30 rows to four inches on 4mm needles in stocking stitch.
Size matters
- To fit chest/bust 24 [26, 28, 30, 32, 34, 36, 38,40] inches; length from top of shoulders 13½ [14½, 16, 17, 18, 19, 19½, 20, 20] inches.
A Word on the Wool.
The recommended wool was a pure wool double knitting, yardage 120m per 50g ball.
I used Rowan Wool Cotton to make it more summery, but the yardage on wool cotton is somewhat less at 113m per 50g ball.
Abbreviations:
- C6F: slip next 3 sts on cable needle and leave at front of work, k3, then k3 from cable needle.
- C6B: slip next 3 sts on cable needle and leave at back of work, k3 then k3 from cable needle.
Instructions.
This pattern is worked in several sections including intarsia techniques, (to insert the vertical colour for the cable stripes); and jaquard (to make the dots).
For the cables, and edge stitches, do not strand yarn across wrong side of work, but use separate balls: this will be 2 bobbins for the Navy cables and 2 bobbins for the Citron edge stitches. Twist the colours on wrong side where they meet to avoid a hole.
Use your main ball of wool for the centre section in Citron (main shade), again twisting it where it meets the navy cable bobbin.
When working the row of coloured dots join in and break off the navy at the beginning and end of the row.
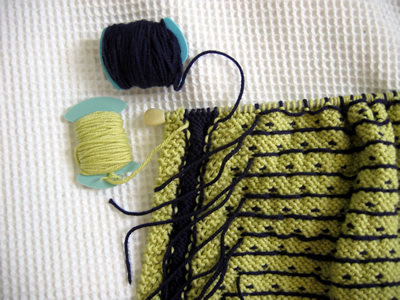
Here is a picture of the wrong side of the work:

Back:
With No 10 needles and contrast colour, cast on 70 [74, 78, 86, 90, 94, 102, 106, 114] sts and work in K2, P2 rib for 3 [3, 4, 4, 5, 6, 6, 6, 6] cm, (rows on right side having K2) at each end.
End with right side facing for next row and increase 1 st at end of last row (71 [75, 79, 87, 91, 95, 103, 107, 115] sts).
Change to No 8 needles and work in cables and colour pattern as follows:
1st Row: (Right side facing) K3 in main shade (M) from bobbin, k6 in contrast (C) from bobbin, knit in main shade ball to last 9 sts; k6 in C from bobbin, k3 in M from bobbin.
2nd Row: K3 in M, p6 in C; change to main shade ball M and k3, purl to last 12 sts; k3; p6 in C, k3, in M.
3rd Row: (Make row of dots) K3 in M, k6 in C; then for centre section:
k3 in M; *p3 in M, put M yarn to back of work; join in C and, using your separate strand of contrast, k1 in C, then bring M forward again for your next purl stitch; repeat from * (stranding the unused yarn colour across the back of the work) to last 15 sts, break off separate strand of contrast C; p3 in M, k3 in M, k6 in C, K3 in M.
4th Row: as second
5th Row: as first
6th Row: as second
7th Row: (Make row of dots and cable) K3 in M, C6F in C; then for centre section:
k3 in M; *p1 in M, put M yarn to back of work; join in C and, using your separate strand of contrast, k1 in C, then bring M forward again p2 in M; repeat from * (stranding the unused yarn colour across the back of the work as before) to last 15 sts; p1 in M, put M yarn to back of work, k1 in C, bring M forward again p1 in M; k3 in M, C6B in C, K3 in M.
8th Row: as second
These 8 rows form the pattern.
Continue in pattern until back measures 34 [37, 41, 43, 46, 48, 49, 51, 51] cm, ending with right side facing for next row.
Shape shoulders by casting off 11 [12, 13, 9, 10, 12, 11, 12, 13] sts at beg of next 2 rows, then cast off 12 [12,12, 10,10,10,12, 12, 13] sts at beg of next 2 [2, 2, 4, 4, 4, 4, 4, 4] rows.
Leave remaining 25 [27, 29, 29, 31, 31, 33, 35, 37] sts on a spare needle.
Front:
Work as for back until front measures 26 [29, 33, 35, 37, 39, 39, 41,41] cm, ending with right side facing for next row.
Keeping continuity of the pattern, divide for neck as follows:
Pattern 33 [35, 37, 41, 43, 45, 49, 51, 55] sts, k2tog, turn and leave remaining sts on a spare needle.
Continue on these 34 [36, 38, 42, 44, 46, 50, 52, 56] sts for first side, decrease 1 stitch at neck edge on every row until 30 [30, 30, 34, 38, 40, 40, 42, 44 ] sts remain, then on every alt row until 23 [24, 25, 29, 30, 32, 35, 36, 39] sts remain.
Work straight until Front matches Back to start of shoulder shaping, ending with right side facing for next row.
Cast off 11 [12, 13, 9, 10, 12, 11, 12, 13] sts at beg of next row.
Work 1 row.
1st, 2nd, and 3rd sizes:
Cast off remaining 12 sts.
4th, 5th, 6th, 7th, 8th and 9th sizes:
Cast off [10, 10, 10, 12, 12, 13]sts at the beginning of the next and following alternate row.
All sizes:
With right side facing, rejoin yarn to remaining sts, cast off centre st, k2tog, pattern to end.
Work to match first side, reversing shapings.
To Make Up
Do not press.
Join right shoulder seam.
Left Neck Border:
With right side facing, using No 10 needles and Contrast, knit up 30 [30, 30, 34, 38, 38, 42, 42, 42] sts down left side of neck and work 7 [7,9, 9, 9, 9, 11, 11, 11] rows in p2, k2 rib, rows on wrong side having a p2 at each end. Cast off evenly in rib.
Right Neck Border:
With right side facing, using No 10 needles and Contrast, starting at centre front, knit up 30 [30, 30, 34, 38, 38, 42, 42, 42] sts to shoulder. Knit across 25 [27, 29, 29, 31, 31, 33, 35, 37] sts from back of neck increasing 3 [1, 3, 3, 1, 1, 3, 1, 3] sts evenly (58 [58, 62, 66, 70, 70, 78, 78, 82] sts).
Work 7 [7, 9, 9, 9, 9, 11, 11, 11] rows in P2, K2 rib, rows on wrong side having P2 at each end. Cast off evenly in rib.
Join left shoulder, then sew border in position, placing right over left.
Join side seams leaving 14 [15, 16, 18, 19, 20, 21, 22, 24] cm down from shoulder free for armhole.
[ Editor's note: This is how I have sewn the side seams, but I have noticed that some of the latest designs sew the side seams only at the welt, leaving most of the side open, with a view to wearing a top like this layered over a sleeveless summer dress.]
Press seams.
Sew on button at neck.