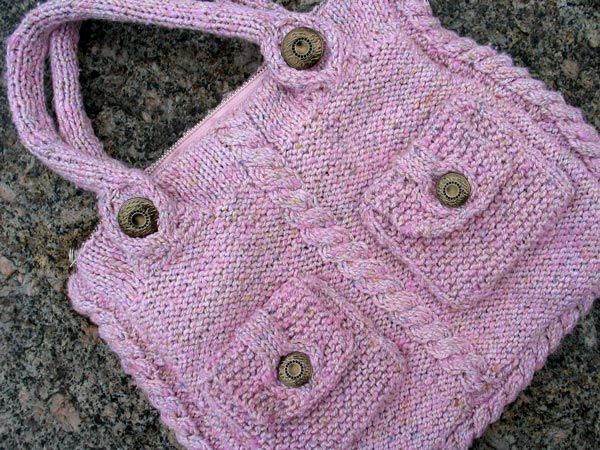
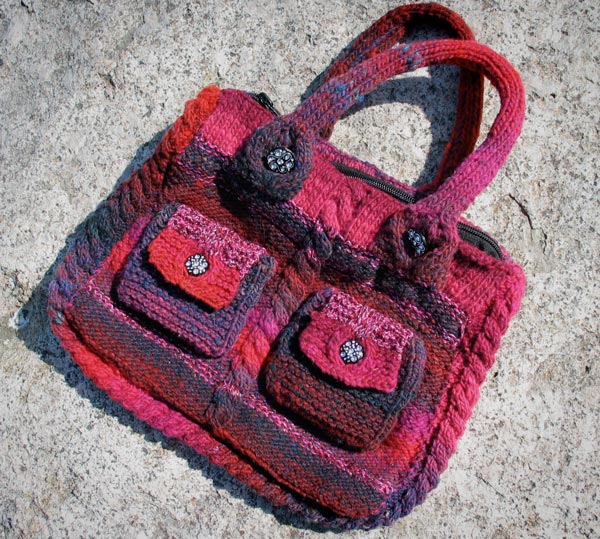
Knitted Aurora Bag
The Knitted Aurora Bag is a stylish and functional accessory that adds a touch of cozy charm to your outfit. With its intricate knit design and soft yarn material, this bag is not only fashionable but also practical for carrying your everyday essentials. Its spacious interior allows you to easily store your wallet, phone, keys, and more while on the go. The lovely Aurora Bag is perfect for adding a unique flair to your outfit, whether you're running errands or meeting friends for coffee. So, treat yourself to this delightful creation and enjoy the convenience and style it brings to your day-to-day adventures!
Supplies
- Basic version: 7 balls (350 g) Rowan RYC Natural Silk Aran colorway 463
- Glam version: 4 balls (200 g) Noro Kureyon (main yarn) colorway 124, 1 ball (50 g) ONline Linie 173 Chic (glittering yarn) colorway 09
- Gauge: 19 sts = 10 cm in stockinette stitch
- You can knit the bag with thinner or thicker yarn, just keep in mind that the size of the bag and the need for the lining fabric changes accordingly. Because the bag has cable patterning, choose a fairly smooth, fairly solid-colored yarn that shows the patterning.
- Recommended needle size: 4,5 mm
- A cable needle or an extra needle is needed when making the cables.
- 4 buttons for handles
- 2 smaller buttons for pockets
- 40 cm x 60 cm piece lining fabric
- any un-stretchy fabric for handles
- zipper, 25-30 cm long
Abbreviations
- inc = increase: yarn over which is knitted twisted in the next round so the hole does not show
- k = knit stitch
- k2tg = knit 2 sts together (right-slanting decrease)
- p = purl stitch
- p2tg = purl 2 sts together
- RS = right side
- ssk = slip-slip-knit (left-slanting decrease)
- st = stitch
- sts = stitches
- WS = wrong side
[CBL2_BACK]
slide the next 2 sts to the cable needle, move the needle to the back of the work, k2, slide the sts back from the cable needle, k2
[CBL2_FRONT]
slide the next 2 sts to the cable needle, move the needle to the front of the work, k2, slide the sts back from the cable needle, k2
[CBL3_BACK]
slide the next 3 sts to the cable needle, move the needle to the back of the work, k3, slide the sts back from the cable needle, k3
[CBL3_FRONT]
slide the next 3 sts to the cable needle, move the needle to the front of the work, k3, slide the sts back from the cable needle, k3
[CBL3-BACK]
slide the next 3 sts to the cable needle, move the needle to the back of the work, k3, slide the sts back from the cable needle, k2tg, k1
[CBL3-FRONT]
slide the next 3 sts to the cable needle, move the needle to the front of the work, k3, slide the sts back from the cable needle, k1, k2tg
[CBL3+BACK]
slide the next 3 sts to the cable needle, move the needle to the back of the work, k1, [K1M1], slide the sts back from the cable needle, k3
[CBL3+FRONT]
slide the next 2 sts to the cable needle, move the needle to the front of the work, k3, slide the sts back from the cable needle,[K1M1], k1
[K1M1]
increase 1 stitch by knitting in front and back of the stitch
[P1M1]
increase 1 stitch by purling in front and back of the stitch
Front & Back Pieces
Knit two pieces: front and back. The pieces are knitted starting from the bottom of the bag.
Glam version: Start knitting a piece by using your main yarn. The back piece has some extra stripes that the front piece does not have. These are included in the instructions.
Cast on 50 sts.
1. row (RS): p23, k4, p23
2. row (WS): k23, p4, k23
3. row: p1, inc 1, p22, slide the next 2 sts to the cable needle and move the needle to the front of the work, [K1M1], k1, slide the 2 sts back from the cable needle, [K1M1], k1, p22, inc 1, p1. Total: 54 sts
4. row: k24, p6, k24
5. row: p1, inc 1, p23, k6, p23, inc 1, p1. Total: 56 sts
6. row: k25, p6, k25
7. row: p25, [CBL3_FRONT], p25
8. row: k25, p6, k25
Glam version: Change to the glittering yarn.
9. row: p25, k6, p25
10. row: k25, p6, k25
Glam version: Change to the main yarn.
11. row: p25, [CBL3_FRONT], p25
12. row: k25, p6, k25
Repeat rows 9.-12. two more times. Glam version: continue knitting these repeats with the main yarn.
Glam version, back piece: After 20. row, change to the glittering yarn.
21. row (RS, 1st decrease row): p1, p2tg, p22, k6, p22, p2tg, p1. Total: 54 sts
22. row: k24, p6, k24
Glam version, back piece: After 22. row, change to the main yarn.
Continue making cables every 4th row as set until there are 52 rows total. AT THE SAME TIME: decrease 2 sts in every 10th row 3 more times. Total: 4 decrease rows, 48 sts. Glam version, back piece: knit rows 29.-30. with the glittering yarn, rows 31.-32. with the main yarn, rows 33.-34. with the glittering yarn, rows 35.-50. with the main yarn. Glam version, both front and back piece: Knit the last decrease rows 51. and 52. with the glittering yarn. Then change back to the main yarn.
53. row (RS): k20, p1, k6, p1, k20
54. row (WS): p20, k1, p6, k1, p20
Continue as set, making cables every 4th row, until there are 62 rows total.
63. row (RS): k20, p1, slide the next 3 sts to the cable needle and move the needle to the front of the work, k2tg, k1, slide the 3 sts back from the cable needle, k2tg, k1, p1, k20. Total: 46 sts
64. row (WS): knit
65. row (RS): knit
66. row (WS): purl
Repeat rows 65.-66. 4 more times. Total: 10 rows stockinette stitch after the ridge.
75. row: Cast off.
Gusset
Glam version: Knit using your main yarn only.
Cast on 13 sts.
1. row (RS): p2, k4, p1, k4, p2
2. row (WS): k2, p4, k1, p4, k2
3. row: p2, slide the next 2 sts to the cable needle and move the needle to the back of the work, [K1M1], k1, slide the 2 sts back from the cable needle, [K1M1], k1, p1, slide the next 2 sts to the cable needle and move the needle to the front of the work, [K1M1], k1, slide the 2 sts back from the cable needle, [K1M1], k1, p2. Total: 17 sts
4. row: k2, p6, k1, p6, k2
5. row: p2, k6, p1, k6, p2
6. row: k2, p6, k1, p6, k2
7. row: p2, [CBL3_BACK], p1, [CBL3_FRONT], p2
8. row: k2, p6, k1, p6, k2
Repeat rows 5.-8. until you have 53 cable pairs.
Finish the gusset:
1. row (RS): p2, k1, k2tg, ssk, k1, p1, k1, k2tg, ssk, k1, p2. Total: 13 sts
2. row (WS): k2, p4, k1, p4, k2
3. row: p2, k4, p1, k4, p2
4. row: Cast off by knitting the knitted sts and purling the purled sts.
Pockets
Make 2 similar pockets. The pocket is knit in one piece from the front to the flap.
Glam version: Start knitting by using your main yarn.
Cast on 22 sts.
1. row (RS): knit
2. row (WS): p3, k16, p3
Repeat rows 1.-2. 13 times more. Total: 14 ridges.
29. row (RS): k3, ssk, k12, k2tg, k3. Total: 20 sts
30. row: purl
31. row: k3, ssk, k10, k2tg, k3. Total: 18 sts
32. row: purl
33. row: k3, ssk, k8, k2tg, k3. Total: 16 sts
34. row: knit
Continue by knitting 26 rows garter stitch. Total: 14 ridges.
Glam version: Change to the glittering yarn.
61. row: knit
62. row: k6, p4, k6
Classic version: Repeat rows 61.-62. 5 times more. Total: 6 ridges.
Glam version: Repeat rows 61.-62. 4 times more. Total: 5 ridges. Change to the main yarn. Repeat rows 61.-62. once more.
73. row: k4, [CBL2_BACK], [CBL2_FRONT], k4
74. row: k4, p8, k4
75. row: k7, cast off 2 sts, knit to end
76. row: k4, p3, cast on 2 sts, p3, k4
77. row: knit
78. row: k4, p8, k4
79. row: k4, [CBL2_FRONT], [CBL2_BACK], k4
80. row: k6, p4, k6
81. row: Cast off.
Handles
Make 2 similar handles.
Glam version: Knit using your main yarn only.
Cast on 14 sts.
1. row: knit
2. row: k5, p4, k5
3. row: k2, [CBL3+BACK], [CBL3+FRONT], k2. Total: 16 sts
4. row: k2, p12, k2
5. row: knit
6. row: k2, p12, k2
Repeat rows 5.-6. 3 times more.
13. row: k2tg, [CBL3_FRONT], [CBL3_BACK], k2tg. Total: 14 sts
14. row: p2tg, p10, p2tg. Total: 12 sts
Continue by knitting 76 rows stockinette stitch. Total: 90 rows.
91. row: [K1M1], k10, [K1M1]. Total: 14 sts
92. row: [P1M1], p12, [P1M1]. Total: 16 sts
93. row: k2, [CBL3_BACK], [CBL3_FRONT], k2
94. row: k2, p12, k2
95. row: knit
96. row: k2, p12, k2
Repeat rows 95.-96. 3 times more.
103. row: k2, [CBL3-FRONT], [CBL3-BACK], k2. Total: 14 sts.
104. row: k5, p4, k5
105. row: Cast off.
Finishing
1) Press the front and back pieces.
2) POCKETS: Sew the side seams of the pockets. These seams go on the backside of the pockets and will not show when you sew the pockets in place. Sew the buttons to the pockets. Sew the pockets to the front piece.
3) GUSSET: Sew the gusset to the front and back pieces. The top of the gusset is in the same line with the purl row on the top of the pieces. Stitch a string of yarn to the end of the gusset and draw so that the gusset end will become sturdier and rounder.
4) LINING: Fold the lining fabric in half and set the bag on it. Cut the lining by following the bags outer dimensions. Sew the side seams of the lining. Fold 1 cm from the top edge of the lining and press. Sew the lining in place by hand stitching the folded edge to the bag, stitch near the folding. Sew the folding in place, over the lining.
5) HANDLES: Press the handle pieces. Cut two 7 cm wide pieces of any un-stretchy fabric. The length of these pieces should be similar to the straight part of the handles. Fold the long side edges of the fabric pieces to the wrong side, then fold the pieces in half. Sew along the low edge. Sew the straight edges of the handle piece together so that the fabric piece will be inside the handle and the sewing line will leave 2 sts inside the handle from both edges. This way the handle gets sturdier. Sew the buttons on the handles. Sew the handles in place.
6) ZIPPER: Hand-stitch the zipper in place so that it will be located about 1 cm from the top edge.