Crochet Birthday Bag
The Crochet Birthday Bag is a delightful project that combines creativity and thoughtfulness in celebrating a special occasion. With its beautiful patterns and vibrant colors, this bag serves as a personalized and handmade gift that truly shows the effort and care put into it. Whether you're a seasoned crocheter or trying it out for the first time, this project is a wonderful way to spread joy and make someone's birthday extra special.
Pattern:
Materials needed:
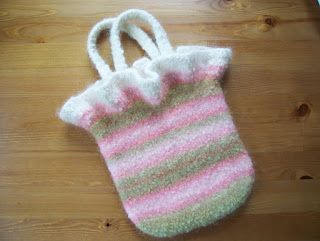
- 2 balls Patons Soy Wool Stripes in Natural Pink, 1 ball Patons Soy Wool Solids in Natural Snow
- Size 10 16" circular needle (Addi Turbo is perfect for this project, as the slippery metal helps keep the knitting nice and loose for felting.)
- Tapestry needle, measuring tape
Directions:
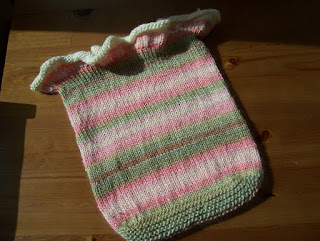
Base of bag: Cast on 34 stitches with Natural Pink and work 22 rows in garter stitch (11 garter stitch "ridges"). At the end of the final row of garter stitch, turn the work clockwise and pick up and knit 11 stitches along the "short side". (This is very easy, as you are just picking up one "bump" from each garter stitch ridge.) At the end of this row, turn the work clockwise again and pick up and knit 34 stitches along the cast on row. Repeat for the next short side (11 stitches) and again for the next long side (34 stitches).
Body of bag: You now have a total of 90 stitches on your needle. Simply knit in the round straight up for 14 inches, joining a new ball of wool when needed.
Ruffle: When you have reached desired length, begin the next round by increasing every stitch. I prefer to do this by knitting into the front and back of each stitch - in knitting terms, kfb 90 stitches. (If this bag wasn't being felted, I might have chosen a more invisible increase, like the M1. However, since it is being felted, the appearance of the little bumps that the kfb increase makes won't matter. You can still use whatever increase you prefer, I just find the kfb to be the easiest/fastest.) You will now have 180 stitches on your needle. Knit straight up for approximately an inch or until you run out of your second ball of yarn. At this point, join in and begin knitting with the Natural Snow color. Knit another inch. Bind off loosely.**
**Actually, before you bind off, read the additional step I've posted in the next paragraph. If you HATE purling/ribbing and absolutely do not want to add this next step, continue knitting in the round until your ruffle is 2.5 - 3" (you want it to measure 16" from top of ruffle to middle of garter stitch base) and go ahead and bind off. You will have then (nearly) completed this project completely in the knit stitch - hurrah! What a great finished product for such little effort. If you're up for a little adventure, however, bind off now and continue with the next paragraph.
Now, bear with me - there is another step to the ruffle that may seem silly and unneccessary, but I found that it really adds a nice bit of body to the finished product. After binding off your ruffle at the 2" mark, go around and pick up 180 stitches from the bound off round. When you have picked up all 180 stitches, begin knitting in k1p1 rib for another 3/4 inch. Bind off loosely in rib. Adding this small bit of ribbing firms up the top of the ruffle and really helps the ruffle hold its shape after felting.
Weave in all ends - you are now ready to make the straps.
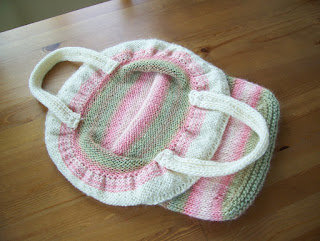
Straps:
When I was thinking of strap options, my first thought was i-cord. But, I really wanted something that would be more of a flat-ish strap than a cord-ish strap.
So, strap directions (make two): Cast on seven stitches using Natural Snow, leaving a tail of about 8 inches after you cast on. Knit 4, bring yarn forward, slip next 3 stitches purlwise. Turn, repeat, continue until you have 16 inches of cool flat strap. Bind off, leaving approx. 8 inch tail.
Using the tails at each end of the straps, sew straps to bag. I eyeballed it, aligning each strap about 3" in from the outside edge of the bag. I sewed the ends of each strap in two spots, about an inch apart to give the straps extra support. See photo for a better visual:
Felting: Bag and straps are now finished! Take a moment to savor your work before you ruthlessly throw it into a hot washing machine:
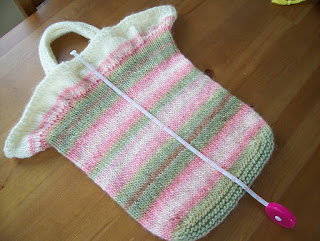
It should measure 16" from top of ruffle to center of garter stitch base, and 11.5" side-to-side. If it doesn't, it's really not a big deal. The great thing about bags is that they are not highly dependent upon accurate gauge! It is important to remember that felted items shrink more lengthwise than widthwise, however, so keep that in mind if you are modifying the pattern on the fly.
To felt this bag, I simply zipped it into a lingerie bag and put it in the washing machine with a few pillowcases. I set the water level to low, and filled the machine with hot water. The bag was fairly well shrunk and felted after just one cycle, but since the recipient of this bag is a toddler I decided to give it another go-round to shrink it just a bit more. Another half cycle was all it took.
Finished dimensions: 9" from top of ruffle to bottom of bag, 7" side-to-side.
I rolled the bag in plain white towels to absorb most of the moisture, and finger-pinched the ruffle into place (though I must admit that it didn't need much adjusting at all - it came out of the wash looking almost letter perfect!).
All that's left is to finish drying the bag.