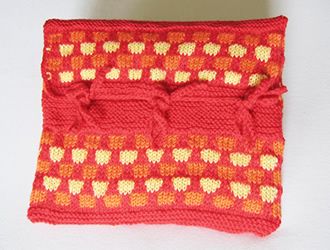
Knitted Cosy Covers
Knitted cosy covers are the perfect way to add a touch of warmth and comfort to your hot water bottle. Whether you prefer a chunky cable-knit design or a soft, seamless pattern, there's a knitted cosy cover out there to suit your taste and style. So go ahead, treat yourself to one of these delightful covers and transform your living space into a snug, inviting sanctuary where you can unwind and relax in style!

Materials
- Original pattern calls for three contrast colours, (red, orange and yellow).
- Example shown is knitted in 4 ply - 1 x 50g ball of each colour.
- One pair each of number 10, an No 11 needles.
- Crochet hook.
- One hot water bottle "replacement core".
Tension
The wool should knit to a basic tension over st st of 28st to 4 inches (10cm) on No 10 (3¼mm) needles.
Size matters
One size.
A word on the wool.
I used Phildar Lambswool (a 4 ply wool/acrylic mix) left over from another project.
Instructions
With No. 11 needles and main colour (red), cast on 58 stitches.
Knit 4 rows in garter stitch (every row knit), then one row purl.
Do not break off the main colour (red).
**Change to number 10 needles and commence pattern as follows, using second colour (orange):
Row 1: (right side) *K4, slip 2; repeat from * to last 4 sts, K4.
Row 2: *P4, slip 2; repeat from * to last 4 sts, P4.
Row 3 and 4: As rows 1 and 2.
Break orange wool, and continue in red.
Row 5: knit
Row 6: purl
Row 7: Using the third colour (yellow) K1, *slip 2, K4; repeat from * to last 3sts, slip 2, K1.
Row 8: P1, *slip 2, P4; repeat from * to last 3sts, slip 2, P1.
Row 9 and 10: As rows 7 and 8.
Break yellow wool, and continue in red.
Row 11: knit
Row 12: purl
Rows 13-24: repeat rows 1-12.
Rows 25-30: repeat rows 1-6.
Change to number 11 needles and continue in garter stitch for 15 rows. Purl one row.**
Repeat from ** to ** three times, then rows 1-30 again.
Change to number 11 needles and work in garter stitch for 4 rows. Cast off.
Making up - Press the piece lightly on the wrong side under a damp cloth with a hot iron.
Fold the cover to form a bag as shown in the picture, and sew up the side edges, on the inside, either oversewing or with backstitch.
Sew in all the ends on the wrong side.
Crochet edging - Using the main colour, (red), work a dc edge around the flap of the cover with ties as follows:
With right side facing, starting at the side edge, work 6 dc up edge of the garter st band, 15 dc up the honeycomb edge, 2dc up to corner, 3 dc into the corner st.
Then work across the cast-off edge making 2 dc into every 3 cast off sts approximately. After the first 6 dc (or where you want to place a tie) work the first tie by making 40 chain, then working 1dc into each chain back down to the knitted edge. Continue to work dc into the cast-off sts, making a second tie in the centre of the flap, after approximately 14 dc. Work another 14 dc and make another tie (match the position of the first tie). Work to the edge, 3dc into the corner st and then finish to match the other side of the flap.
Fasten off.
Work 3 more ties by making 40 chain, then working 1 row of dc into each chain. Sew the ties on to the cover to match the positions of the ties on the flap.