Knitted Cuddly Mouse Toy
Looking for the perfect cuddly companion for your little one? The Knitted Cuddly Mouse Toy is the ultimate snuggle buddy for endless playtime fun! Crafted with soft and cozy materials, this adorable mouse toy is not only super cute but also super huggable. With its charming design and lovable features, this toy is sure to become your child's new best friend in no time. So why wait? Bring home the Knitted Cuddly Mouse Toy today and watch as your little one's face lights up with joy and excitement!

Materials
- Double Knitting, Aran, or Worsted:
- 1 ball in each of white (A) and a contrast (B).
- Pair of No 9 (3¾mm) needles.
- 30cm x 30cm (12 inch square) of calico for lining.
- Stuffing.
Tension
25 sts and 34 rows to 4 inches measured over stocking stitch. However, as this is a toy the tension is less important - you just need to be consistent.
Size matters
Makes about a 10 inch toy.
Abbreviations:
- k2tog or p2tog: knit or purl 2 stitches together (decrease one stitch).
- sl1p: slip 1 stitch purlwise.
- yf: bring the yarn to the front of the work.
- yb: take the yarn to the back of the work.
- stocking stitch: one row knit and one row purl, ("stockinette").
A Word on the Wool:
The original yarns used were a quick-knit - that is between a DK and a 4ply - and a 4ply, but the yarns were used double.
The original yarn came in 50g balls of 160 metres.
Instructions
The original pattern used two strands held together of a 4ply weight yarn, but you could easily use a single strand of anything from a double knit through to a chunky yarn, which would ultimately only affect the resulting size of the toy. It's nice to have a fairly firm tension for a toy so adjust the needle size as appropriate.
Body (2 pieces)
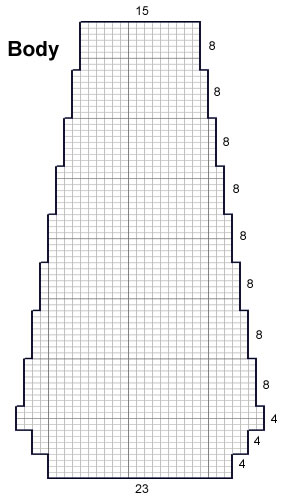
Using contrast colour (B), cast on 23 stitches.
1st row: knit in B.
2nd row: purl in B.
Join in white (A)
3rd row: In A, k1, * sl1p, k1; repeat from * to end
4th row: In A, k1, * yf, sl1p, yb, k1; repeat from * to end
These four rows form the colour pattern.
Keeping the pattern correct, continue and cast on 2 stitches at the beginning of the next 2 rows.
Work 2 rows.
Repeat the last 4 rows [31 sts].
Work 2 rows.
Decrease 1 stitch at each end of the next and every following 8th row until 15 stitches remain.
Work 7 rows.
Cast off.
Work a second piece in the same way.

Head (2 pieces)
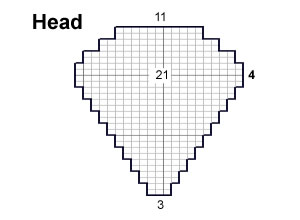
Using white (A), start at the nose and cast on 3 stitches.
Starting with a knit row, work in stocking stitch, increasing 1 stitch at each end of the 3rd and every following alternate row until there are 21 stitches on the needle.
Work 3 rows.
Decrease 1 stitch at each end of the next row.
Work 1 row.
Cast off 2 stitches at the beginning of the next 4 rows.
Work 1 row.
Cast off the remaining 11 stitches.
Work a second piece in the same way.

Ears (4 pieces)
Using contrast colour (B), cast on 7 stitches, and, starting with a knit row, work in stocking stitch, increasing 1 stitch at each end of the 3rd and following alternate row.
Work 5 rows.
Cast off 2 stitches at the beginning of the next 2 rows.
Work 1 row.
Cast off the remaining 7 stitches.
Work three further pieces in the same way.
Tail (1 piece)
The tail can be either a 4-stitch I-cord, or a twisted cord - make it as long as you think suitable for the toy.
To Make Up
Cut out the body and head in calico, leaving a 1½cm seam allowance, using the knitted pieces as a template.
Join the side seams of the body and the outside edges of the head, of both the knitted and calico versions. Turn the calico lining to the right side and sew head to body. Fill and sew up lower edge.
Place the lining inside the the knitted version and finish all seams.
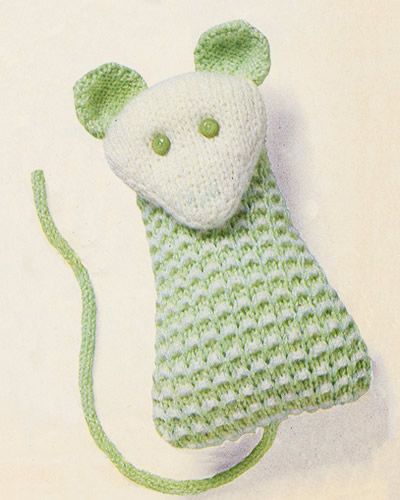
Seam the ears together, noting that the reverse stocking stitch is the right side. Sew the cast-off edges of the ears to the head.
Attach the tail to the body.
The eyes can be embroidery or buttons as shown in the picture. There is also a tiny embroidered nose.