Knitted Cuddly Cat Toy
Looking for the perfect companion for your feline friend? Look no further than the Knitted Cuddly Cat Toy! Handcrafted with love and care, this adorable toy is sure to bring endless joy and entertainment to your furry buddy. Its soft and cozy texture makes it perfect for cuddling and playing, providing hours of fun for your beloved pet. Treat your cat to the Knitted Cuddly Cat Toy today and watch as their eyes light up with excitement and delight!

Materials
- Quick-knit or 5 ply:
- 1 ball in each of pale blue shade (M) "Forget-Me-Not", dark blue/black (B) "Sloe", and grey (G) "Mouse".
- Pair of No 12 (2¾mm or 2½mm) needles which should be pointed at both ends, or circular.
- Stuffing.
Tension
25 sts and 34 rows to 4 inches measured over stocking stitch. However, as this is a toy the tension is less important - you just need to be consistent.
Size matters
Makes about a 10 inch toy.
Abbreviations:
- k2tog or p2tog: knit or purl 2 stitches together (decrease one stitch).
- stocking stitch: one row knit and one row purl, ("stockinette").
A Word on the Wool:
The original yarn was a quick-knit - that is between a DK and a 4ply, either of which could be substituted - the toy would just end up a little larger or smaller.
The original yarn came in 50g balls of 160 metres.
Instructions
This is a very simple toy made up of fairly flat ovals, which should not be over-stuffed.
Body (2 pieces)
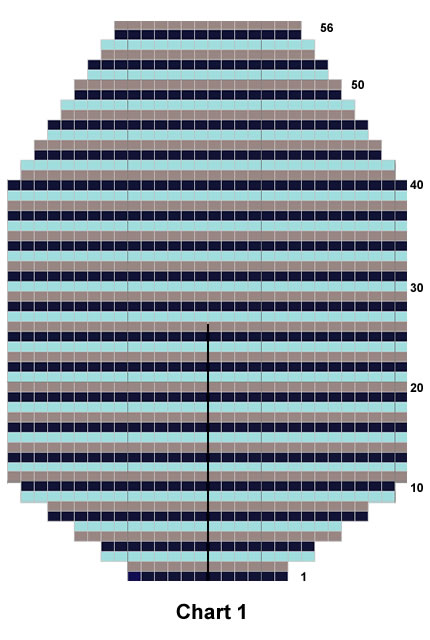
Using dark colour (B), cast on 12 stitches and work in striped stocking stitch following Chart 1 with stripes as follows:
Work 1 row in B, 1 row in G, 1 row in M, throughout.

(The chart shows casting on 2 stitches at the end of every row, until there are 28 stitches, then increase 1 stitch at each end of the next row [30 sts]; then working 29 rows straight, before starting to decrease 1 stitch at at each end of the next and every alternate row until 14 stitches remain).
Cast off using B.
Work a second side in the same way.
Head (2 pieces)
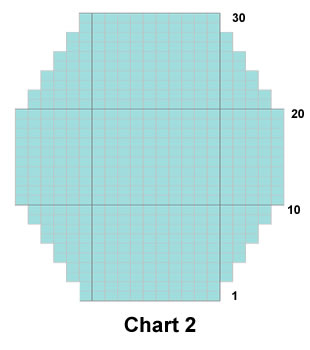
Using light colour (M), cast on 11 stitches and work in stocking stitch following Chart 2, (which shows increasing 1 stitch at each end of the third and every following alternate row until there are 21 stitches; then working 9 rows straight, before starting to decrease 1 stitch at at each end of the next and every alternate row until 11 stitches remain).

Work a second side in the same way.
Ears (2 pieces)
Using light colour (M), cast on 8 stitches, and work 10 rows straight.
Cast off.
Work a second ear in the same way.
Paws (4 pieces)
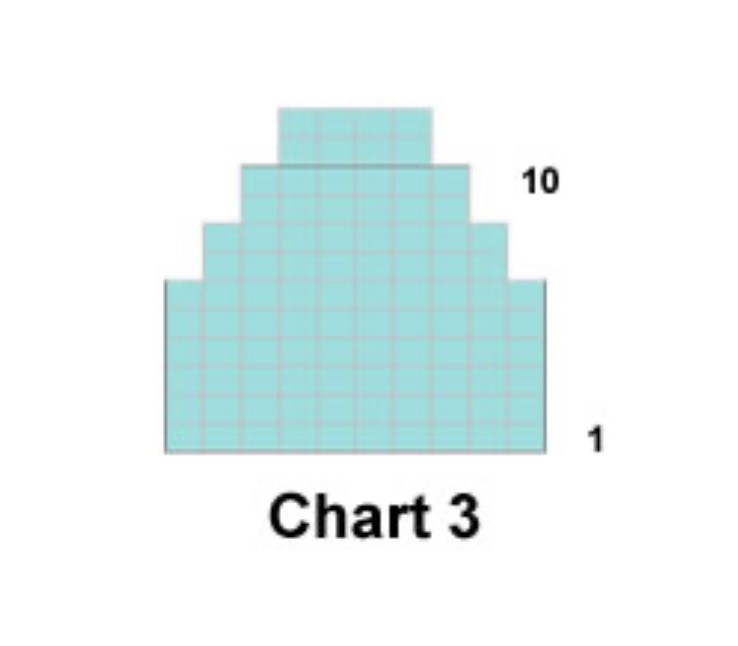
Using light colour (M), cast on 10 stitches and work in stocking stitch following Chart 3, (which shows working 6 rows straight, then decreasing 1 stitch at at each end of the next and every alternate row until 4 stitches remain).

Cast off.
Work a further 3 pieces in the same way.
Tail (1 piece)
Using dark colour (B), cast on 12 stitches and work 62 rows in striped stocking stitch as follows:
1 row in B, 1 row in G, 1 row in M, throughout.
Cast off.
To Make Up
Assemble the two faces of the body, the head and the paws. Sew, (right sides together) leaving an opening. Turn right side out, stuff, and sew closed.
Fold the rectangles of the ears in two to form a triangle, and sew on each side of the head.
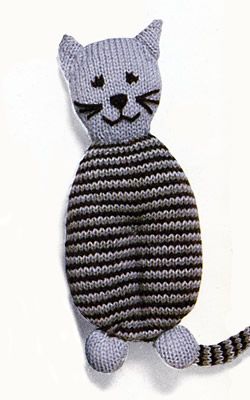
Sew the head and paws to the body, as shown in the picture.
Sew an 8cm seam in backstitch, as indicated on Chart 1, starting from the bottom and the middle of the body, to indicate trousers.
Fold the tail in two lengthwise (wrong side out), sew the seam, turn right side out, stuff and close; fix it on the top of the back seam of the pants.
Embroider eyes, nose, mouth, and whiskers, in color B as shown in the photo.