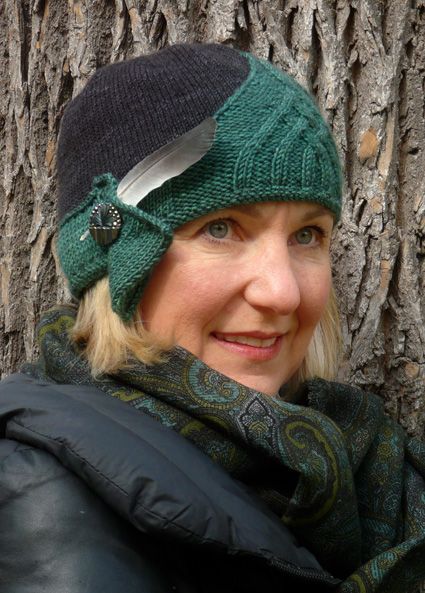
Knitted Beautiful Cap
The Knitted Beautiful Cap is simply a must-have for anyone looking to elevate their winter wardrobe. This stylish and cozy accessory not only keeps your head warm but also adds a touch of charm to any outfit. With its intricate knit design and soft material, it's the perfect blend of fashion and function. You'll love how versatile and comfortable this cap is, making it easy to wear on casual outings or even for a more dressed-up look. So go ahead and treat yourself to the Knitted Beautiful Cap – you'll be turning heads and staying warm all season long!
SIZE
S[M, L]
Fits head circumferences 19-20[21-22, 23-24] inches
Shown in size Medium
FINISHED MEASUREMENTS
Circumference: 18[19.25, 20.75] inches
Depth: 7[7.5, 8] inches
MATERIALS
Yarn
- [MC] The Plucky Knitter Traveler [65% extrafine superwash merino wool, 20% mulberry silk, 15% yak; 325 yds (297 m) per 1.75oz (50g) skein]; color: Morticia; 1 skein
- [CC] The Plucky Knitter Plucky Bello Worsted [55% merino wool, 45% cashmere; 200 yds (183 m) per 1.75oz (50 g) skein]; color: Old Copper; 1 skein
- Recommended needle size
- [always use a needle size that gives you the gauge listed below -- every knitter's gauge is unique]
- 1 set US #6/4mm needles for working flat cable panel and band
- 1 16-inch US #3/3.25mm circular needle for working cap
- US #3/3.25mm needles for small circumference
Notions
- cable needle
- 10 stitch markers, one in a unique color
- 1 locking stitch marker
- waste yarn
- yarn needle
- millinery form or small, rounded mixing bowl for blocking
- One 1-inch diameter button or brooch
- One feather (optional)
GAUGE
27 sts/40 rnds = 4 inches in stockinette stitch and MC with smaller needles
21.5 sts/30 rnds = 4 inches in stockinette stitch and CC with larger needles
PATTERN NOTES
This is worked in three separate pieces: the cap, the cabled peak, and the stockinette band with short-row shaped side tab. One end of the Cable band is purposely worked longer than the other end to accommodate the overlap of this shaped side tab. Directions for the cable panel are provided in chart format, with a Stitch Key for the cable crosses. If you don't own a millinery form for blocking the finished cap, a small, rounded mixing bowl will do nicely as long as its circumference is similar to that of your head.
C4L: Slip 2 sts to cable needle, hold in front, k2, then k2 from cable needle
C4R: Slip 2 sts to cable needle, hold in back, k2, then k2 from cable needle
T2/1L: Slip 2 sts to cable needle, hold in front, p1, then k2 from cable needle
T2/1R: Slip 1 to cable needle, hold in back, k2, then p1 from cable needle
T4L: Slip 2 sts to cable needle, hold in front, p2, then p2 from cable needle
T4R: Slip 2 sts to cable needle, hold in back, k2, then p2 from cable needle
DIRECTIONS
Cap
With smaller circ needle and MC, use Cable method to CO 120[130, 140] sts. Place marker and join for working in the round, being careful not to twist.
Knit all rounds until piece measures 4.5[5, 5.5] inches from CO edge.
Next rnd, place markers: (K12[13, 14], pm) around.
Shape crown:
Change to needles for small circumference when work gets too small for the circular needle.
Decrease rnd: [K to 2 sts before m, k2tog] around. 10 sts decreased.
Next rnd: Knit.
Rep last 2 rnds 8[9, 10] more times, then rep Decrease rnd once more. 20 sts rem.
Final rnd: K2tog 10 times, removing markers as you go. 10 sts rem.
Cut yarn, leaving a 6-in tail. Thread tail onto tapestry needle, and then pull yarn through rem sts and cinch closed.
Band
With larger needles and CC, use Cable method to CO 70[80, 90] sts.
Row 1 [RS]: Purl.
Row 2 [WS]: Knit.
Work in St st, starting with a RS row, until piece measures approx 1.25[1.25, 1.5] ins above rev St st edging, ending with a WS row.
Shape tab:
Row 1 [RS]: K25[25, 30], w&t.
Row 2 [WS]: P.
Row 3 [RS]: K20[20, 25], w&t.
Row 4 [WS]: P.
Row 5 [RS]: K15[15, 20], w&t.
Row 6 [WS]: P.
Row 7 [RS]: K10[10, 15], w&t.
Row 8 [WS]: P to end.
Row 9 [RS]: K5[5, 10], w&t.
Row 10 [WS]: P.
Size L Only:
Row 11 [RS]: K5, w&t.
Row 12 [WS]: P.
All sizes:
Next row [RS]: Knit, working wrapped sts together with their wraps.
Next row [WS]: P.
BO all sts.
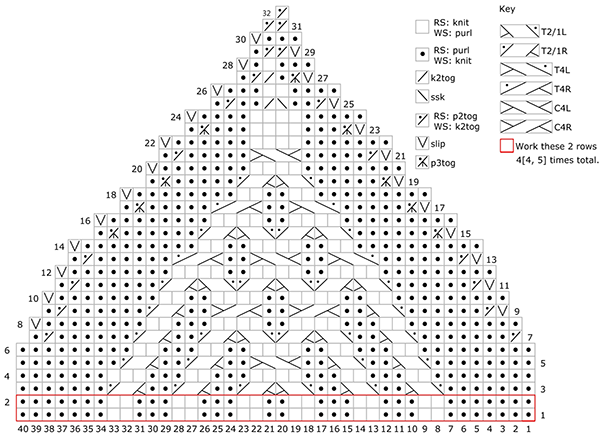
CABLE PANEL:
With larger needles and and CC, use Cable method to CO 55 sts.
Setup Row 1 [RS]: P.
Setup Row 2 [WS]: K.
Row 1 [RS]: K5, pm, work Cable chart row 1 across next 40 sts, pm, k to end.
Row 2 [WS]: P10, work Cable chart row 2 across next 40 sts, p to end.
Repeats Rows 1-2 3[3, 4] more times.
Begin Cable shaping:
Row 3 [RS]: K to m, work Cable chart row 3, k to end.
Row 4 [WS]: P to m, work Cable chart row 4, p to end.
Row 5 [RS]: K to m, work Cable chart row 5, k to end.
Row 6 [WS]: K to m, work Cable chart row 6 k, to end.
Row 7 [RS]: BO 5 sts, removing m, work Cable chart row 7, k to end. 50 sts rem.
Row 8 [WS]: BO 10 sts, removing m, work Cable chart row 8 to end. 40 sts rem.
Continue working Cable chart as set until all 32 rows are complete. 1 st rem.
Fasten off, leaving a tail approx 6 ins long.
FINISHING
Weave in ends.
Place Cap over a mixing bowl or hat form and mist to block smooth.
Sew narrow end of Band to short end of Cable Panel. Pin piece out to approx 22[24, 25.75] inches long, 2[2, 2.25] inches tall at narrow end, and 5[5, 5.25] inches tall at peak. Mist to block smooth.
Pin Band to Cap with rev St st edge overlapping CO edge of Cap. Place shaped end over top of rem end of Cable panel by 2-3 ins. Try on Cap to ensure proper fit. Sew lower edge of pieces together. Sew BO edge of Band to front of Cap.
Sew peak of Cable panel to cloche.
Fold shaped end of Band to form a fan. Invisibly tack fold and free edge to lower edge of Cap. Sew button or brooch to edge of pleat, using photo as a guide.