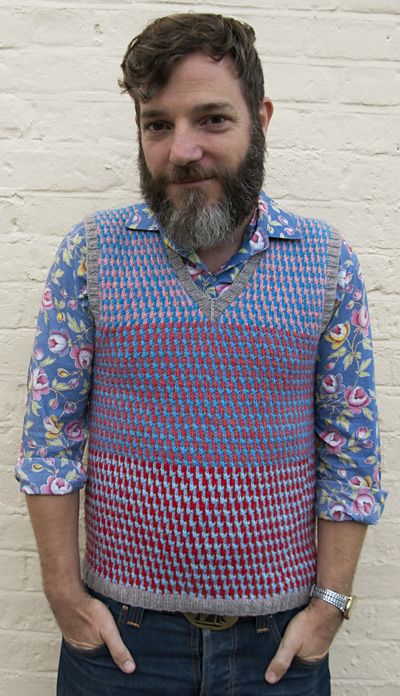
knitted Adorable Vest
Oh, the knitted Adorable Vest is simply darling! The warmth and coziness it brings are matched only by its cuteness factor. Whether it's for a fancy occasion or just a casual day out, this vest adds a touch of charm to any outfit. Its intricate patterns and soft material make it a delightful piece that is sure to be a favorite in your wardrobe. So, snuggle up in this lovely vest and let its charm brighten up your day!
SIZE
For men's garments: XS[S, M, L, 1X, 2X]
Shown in size S, worn with a small amount of positive ease.
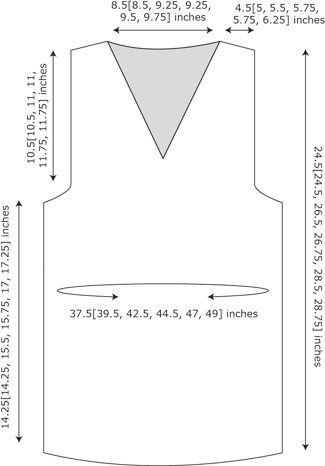
FINISHED MEASUREMENTS
- Chest: 37.5[39.5, 42.5, 44.5, 47, 49] inches
- Length: 24.5[24.5, 26.5, 26.75, 28.75, 28.75] inches
MATERIALS
- Yarn
- John Arbon, Knit by Numbers [100% Merino; 273yd/250m per 100g skein]; 1 skein each:
- [MC] Grey KBN12
- [BR] Red KBN20
- [LB] Light Blue KBN42
- [MR] Bright Pink KBN22
- [MB] Medium Blue KBN40
- [LR] Light Pink KBN24
- [BB] Bright Blue KBN38
- Recommended needle size
- [always use a needle size that gives you the gauge listed below -- every knitter's gauge is unique]
- 3.5mm / #4US 24-inch circular needle
- 4mm / #6US 32-inch circular needle
Notions
- stitch markers
- yarn needle
- stitch holders and/or scrap yarn
- extra needle for the 3-needle bind off
- Note: if you usually bind off tightly, use a bigger needle size
- crochet hook (optional)
GAUGE
24sts/26rows = 4 inches in Lean On Me Pattern on larger needles
PATTERN NOTES
You want the cast-on and bind-off edgings to have stretch without being billowy. Read this for more about loosening your cast on. And here's information on loosening your bind off.
Give yourself a way of remembering which hand holds which color range and stick to it! I used English political colors -- red for left wing in my left hand, blue for right wing in my right hand. This is to avoid color dominance issues.
chart Texture and colorwork may seem a little daunting to combine, but it's not so scary. If you are using the bi-hand method and find either throwing or picking easier, you could consistently chose to use that hand for the rows with both knits and purls. However, it's worth trying to do it with both hands. If it really is too much for you, there's no harm in working the pattern without the texture.
Because of the diagonal in the colorwork pattern, to avoid having a distinct side seam, start the rnd 1st earlier (to the right) every other rnd (as you change from B2, R1 to B1, R2), so that the colorwork pattern flows seamlessly and joglessly around the body. This will in effect change where your row starts, but is well worth it for continuity of pattern.
Work all Steek Stitches with both yarns held together at the same time.
All Edge Stitches are worked in R yarns, changing from MR to LR as required.
It's not strictly necessary, but when I know I will k2tog them in the following rnd for the steek edge st, I skip on the purled stitches in the stitch pattern. I just think it sits flatter if you skip those
When weaving in the ends after knotting your yarns, you may find it easier to thread the needle before or after you have slid it in to the floats at the back of the knitting. Work out what feels best for you, but try both. As naughty as it sounds, you actually need to split the yarn floats as you are skimming the ends through. You can work all the knots in one go and then move to sewing in the ends, or knot down one side and then sew the ends in.
Picking up stitches for the edgings may be an easier job and produce neater results if you pick up 1 stitch per row worked and adjust the count to the required number on the subsequent round. Instead of the usual "pick up and knit", scoop the new strand of MC up through the edge stitches to form a new stitch and then knit these loops on the following round. A crochet hook can help here.
DIRECTIONS
With smaller needles and MC, cast on 212[224, 240, 252, 268, 280] sts. Join for working in the rnd being careful not to twist. Place marker to indicate beginning of rnd.
Work 8[8, 8, 10, 10, 12] rnds in [k2, p2] rib.
Break off MC. Begin working with BR and LB and change to larger needle size.
Note: To keep the pattern seamless, growing in a gentle spiral, shift the marker and beginning of the rnd to the right by a stitch every other rnd until the steek placement rnd.
Begin chart and increase as follows for chosen size:
Size XS: K17, [M1L, k15] 13 times. 225 sts
Size S: K16, [M1L, k16] 13 times. 237 sts
Size M: K2, [M1L, k17] 14 times, M1L. 255 sts
Size L: [M1L, k18] 14 times, M1L. 267 sts
Size 1X: K2, [M1L, k19] 14 times. 282 sts
Size 2X: [M1L, k20] 14 times. 294 sts
Keeping pattern correct, work a further 48[48, 52, 52, 56, 56] rnds -- work measures approximately 8.5[8.5, 9.25, 9.5, 10.25, 10.5] inches from cast-on edge.
Break off BR and LB, join in MR and MB and continue in pattern for a further 36[36, 40, 40, 44, 44] rnds.
ARMHOLE STEEKS
Steek Placement Rnd: Place 6[6, 10, 10, 14, 14] sts on hold. Using both yarns and the backwards loop method, cast on 10 sts (armhole steek stitches -- see Pattern Notes). Work 1 st in MR (edge stitch, worked in R throughout). Work 105[111, 115, 121, 125, 131] sts correctly in pattern: these will form the Front. Work 1 st in MR (edge stitch, worked in R throughout). Place 6[6, 10, 10, 14, 14] sts on hold. Using both yarns and the backwards loop method, cast on 10 sts (armhole steek stitches -- see Pattern Notes). Work 1 st in MR (edge stitch, worked in R throughout). Work 104[k110, 116, 122, 125, 131] sts correctly in pattern -- these will form the Back. Work 1 stitch in MR (edge stitch, worked in R throughout). 233[245, 255, 267, 274, 289] sts.
Maintain all armhole steeks as indicated (see Pattern Notes) and all edge stitches in R (MR or LR as they change), up to the shoulders -- they will be used as the active decrease stitch to keep the pattern consistent and unaffected by the decreasing.
Next rnd: Work 5 armhole steek sts correctly. Place marker for new beg of rnd. Work 1 rnd even in pattern.
Armhole Dec Rnd: [Work armhole steek, ssk, work in patt up to 2 sts before next armhole steek, k2tog] twice, work to end of rnd marker. 4 sts dec'd
Rep Armhole Dec Rnd 3 more times. 217[229, 239, 251, 258, 270] sts
Next rnd: [Work 1 rnd even, work 1 Armhole Dec Rnd] 4 times. 201[213, 223, 235, 242, 254] sts
Keeping pattern correct, work even with MR & MB until 48[48, 52, 52, 56, 56] rnds have been worked -- work measures approximately 16[16, 17.25, 17.5, 18.75, 19] inches from cast-on edge.
Break off MR and MB, join in BB and LR; maintain steek and edge sts correctly as indicated.
NECK STEEK
Steek Placement Rnd: Work armhole steek and edge st correctly, work in patt over next 43[46, 48, 51, 53, 56] sts, work 1 st in LR (edge stitch), place next stitch on hold. Using both yarns and the backwards loop method, cast on 10 sts (neck steek stitches -- see Pattern Notes), work 1 st in LR (edge stitch), work in patt over next 43[46, 48, 51, 53, 56] sts, work edge stitch, work armhole steek, work edge stitch, work in patt over next 88[94, 100, 106, 109, 115] sts, work edge stitch, work to end of rnd. 210[222, 232, 244, 251, 263] sts.
Maintain all armhole and neck steeks as indicated (see Pattern Notes) and all edge stitches in R (MR or LR as they change), up to the shoulders; they will be used as the active decrease stitch to keep the pattern consistent and unaffected by the decreasing.
Neck Shaping Rnd: Work armhole steek, work edge stitch, work in patt up to 2 sts before neck steek, k2tog, work neck steek, ssk, work in patt to end of rnd. 2 sts dec'd
Rep Neck Shaping Rnd 4 more times. 200[212, 222, 234, 241, 253] sts
Next 10 rnds: [Work 1 rnd even, work Neck Shaping Rnd] 5 times. 190[202, 212, 224, 231, 243] sts
Next 15 rnds: [Work 2 rnds even, work Neck Shaping Rnd] 5 times. 180[192, 202, 214, 221, 233] sts
Next 12 rnds: [Work 3 rnds even, work Neck Shaping Rnd] 3 times. 174[186, 196, 208, 215, 227] sts
SIZES L, 1X, 2X ONLY:
-[-, -, L, 1X, 2X] Next 8 rnds: [Work 3 rnds even, work Neck Dec Rnd] twice. -[-, -, 204, 211, 223] sts
Stitches between steeks: 27[30, 32, 33, 35, 38] on each Front, 90[96, 102, 108, 111, 117] on Back. 3 steek sections of 10 sts each.
Continue working even in pattern with LR & BB until 56[56, 60, 60, 64, 64] rnds have been worked
Next rnd: Work armhole steek sts, place on hold. Work Left Front. Work neck steek sts, place on hold. Work Right Front. Work armhole steek sts, place on hold.
Turn work inside out so WS is facing.
With dominant color (the one that would work the "2 sts section" on this rnd), on the WS of work and using the 3-needle BO method, bind off Right Front and Back Right Shoulder together over 27[30, 32, 33, 35, 38] sts. Work a regular bind off on central 36[36, 38, 42, 41, 41] Back Neck sts. With the 3-needle BO method, BO rem Back Left and Left Front Shoulder together -- 27[30, 32, 33, 35, 38] sts.
Place rem steek sts on hold. Break off all yarns.
Turn garment RS out.
Steek:
Cut down the centre of all steek sections between stitches 5 and 6, to have an even amount on both sides.
Unravel steek stitches, up to, but not including the edge stitch; knot together the 2 colors from each row of colorwork, fastening the knot as close to the steek edge stitch as you can.
Weave in the ends after knotting approximately 1 inch (see Pattern Notes) then trim, leaving a small tail.
ARMHOLE EDGING
(see Pattern Notes)
With RS facing and smaller needles, using the steek edge stitch as a guide (picking up between the edge stitch and the patterned body), evenly pick up 63[63, 67, 67, 71, 71] sts up to shoulder seam and 63[63, 67, 67, 71, 71] sts down to the underarm sts. Join MC and knit held 6[6, 10, 10, 14, 14] sts from underarm.
Place marker in the middle of these sts for beg of rnd. 132[132, 144, 144, 156, 156] sts
Work 6 rnds of [k2, p2] rib. Bind off in pattern.
NECK EDGING
(see Pattern Notes)
With RS facing and smaller needles, using the steek edge stitch as a guide, evenly pick up 34[34, 36, 42, 42, 42] sts across Back Neck BO sts to Left Shoulder, and 57[57, 61, 61, 65, 65] sts down to centre neck. Place marker, place held st on the needles, and evenly pick up 57[57, 61, 61, 65, 65] sts up to the Right Shoulder Line. 149[149, 159, 165, 173, 173] sts. Join MC and PM for beg of rnd.
Dec Rnd: [K2, p2] to 1 st before centre st, CDD, work in rib to end. 2 sts dec'd
Note: To ensure ribbing matches exactly, the first stitch after the CDD should be the same type and count as the stitch before the CDD (ie, if the pattern ended in k1 before the decrease was performed, begin with a k1, and apply the same logic for all following rnds)
Rep Dec Rnd 5 more times.
Bind off in pattern.
schematic
FINISHING
Weave in all ends.
Soak for a good while in low temperature water with a mild detergent. Squeeze to dry – do not wring.
Block to size