Knitted Adorable Pullover
Oh, the knitted adorable pullover is an absolute delight! It's like wearing a cozy hug that keeps you warm and stylish at the same time. The intricate details of the knitwork add a touch of charm to any outfit, making you feel effortlessly adorable. Whether you're lounging at home or going out for a casual stroll, this pullover will definitely be your go-to piece. Embrace the comfort and cuteness with this lovely knitwear addition to your wardrobe!

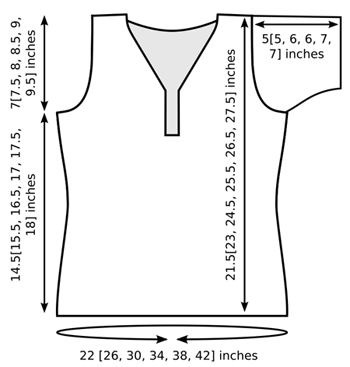
SIZE
XS [S, M, L, 1X, 2X] (shown in size XS)
To fit chest circumference: 29[33, 37, 41, 45, 49] inches
FINISHED MEASUREMENTS
- Chest: 22 [26, 30, 34, 38, 42] inches, unstretched
- Length: 21.5[23, 24.5, 25.5, 26.5, 27.5] inches
- Note: The stitch pattern is very stretchy, and is designed to be worn with approx. 7 inches of negative ease.
MATERIALS
- Cascade Pima Melange [100% Cotton; 120yd/110m per 50g skein]; color: #C111; 8 [9, 11, 12, 13, 15] skeins Note:
- Recommended needle size:
- 1 US #7/4.5mm circular needle; 24 or 32 inches long (longer needle recommended for larger sizes)
- 1 set US #7/4.5mm double-point needles
- [always use a needle size that gives you the gauge listed below -- every knitter's gauge is unique]
- 3 stitch markers; be sure one marker is different from the others
- Stitch holders or waste yarn
- Tapestry needle
- Sewing needle and thread to match yarn
- 3 buttons
GAUGE
32 sts/28 rows = 4 inches in cable rib stitch unstretched.
PATTERN NOTES
If desired, sleeves may be worked using the Magic Loop technique rather than double-point needles. A tutorial can be found here.
RT (Right Twist): K2tog, but do not drop sts from left needle; insert right needle between sts just worked together and k into first st again; drop both sts from left needle.
W2tog: Work 2 sts together in pattern. If the next st in pattern would be a k st, work k2tog; if it would be a p st, work p2tog.
Mini-Cable Rib Pattern (Worked in the round over a multiple of 8 sts):
Rounds 1-2: [P2, k2] to end.
Round 3: [P2, k2, p2, RT] to end.
Round 4: [P2, k2] to end.
Repeat Rounds 1-4 for pattern.
Mini-Cable Rib Pattern (Worked back and forth over a multiple of 8 sts):
Row 1 [RS]: [P2, k2] to end.
Rows 2 and 4 [WS]: [P2, k2] to end.
Row 3 [RS]: [P2, k2, p2, RT] to end.
Repeat Rows 1-4 for pattern.
1x1 Rib (Worked over an even number of sts):
Row 1: [K1, p1] to end.
Repeat this row for 1x1 Rib.
DIRECTIONS
LOWER BODY
Using circular needle, CO 192[232, 272, 304, 344, 384] sts. Place marker and join to begin working in the round, being careful not to twist. Use the marker which is different from the others; end of round is located at side.
Work in Mini-Cable Rib until work measures 4[4, 4.5, 4.5, 5, 5] inches.
Next Round: Work 96[116, 136, 152, 172, 192] sts in pattern, place marker, work in pattern to end.
Decrease Round: [Work in pattern to 2 sts before marker, w2tog] twice. 2 sts decreased.
Work 3 rounds in pattern.
Repeat these 4 rounds 4 times more. 182[222, 262, 294, 334, 374] sts.
Continue in pattern until work measures 8[8.5, 9, 9.5, 10, 10] inches.
Increase Round: [Work in pattern to marker, m1, slip marker] twice. 2 sts increased.
Work 3 rounds in pattern.
Repeat these 4 rounds 4 times more. 192[232, 272, 304, 344, 384] sts.
Continue in pattern until work measures 12[13, 14, 14.5, 15, 15.5] inches, ending with Round 3 of pattern.
Shape Neckline Placket:
Next Round (pattern Round 4): Work 44[56, 64, 72, 84, 92] sts in pattern (next st is a p st), BO 6 sts, continue in pattern to end of round.
Break yarn. Slip next 44[56, 64, 72, 84, 92] sts (to bound-off sts) to right needle.
Rejoin yarn at placket edge with RS facing and begin working back and forth in pattern as set, beginning with Pattern Round 1. Note that Round 3 of pattern will always be a RS round. From this point on, work first and last st of each row in stockinette st.
Continue in pattern until work measures 14.5[15.5, 16.5, 17, 17.5, 18] inches (2.5 inches from beginning of placket shaping), ending with a WS row.
Next Row [RS]: Work 40[49, 58, 65, 74, 83] sts in pattern and place these sts on a st holder or waste yarn; BO 10[12, 14, 16, 18, 20] sts, work 85[103, 121, 135, 153, 171] sts in pattern (86[104, 122, 136, 154, 172] sts after BO sts) and place these sts on a st holder or waste yarn; BO 10[12, 14, 16, 18, 20] sts, work in pattern to end. 40[49, 58, 65, 74, 83] sts.
LEFT FRONT
Note: Read ahead! Armhole shaping and neckline shaping are worked at the same time.
Shape Armhole:
Work 1 row in pattern.
Next Row [RS]: BO 2[3, 4, 4, 5, 6] sts, work in pattern to end.
Repeat these 2 rows twice more. 34[40, 46, 53, 59, 65] sts.
From this point on, work st at armhole edge in stockinette st.
Work 1 row in pattern.
Next Row [RS]: K1, k2tog, work in pattern to end.
Repeat these 2 rows 1[4, 7, 11, 14, 17] times more.
AT THE SAME TIME: When work measures 16[17, 18, 18.5, 19, 19.5] inches (4 inches from beginning of neckline placket), ending with a WS row, shape neckline as follows:
Next Row [RS]: Work in pattern to last 3 sts, ssk, k1.
Work 1 row in pattern.
Repeat these 2 rows 21[22, 23, 24, 25, 26] times more. 10[12, 14, 16, 18, 20] sts.
Continue in pattern until work measures 21.5[23, 24.5, 25.5, 26.5, 27.5] inches (armhole measures 7[7.5, 8, 8.5, 9, 9.5] inches), ending with a WS row.
BO all sts.
RIGHT FRONT
Place 40[49, 58, 65, 74, 83] held sts of right front on needle with WS facing and rejoin yarn at armhole edge.
Next Row [WS]: BO 2[3, 4, 4, 5, 6] sts, work in pattern to end.
Work 1 row in pattern.
Repeat these 2 rows once, then work the first of these rows (BO row) once more. 34[40, 46, 53, 59, 65] sts.
From this point on, work st at armhole edge in stockinette st.
Next Row [RS]: Work in pattern to last 3 sts, ssk, k1.
Work 1 row in pattern.
Repeat these 2 rows 1[4, 7, 11, 14, 17] times more.
AT THE SAME TIME: When work measures 16[17, 18, 18.5, 19, 19.5] inches (4 inches from beginning of neckline placket), ending with a WS row, shape neckline as follows:
Next Row [RS]: K1, k2tog, work in pattern to end.
Work 1 row in pattern.
Repeat these 2 rows 21[22, 23, 24, 25, 26] times more. 10[12, 14, 16, 18, 20] sts.
Continue in pattern until work measures same as left front to shoulder, ending with a WS row.
BO all sts.
BACK
Place 86[104, 122, 136, 154, 172] held sts of back on needle with WS facing and rejoin yarn.
BO 2[3, 4, 4, 5, 6] sts at beginning of next 6 rows. 74[86, 98, 112, 124, 136] sts.
From this point on, work st at armhole edge in stockinette st.
Next Row [RS]: K1, k2tog, work in pattern to last 3 sts, ssk, k1.
Work 1 row in pattern.
Repeat these 2 rows 1[4, 7, 11, 14, 17] times more. 70[76, 82, 88, 94, 100] sts.
Work in pattern until work measures 20[21.5, 23, 24, 25, 26] inches (armhole measures 5.5[6, 6.5, 7, 7.5, 8] inches), ending with a WS row.
Next Row [RS]: Work 20[22, 24, 26, 28, 30] sts in pattern and place these sts on a st holder or waste yarn; BO 30[32, 34, 36, 38, 40] sts, work in pattern to end. 20[22, 24, 26, 28, 30] sts.
Work 1 row in pattern.
Next Row [RS]: BO 2 sts, work in pattern to end.
Repeat these 2 rows 4 times more.
BO remaining 10[12, 14, 16, 18, 20] sts.
Place held sts on needle with WS facing and rejoin yarn.
Next Row [WS]: BO 2 sts, work in pattern to end.
Work 1 row in pattern.
Repeat these 2 rows 4 times more.
BO remaining 10[12, 14, 16, 18, 20] sts.
Sew back to fronts at shoulders.
COLLAR
Using circular needle and beginning with RS facing at base of right front placket edge, pick up and k 1 st in each row and 1 st in each BO st around placket and neckline edge, ending at base of left front placket edge. As you pick up sts, place st markers at each shoulder seam.
As you work the sequence of short rows that follows, when you encounter a wrapped st, pick up the wrap and work it together with the wrapped st.
Row 1 [WS]: Work in 1x1 Rib up left front edge and across back neck edge to 1 st before marker at right shoulder, W&T.
Row 2 [RS]: Work in 1x1 Rib to 1 st before marker at left shoulder, W&T.
Row 3 [WS]: Work in pattern to 1 st past previous wrapped st, W&T.
Rows 4-8: Work 5 more short rows as for Row 3. Last wrapped st on each side is 6th st from marker.
Row 9 [WS]: Work in pattern to 3 sts past previous wrapped st, W&T.
Rows 10-22: Work 13 more short rows as for Row 9. Last wrapped st on each side is 34th st from marker.
Row 23 [WS]: Work in pattern to 5 sts past previous wrapped st, W&T.
Work 3[3, 5, 7, 9, 9] more short rows as for Row 23. Last wrapped st on each side is 46th[46th, 52nd, 58th, 64th, 64th] sts from marker.
Next Row [WS]: Work in pattern to end.
Work 4 rows in 1x1 Rib over all sts.
Note: Directions for buttonholes are based on a row beginning with a k st. If your row begins with a p st, work 4 sts before the first buttonhole instead of 5.
Buttonhole Row [RS]: Work 5 sts in pattern, yo, k2tog, [work 8 sts in pattern, yo, k2tog] twice, work in pattern to end.
Work 5 more rows in pattern. BO all sts in pattern.
SLEEVES
Using double-point needles, beginning at center of underarm BO edge with RS facing, pick up and k 1 st in each BO st and 3 sts for every 4 rows around armhole edge.
Place marker and join to work in the round.
Count sts on needle. If necessary, in next round increase or decrease up to 4 sts to obtain a mutiple of 8 sts.
Set-up Round: K1, [p2, k2] to last 3 sts, p2, k1. This round establishes Mini-Cable Rib Pattern for sleeves.
Decrease Round: K1, k2tog, work in pattern to last 3 sts, ssk, k1.
Work 1 round in pattern.
Repeat these 2 rounds 16 times more. 34 sts decreased.
Continue in pattern until sleeve measures 5[5, 6, 6, 7, 7] inches.
BO all sts in pattern.
Work other sleeve in the same way.
FINISHING
Sew edges of collar to BO edge of placket opening, overlapping right collar (with buttonholes) over left collar. Sew buttons to left collar, behind buttonholes.
Weave in ends. Wash garment according to directions on ball band and lay flat to dry.