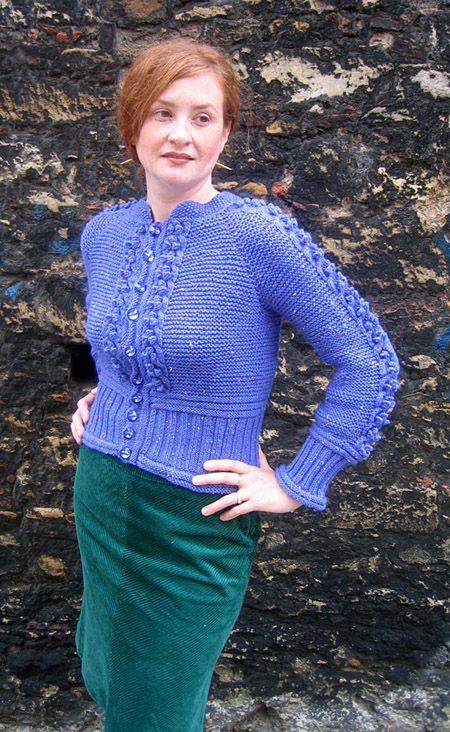
Knitted Beautiful Sweater
When it comes to a knitted beautiful sweater, you're in for a treat! Picture yourself cozying up in a soft, handcrafted masterpiece that not only keeps you warm but also makes you feel stylish and confident. It's like a warm hug from your favorite grandma, complete with intricate patterns and vibrant colors that will have everyone asking, "Where did you get that fabulous sweater?" Embrace the comfort and charm of a knitted beauty that is sure to become your go-to piece for chilly days or even just lounging at home. So, wrap yourself in the warmth and love of a knitted beautiful sweater, because you deserve to feel fabulous inside and out!

SIZE
S [M, L, XL, XXL] (shown in size M)
FINISHED MEASUREMENTS
- Chest: 32.5 [36.5, 39.5, 43.5, 48.5] inches
- Length: 18[20, 21, 22, 23] inches
MATERIALS
- Cascade 220 Tweed [90% Peruvian Highland Wool, 10% Donegal (Tweed); 220 yd/198 m per 100g skein]; color: 7606; 4[4, 4, 5, 5] skeins
- 1 US #7/4.5mm circular needle, 32 inch or longer
- 1 US #5/3.5mm circular needle, 32 inch or longer
- Double-point needles in sizes listed above (optional)
- 10 0.75-inch buttons
- Stitch holders
- Waste yarn
- 10 safety pins
- Tapestry needle
GAUGE
16 sts/32 rows = 4 inches in garter stitch on US 7/4.5mm needles
PATTERN NOTES
This pattern is knit flat on circular needles from the neckline to the hem. The sleeves are knit flat and seamed later, but could easily be knit in the round. The button bands are picked up and knit from the cardigan front edges.
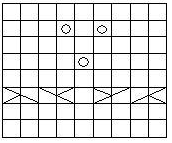
WC9: Work next row of Cable over next 9 stitches


Make bobble
Slip next 2 sts to cable needle and hold to front of work, k2, k2 from cable needle.
Slip next 2 sts to cable needle and hold to back of work, k2, k2 from cable needle.
Make bobble: K into front, then back, then front, then back, then front again, of next stitch (4 sts increased), turn work; p5, turn work; pass second, third, fourth and fifth sts over first st, then k this st through back loop.
DIRECTIONS
Collar
Using smaller needle, CO 72[72, 80, 80, 80] sts.
Row 1 [RS]: Sl 1, kfb, [k1, p1] to end.
Row 2 [WS]: Sl 1, kfb, [p1, k1] to last st, p1.
Row 3 [RS]: Sl 1, kfb, [p1, k1] to end.
Row 4 [WS]: Sl 1, kfb, [k1, p] to last st, k1.
Rows 5 & 6: Work as for Rows 1 & 2. 78[78, 86, 86, 86] sts.
Rows 7, 9, 11 [RS]: Sl 1, [k1, p1] to last st, k1.
Rows 8, 10, 12 [WS]: Sl 1, [p1, k1] to last st, p1.
Rows 13 & 14: Sl 1, k to end.
Rows 15 & 16: Sl 1, p to end.
Yoke
Switch to larger needle and proceed as follows:
Row 17 [RS]: Sl 1, WC9, p4[4, 6, 6, 6], place marker, k1, WC9, place marker, k1, WC9, p10[10, 14, 14, 14], WC9, place marker, k1, WC9, place marker, k1, p4[4, 6, 6, 6], WC9, p1.
Row 18 [WS]: Sl 1, p to end.
Row 19 [RS]: Sl 1, WC9, p to marker, m1, slip marker, k1, m1, WC9, m1, slip marker, k1, m1, WC9, p10[10, 14, 14, 14], WC9, m1, slip marker, k1, m1, WC9, m1, slip marker, k1, m1, p to cable, WC9, p1. 86[86, 94, 94, 94] sts.
Row 20 [WS]: Sl 1, p to end.
Row 21 [RS]: Sl 1, WC9, p to marker, m1, slip marker, k1, m1, p to cable, WC9, p to marker, m1, slip marker, k1, m1, p to cable, WC9, p10[10, 14, 14, 14], WC9, p to marker, m1, slip marker, k1, m1, p to cable, WC9, p to marker, m1, slip marker, k1, m1, p to cable, WC9, p1. 8 sts increased.
Repeat these 2 rows 16[20, 21, 25, 30] times more. 222[254, 270, 302, 342] sts.
Divide Sleeves and Body:
Next Row [WS]: Sl 1, p31[35, 38, 42, 47], place next 47[55, 57, 65, 75] sts on st holder or waste yarn for first sleeve, p64[72, 78, 86, 96], place next 47[55, 57, 65, 75] sts on st holder or waste yarn for second sleeve, p32[36, 39, 43, 48]. 128[144, 156, 172, 192] sts on needle.
Lower Body:
Next Row [RS]: Sl 1, [p to cable, WC9] 4 times, p to end.
Next Row [WS]: Sl 1, p to end.
Repeat these 2 rows until work measures 3.5[4.5, 5.5, 6.5, 7.5] inches from underarm.
Lower Border:
Switch to smaller needle and continue as follows, slipping first st of each row:
*Work 3 rows in reverse stockinette st. Work 2 rows in stockinette st.
Repeat from * once more, then work 3 more rows in reverse stockinette st.
P 1 row.
Next Row [RS]: Sl 1, [k2, p2] to last 3 sts, k3.
Next Row [WS]: Sl 1, [p2, k2] to last 3 sts, p3.
Repeat these 2 rows 10 times more.
K 1 row.
**Work 3 rows in reverse stockinette st. Work 2 rows in stockinette st.
Repeat from ** once more, then work 3 more rows in reverse stockinette st.
BO all sts using larger needle.
Sleeves
Replace held sts of one sleeve on larger needle with RS facing, and rejoin yarn.
Note: When working sleeves, do not slip first st of each row.
If desired, sleeves may be worked in the round on double-point needles; if you do this, alternate rows (rows marked "WS") are knit, rather than purled.
Next Row [RS]: P to cable, WC9, p to end.
Next Row [WS]: P all sts.
Repeat these 2 rows until sleeve measures 6.5 inches less than desired length.
Work Lower Border as for Body. On first row of border, decrease 3[3, 1, 1, 3] sts, evenly spaced.
Repeat for second sleeve.
Button Band
Using smaller needles, with RS facing and beg at lower corner of right front edge, pick up and k 3 sts for every 4 rows along edge of lower border, and 1 st for every 2 rows along garter stitch section of body, stopping at base of collar. (When picking up sts along an edge that has been worked with slipped sts, remember that one slipped st on an edge = 2 rows.)
Work 3 rows reverse stockinette st, two rows stockinette st, then three more rows reverse stockinette st. BO all sts using larger needle.
Buttonhole Band
Using smaller needles, with RS facing and beg at upper corner of left front edge at base of collar, pick up and k 1 st for every 2 rows along garter stitch section of body, and 3 sts for every 4 rows along edge of lower border.
Work 3 rows reverse stockinette st.
Using safety pins, mark locations of 10 evenly spaced buttonholes.
Next Row [RS]: [K to location of buttonhole, BO 2 sts] ten times, k to end.
Next Row [WS]: [P to bound off sts, CO 2 sts using backward loop method] ten times, p to end.
Work 3 more rows reverse stockinette st. BO all sts using larger needle.
FINISHING
Sew sleeve seams.
Weave in ends and attach buttons.
Block as desired.