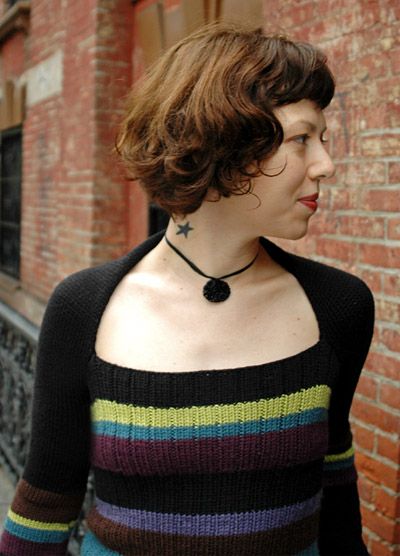
Knitted Adorable Sweater
Knitted adorable sweaters are like cozy hugs in clothing form. The intricate details and soft texture make them not only fashionable but also irresistibly cute. Whether you prefer a classic cable knit or a funky Fair Isle pattern, there's a knitted sweater to suit every style and personality. Wrapping yourself in one feels like a warm embrace from your favorite grandma or a playful pat on the back from a dear friend. With their charm and warmth, knitted adorable sweaters are a must-have addition to any wardrobe, promising both comfort and style in abundance.
SIZE
XS [S, M, L, XL] (shown in size S)
FINISHED MEASUREMENTS
- Chest: 27 [29, 31, 33, 36] inches
- Note: Will stretch up to 40[43, 46, 49, 54] inches
- Cross-back width: 19[20, 21.5, 23, 24.5]
- Length: 22.5[23.5, 24.5, 25.5, 26.5] inches
Designer's note: The 3x1 rib used for the body of the sweater is very stretchy, which makes it accommodating for a wide variety of shapes and measurements. For reference, my chest is about 36 inches, and I'm wearing size S in the photo.
Important Note: Be sure to choose a size with a cross-back measurement that is at least .5 inches longer than the width of your back, measured from center of armpit to center of armpit, when your arms are held forward. (Have a friend help you take this measurement!)
MATERIALS
- Debbie Bliss Cashmerino Aran [55% Merino Wool, 33% Microfibre, 12% Cashmere; 100yds/ 90m per 50g ball]
- [MC] #300 Black 6 [7, 8, 9, 10] balls
- [CC1] #612 Eggplant; 1 ball
- [CC2] #105 Brown; 1 [1, 1, 1, 2] balls
- [CC3] #201 Teal; 1 [2, 2, 2, 2]balls
- [CC4] #501 Pea Green; 1 ball
- [CC5] #607 Purple; 1 [2, 2, 2, 2] balls
- This allows for the stripe layout exactly per the pattern, and will leave a lot left over of the contrast colors. A solid version would require 10 [11, 12, 13, 15] balls.
- 1 set US #8/5mm double-point needles
- 1 24-inch or 32-inch US #8/5mm circular needle
- Stitch marker
- Split ring markers or safety pins
- Tapestry needle
- Waste yarn
- Crochet hook
GAUGE
- 20 sts/24 rows = 4 inches in stockinette stitch
- 24 sts/24 rows = 4 inches in 3x1 Rib
PATTERN NOTES
The first sleeve is cast on at the side back using the Crochet Cast On method. (If you prefer, you can use another provisional cast on method.) After the first sleeve is worked, you will remove the crochet chain from the cast on edge, and pick up the live stitches to begin working the second sleeve.
Crochet Cast On
Using waste yarn, work a crochet chain several sts longer than the number of sts to be cast on. Starting 1 or 2 sts in from end of chain and using working yarn, pick up and k 1 st in the back loop of each st until the required number of sts have been worked. Later, the chain will be unraveled and the resulting live sts picked up.
3x1 Rib (Worked in the round over a multiple of 4 sts):
Round 1: [K3, p1] around.
Repeat this round for 3x1 Rib.
DIRECTIONS
Sleeves
Using Crochet Cast On and MC, CO 50 [55, 60, 65, 70] sts onto circular needle.
Work in stockinette st, slipping first st of each row, until work measures 19[20, 21.5, 23, 24.5] inches, ending with a WS row.
K next row onto double-point needles, dividing sts evenly between needles. Place marker and join to begin working in the round.
*Cont in stockinette st, working in the round, until work measures 6.5[6.5, 6.5, 7, 7.5] inches from join.
Work stripe patt as follows:
K 12 rounds CC2.
K 3 rounds CC4.
K 5 rounds CC3.
K 8 rounds CC5.
K 1 round using MC.
Next Round: [K10[11, 12, 13, 14], m1] 5 times. 55[60, 65, 70, 75] sts.
Cont in stockinette st, using MC, until work measures 20 [20, 20.5, 21, 21.5] inches from join, or desired length.
P 1 row.
BO all sts knitwise.*
Remove crochet chain from CO edge and place live sts on double-point needles, dividing evenly between needles. Place marker and join to begin working in the round.
Work from * to * as for first sleeve. When completed, finished piece will resemble a shrug, with a large opening at the center, between two sleeves.
Designate one edge of this opening as the front, and the other edge as the back. (When the finished sweater is worn, the “front” edge of this piece will form the side and back edges of the neckline.) Place a split ring marker or safety pin at the center of the back edge, and at each corner of the opening (the points where the front and back edges meet). Place a marker or pin 3.25[3.75, 4.5, 5, 5.5] inches from each corner, along the front edge. (See diagram below.)
Body
Using MC and circular needle, CO 48[48, 48, 48, 52] sts.
Lay the sleeve section so that the opening faces up, with the front edge towards you.
Continuing from the stitches you have just cast on and beginning at the front marker on your left, pick up and k 16[19, 22, 25, 28] sts between front marker and side marker (approx. 4 sts for every 5 rows), pick up and k 80[86, 92, 98, 108] sts along the back edge (approx. 7 sts for every 10 rows), and 16[19, 22, 25, 28] sts between side marker and front marker. 160[172, 184, 196, 216] sts on needle.
Ensuring that CO sts are not twisted, join to begin working in the round.
Work in 3x1 Rib to side marker, remove split marker or pin and place stitch marker to indicate beg of round. Remove remaining markers.
Work 11[12, 13, 14, 16] rounds in 3x1 Rib using MC.
Continuing in 3x1 Rib, work in stripe patt as follows:
Work 6 rounds CC4.
Work 4 rounds CC3.
Work 11 rounds CC1.
Work 14 rounds MC.
Work 6 rounds CC5.
Work 11 rounds CC2.
Work 16 rounds CC3.
Work 4 rounds CC4.
Work 16 rounds CC5.
Cont in MC until work measures 17.5[18, 18.5, 19, 19.5] inches, or desired length. BO loosely in patt.
FINISHING
Weave in ends.
Try on sweater. If neckline seems too loose, use MC to sew edges of Sleeves and edges of Body together until neckline is desired size.
Block as desired. Be sure not to stretch ribbed body while blocking!