Knitted Handmade Camisole
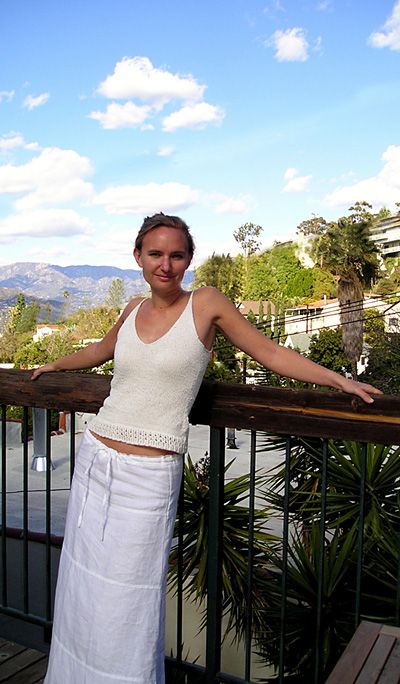
Oh, the knitted handmade camisole is simply a charming piece! Imagine the intricate details and cozy feel of each stitch lovingly made by hand. It's like wearing a hug from a talented knitter. This camisole brings a touch of warmth and homemade goodness to any outfit, perfect for adding a unique and personal touch to your wardrobe. Whether you pair it with jeans for a casual day out or dress it up with a skirt for a special occasion, this handmade beauty is sure to make you feel both stylish and connected to the art of crafting.

SIZE
To fit bust size 32[34, 36, 38, 40, 42, 44] inches
FINISHED MEASUREMENTS
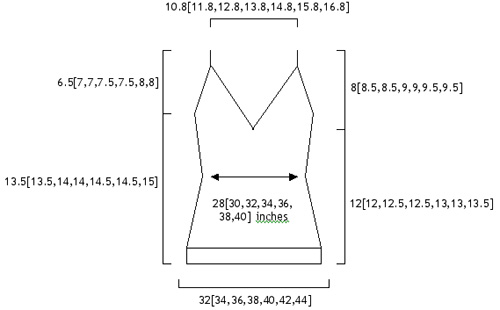
- Chest: 32[34, 36, 38, 40, 42, 44] inches
- Length: 20[20.5, 21, 21.5, 22, 22.5, 23] inches
MATERIALS
- GGH Mystik [54% cotton, 46% viscose; 120 yd/110m per 50g skein];
- color: Ivory (02); 4[5, 5, 5, 6, 6, 6] skeins
- 1 set 28 inch US #6/4mm circular needles
- 1 set US #6/4mm straight needles
Optional:
1 set US #6/4mm double pointed needles
Notions:
- 4 stitch markers, 2 in one color and 2 in a second color
- 2-4 stitch holders
- 1-2 safety pins
GAUGE
20 sts/28 rows = 4" in stockinette stitch
STITCH PATTERNS
- Ktbl: Knit through the back loop to form a twisted knit stitch
- Rdec: make a right-slanting decrease using the ssk method -- slip 2 sts from the left to right needle knitwise and then knit the two slipped sts together.
- Ldec: make a left-slanting decrease by knitting 1 stitch, returning it to the left needle, passing the second stitch on the left needle over the returned stitch, and finally returning the first stitch to the right needle (w/o twisting it or knitting it again).
- RRI: make a right raised increase. Reach the tip of the right needle around on the farside and insert it up under the purl nub below the first stitch on the left needle. Lift this stitch onto the left needle tip without twisting. Now knit the new stitch you created by lifting the purl nub.
- LRI: make a left raised increase by knitting the stitch above the one that you will use to increase. Insert the tip of the left needle under the second purl nub below the stitch that you just knitted and pull up onto the left needle. Knit this new stitch created by the purl nub from the farside (if you knit it from the nearside it will twist and look wrong).
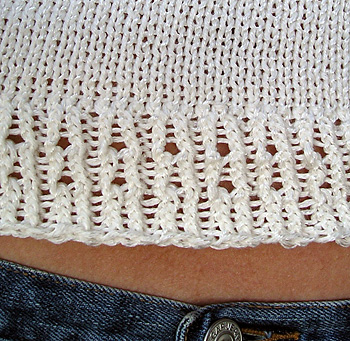
Twisted Rib Eyelet Border (multiple of 3):
Rounds 1-4: *k2 tbl, p1* repeat this pattern for the entire round, all four rounds.
Round 5: *ktbl, yo, ktbl, p1* repeat to end.
Round 6: *k2tog, k, p1* repeat to end. (This is regular knit, not ktbl!)
Rounds 7 and 8: *k2 tbl, p1* repeat to end.
Round 9: *ktbl, yo, ktbl, p1* repeat to end.
Round 10: *k2tog, k, p1* repeat to end.
Rounds 11 and 12: *k2 tbl, p1* repeat to end.
DIRECTIONS

BODY
With circular needles, CO 162[171, 183, 192, 201, 213, 222] sts. Join and pm. Work 1[1, 1, 1, 1, 2, 2, 2] repeats of Twisted Rib Eyelet Border.
Next round: K all sts and dec 2[1, 3, 2, 1, 3, 2] sts evenly around. (160[170, 180, 190, 200, 210, 220] sts).
Next round: K 80[85, 90, 95, 100, 105, 110] sts, pm (this should be the same color as the left armhole marker already on the needles), k to end of round.
Next round: Knit.
Shape Waist
Next round: K1, Rdec, k to last 3 sts before second marker, Ldec, k2 (one st on either side of the right armhole marker), Rdec, knit to last 3 sts in the round, Ldec, k1.
*K 3 rounds even.
Next round: K1, Rdec, k to last 3 sts before second marker, Ldec, k2 (one st on either side of the right armhole marker), Rdec, knit to last 3 sts in the round, Ldec, k1.*
Rep from * to * 3 times more. (140[150, 160, 170, 180, 190, 200] sts).
Work even for 2[2.25, 2.25, 2.5, 2.5, 2.75, 2.75] inches.
Shape Bust
Next round: K1, RRI, k to the last st before second armhole marker, LRI, k2 (one st on either side of second marker) RRI, k to last st, LRI.
**K 5 rounds even.
Next round: K1, RRI, k to the last st before second armhole marker, LRI, k2 (one st on either side of second marker) RRI, k to last st, LRI.**
Rep from ** to ** 3 times more. (160[170, 180, 190, 200, 210, 220] sts).
Work even until body measures 12[12, 12.5, 12.5, 13, 13, 13.5] inches.
Shape V-Neck and Back
K40[43,45,47,50,53,55], place marker to mark center front V, k 80[85,90,95,100,105,110], place marker to mark center back V, k 40[43,45,47,50,53,55].
Next row: k to 3 sts before V-neck marker, Rdec, k1 (you are now at the marker).
Divide the work and start a new ball of yarn on straight needles: k1, Ldec, k past side marker to 3 sts before V-Back marker, Rdec, k1. Stop at the V-back marker. Work only the half of the work that is now on the straight needles. (This is the front right side and the back right side, with the armhole in the center of the work.) You can leave the other half on circular needles for now, or move the live stitches to a stitch holder if you prefer.
Right side
Cont in St st with V-neck and back shaping by decreasing 1 st at each end of the work as previously done on every other row for the rest of the pattern(dec every RS row). Cont as established, at the same time, beg the armhole shaping:
After 1.5 inches of V-neck and V-back shaping, beg shoulder shaping by knitting across the work, BO the 6 center stitches and then cont to knit across to the V-back (don't forget to continue the V-shaping at the end of the row!).
The work will once again be divided in half, this time into front right and back right segments. Work the back right segment. You can leave the right front segment on the needles if you prefer or alternately move it to a stitch holder.
On the next RS row, BO 4 sts, k to end(don't forget V-shaping!).
On the following RS row, k1, Ldec, k to end (again, don't forget V-shaping!).
Cont decreasing 1 st EOR until 4[3, 4, 3, 4, 3, 4]sts rem.
P 1 row. (K1, K2tog, K1) 1[0, 1, 0, 1, 0, 1] times.
Place the 3 rem live sts on a stitch holder.
Return to right front and work as right back, reversing shaping as necessary.
When 3 sts rem, knit I-cord straps by knitting continuously without turning your work, but instead pulling the yarn tightly across the back of your sts.
After you have completed about 3-5 inches, put a safety pin through the live sts and then through the live sts on the right back piece.
Try the camisole on to check the length of the straps. (Yes, you will be flashing some skin!)
When the strap ends are grafted together, the entire length of the camisole should approximately equal the length suggested for your size, but you should adjust the fit to your taste.
Strap placement makes a huge difference in this camisole, and it can look sloppy if you allow the straps to be too long. When you have determined the appropriate strap length, graft the front and back of the strap together. (As a reference, I found that 3 inch straps worked well for size 32 bust).
Left side
Work as for right side, reversing shaping as necessary.
FINISHING
Weave in loose ends. Blocking is unnecessary, as the armholes are designed to roll in so that further finishing is not required. Wear, look ravishing, etc!
