Knitted Beautiful Handbag
Oh, let's talk about knitted beautiful handbags! They are the perfect accessory that adds a touch of charm and uniqueness to any outfit. The intricate patterns and textures created through knitting make each handbag a one-of-a-kind piece that truly stands out. Whether you're going for a casual look or dressing up for a special occasion, a knitted handbag is a versatile choice that adds a cozy and stylish touch.
SIZE
One
FINISHED MEASUREMENTS
Width: 9 inches
Height: 8 inches
Depth: 2 inches
MATERIALS
GGH Velour [100% nylon; 58 m per 25 g skein]; color: 07; 4 skeins
Note: If you can 't find GGH Velour, Berroco Suede [100% nylon; 120 yds per 50 g skein] is a perfect substitute; you will need 2 skeins
1 set(s) US #7/4.5 mm double-point needles
1 set(s) US #7/4.5 mm straight needles
1 set US #6/4 mm straight needles
Approx. 10 yds smooth cotton waste yarn in contrast color, DK weight or lighter
Stitch holders (4)
Yarn needle
Marking chalk
Snap (1) for bag closure (consider a magnetic snap if you intend to line the bag)
Optional [for lining, recommended to enhance durability]
Piece of cardboard, 2 inches x 7 inches
Piece of fabric measuring at least 10 inches x 21 inches (a "fat quarter" from a quilt shop is perfect)
Sewing machine
Sewing thread and needle
GAUGE
20 sts/32 rows = 4" in stockinette stitch with larger needles
DIRECTIONS

With larger needles and waste yarn, CO 96 sts.
P 1 row.
K 1 row.
P 1 row.
Change to MC, leaving a 36 inch tail for joining bottom of bag later (Hint: wrap it up into a butterfly to prevent it from bothering you as you work).
Beg with a RS row, work even in St st until piece measures 8.5 inches from beg of MC, ending with RS facing.
Work 10 rows even in garter st.
Next row: BO 11, k 5 and place on holder A, BO 17, k 5 and place on holder B, BO 20, k 5 and place on holder C, BO 17, k 5 and place on holder D, BO rem 11 sts.
Break yarn, leaving 15 inch tail for sewing.
Long Straps
With smaller needles and WS facing, rejoin yarn to 5 sts on holder A. Work even in garter st for 69 rows.
Next row (RS): K1, sl 1, k2tog, psso, k1 (3 sts).
Work even for 10 rows.
Next row: K1, m1, k1, m1, k1 (5 sts).
Work even for 6 rows.
Next row: K1, m1, k3, m1, k1 (7 sts).
Work even for 8 rows.
Next row: K1, k2tog, k1, k2tog, k1 (5 sts).
K 1 row.
Next row: K1, sl 1, k2tog, psso, k1 (3 sts).
K 1 row.
Next row: K1, sl1, k2tog, psso.
Break yarn and draw tail through rem sts.
Rep from beg with sts on holder C.
Short Straps
With smaller needles and WS facing, rejoin yarn to 5 sts on holder B. Work even in garter st for 5 rows.
Next row (RS): K1, sl 1, k2tog, psso, k1 (3 sts).
Work even for 10 rows.
Next row: K1, m1, k1, m1, k1 (5 sts).
Work even for 6 rows.
Next row: K1, m1, k3, m1, k1 (7 sts).
Work even for 8 rows.
Next row: K1, k2tog, k1, k2tog, k1 (5 sts).
K 1 row.
Next row: K1, sl 1, k2tog, psso, k1 (3 sts).
K 1 row.
Next row: K1, sl1, k2tog, psso.
Break yarn and draw tail through rem sts.
Rep from beg with sts on holder D.
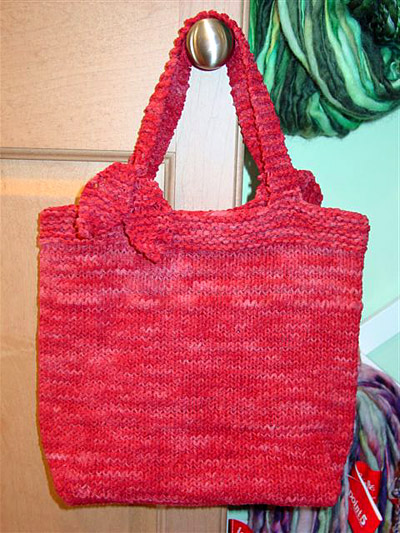
Tie long straps A and C to short straps B and D, respectively, as shown in photograph.
FINISHING
With RS facing, working from right to left, place 48 sts from first row of MC on one dpn by inserting needle through first (right) leg of each st. Rep for next 48 sts using a second dpn. Carefully remove waste yarn. Holding RSs tog, use a third dpn and the long tail of MC to work a 3-needle BO to join bag bottom.
Use tail from BO row to sew bag side seam.
Weave in ends.
Form gusset (see photos for assistance): Turn bag inside out and lay flat with side seam at left. With chalk, mark RH side edge of bag opposite side seam for 2 inches above bottom seam.
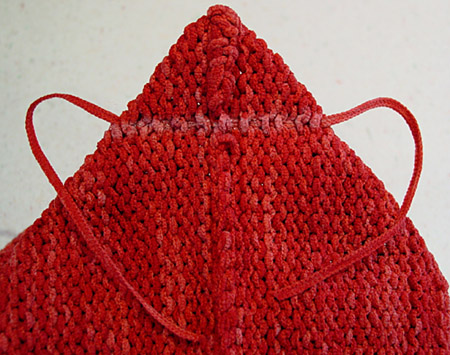
Fold bag so side seam and bottom seam are along the same line. Turn work so the resulting point where the side seam meets the bottom seam is away from you. At a point 1 inch down from the point, mark a line perpendicular to the seams; this line should be about 2.5 inches long. Sew through all layers along this marked line. Fold the point to the bottom seam edge and tack down the point to the bottom seam.
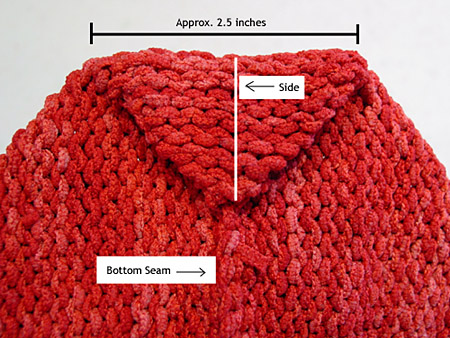
Repeat for the other side of the bag, beg by matching marked side edge to bottom seam. Turn bag right side out. If not lining bag, mark snap position on inside, centered between handles and 0.5 inch from top of bag. Sew snap securely, being careful so that stitching does not show on RS of bag.
Optional lining
Cut a piece of cardboard to 2 inches x 7 inches.
Trim corners.
If desired, cut a piece of fabric 4 inches x 10 inches and cover the cardboard as though you were wrapping a present.
Secure with glue or tape.
Cut another piece of fabric 10 inches x 19 inches.
Note: experienced sewers may wish to make a pocket and sew it to the lining at this point.
Fold the fabric in half with RS together so it measures 10 inches x 9.5 inches.
With sewing machine, sew side and bottom seams.
Create a 1-inch hem at top edge.
Create gusset as for bag.
Install magnetic snap (or sew regular snap) at top edge at the midpoint between the side edges. Turn lining WS out.
Place covered cardboard in bag with finished side down. Place lining in bag and using sewing thread and needle, sew it invisibly to bag approx. 0.5 inch from top of bag.