Knitted Lacy Shrug with Bell Sleeves
A knitted lacy shrug with bell sleeves is a stylish and versatile garment that adds a touch of elegance to any outfit. Made from delicate, openwork yarns, it features intricate lace patterns that create a lightweight, airy feel, perfect for layering in cooler months or to add detail to a simple dress.

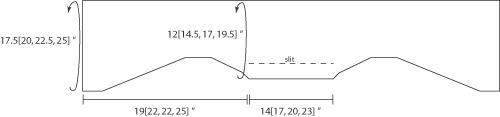
SIZE
S [M, L, XL] (shown in size S with M-length sleeves)
FINISHED MEASUREMENTS
- Back (underarm to underarm): 14[17, 20, 23] inches
- Sleeve length (underarm to base of hand): 19[22, 22, 25] inches
- Sleeve width (uppermost part of the arm): 12[14.5, 17, 19.5] inches
MATERIALS
- Karabella Frost [30% cashmere, 30% silk, 40% viscose; 122 yd/112 m per 50g skein]; Color: White; 4[5, 7, 9] skeins
- Note: This yarn is discontinued. Suggested substitutes: Tahki Cotton Classic II or Tahki Willow
- 16-inch US #7/4.5mm circular needle [or appropriate size to get stated gauge below]
- Optional for sizes S and M only:
- 12-inch US#7/4.5mm circular needle
- OR
- 1 set US#7/4.5mm double-point needles
- Tapestry needle
- Stitch markers
- Optional: crystal or bead to dangle from back
GAUGE
- 18 sts/24 rows = 4 inches in stockinette stitch
- 1 repeat of circular patt=2.5 inches wide by 3 inches long
PATTERN NOTES
LACE PATTERN
NOTE: When the Lace Pattern is worked back and forth (Flat Pattern), it has an odd number of rows. This means that one repeat will begin on a RS row, and the next will begin on a WS row. Every other repeat of the pattern will be reversed from the repeat before it. In order to duplicate this effect when working in the round, the circular version of this stitch pattern has twice as many rows in each repeat.
Circular Pattern (Worked over a multiple of 12 sts):
Row 1: [P2tog, yo] around.
Rows 2-4: P all sts.
Row 5: [P4, yo, p1, yo, p4, p3tog] around.
Row 6: [P3tog, p4, yo, p1, yo, p4] around.
Row 7: [K4, yo, k1, yo, k4, s1-k2tog-psso] around.
Row 8: [S1-k2tog-psso, k4, yo, k1, yo, k4] around.
Row 9: [K4, yo, k1, yo, k4, s1-k2tog-psso] around.
Row 10: [Yo, k2tog] around.
Rows 11-13: K all sts.
Row 14: [S1-k2tog-psso, k4, yo, k1, yo, k4] around.
Row 15: [K4, yo, k1, yo, k4, s1-k2tog-psso] around.
Row 16: [P3tog, p4, yo, p1, yo, p4] around.
Row 17: [P4, yo, p1, yo, p4, p3tog] around.
Row 18: [P3tog, p4, yo, p1, yo, p4] around.
Flat Pattern (Worked over a multiple of 12 sts):
Row 1: [Yo, k2tog] to end.
Row 2: P all sts.
Row 3: K all sts.
Row 4: P all sts.
Row 5: [S1-k2tog-psso, k4, yo, k1, yo, k4] to end.
Rows 6 & 7: [P3tog, p4, yo, p1, yo, p4] to end.
Row 8: [S1-k2tog-psso, k4, yo, k1, yo, k4] to end.
Row 9: [P3tog, p4, yo, p1, yo, p4] to end.
When making decreases in a Lace Pattern round that involves YOs, make the decrease by omitting the last (for right sleeve) or first (for left sleeve) YO in the round.
When making a decrease in a pattern round that does not involve YOs, work a k2tog or p2tog, depending on whether the row is a k row or a p row. Remove st markers as needed.
DIRECTIONS
*Using 16-inch circular needle, CO 84[96, 108, 120] sts. Place a marker every 12 sts, using a different color to mark the beginning of a round. Join to begin working in the round, being careful not to twist.
Right Side
Sleeve: Wrist to Elbow
Sizes M, L, XL Only: Beg with Row 1, work 9 rounds in Circular Pattern.
All Sizes Continue Here: Beg with row 10, work in Circular Pattern, decreasing 1 st in last repeat every round until 3 full repeats have been decreased. (See Pattern Notes re. making decreases in Lace Pattern). 36[45, 45, 45] rounds have been worked, 48[60, 72, 84] sts rem. (For sizes S and M, switch to shorter circular or Double-point needles as needed).
Work 9[9, 9, 27] more rows in Circular Pattern without further shaping. 2.5[3, 3, 4] full 18-row repeats have been worked.
Sleeve: Elbow to Shoulder
Round 1: Work Row 1 of Circular Pattern. Place a new marker on right needle, m1.
Rounds 2-49: Continue working in Circular Pattern, increasing 1 st between final set of markers every 6 rounds.
Rounds 50-52: Continue working in Circular Pattern, increasing 1 st between final set of markers each round. One full 12-st repeat of Circular Pattern has been added. 60[72, 84, 96] sts.
Round 53: Work next row of Circular Pattern. Place a new marker on right needle, m1.
Round 54: Continue working in Circular Pattern, increasing 1 st between final set of markers.
Rounds 55-59: Continue working in Circular Pattern, increasing 2 sts between final set of markers. One more full 12-st repeat of Circular Pattern has been added. 72[84, 96, 108] sts.*
Shoulder and Back
Round 60: P3tog, p4, yo, p1, yo, p4, m1, turn. Piece will now be worked back and forth (Flat Pattern).
Next Row [WS]: K1, work Row 6 of Flat Pattern to end of row, m1.
Keeping edge sts in garter st, work Rows 7-9 of Flat Pattern.
Keeping edge sts in garter st, work 9-row repeat of Flat Pattern 4[5, 6, 7] times. Work Rows 1 & 2 once more. Place all sts on holder.
Left Side
Sleeve:
Work from * to * as for right sleeve, EXCEPT work increase and decrease sections at beg of round instead of end of round.
Round 60: [P3tog, p4, yo, p1, yo, p4] 5[6, 7, 8] times, m1, turn. Piece will now be worked back and forth (Flat Pattern).
Next Row [WS]: K1, work Row 7 of Flat Pattern to end of row, m1.
Keeping edge sts in garter st, work Rows 8 & 9 of Flat Pattern.
Keeping edge sts in garter st, work 9-row repeat of Flat Pattern 4[5, 6, 7] times.
Work Rows 1 & 2 once more. Place all sts on holder.
FINISHING
Graft together the two sections using Kitchener stitch (see photo). Depending on how many pattern repeats you did in the back section, the mid-back may appear either knitted or purled. Weave in ends and block, taking care to stretch the back section well so that it does not pucker (note how the grafted area is stretched). When blocking, pin the edges of the slit closed so that it will lie flat.
Optional: hang a bead or crystal from the center of the bottom edge - not only is this a nice detail, but it helps identify which way the shrug is meant to be worn.
Wear, and knock everybody's socks off.
