Knitted Midsummer headband
Add a touch of charm to your summer look with the Knitted Midsummer headband! This delightful accessory is perfect for keeping your hair in place while adding a fun and stylish flair to your outfit. Whether you're strolling through a sunny park or enjoying a picnic with friends, this headband will not only keep you looking cute but also help you stay comfortable and cool. Embrace the whimsical spirit of summer with the Knitted Midsummer headband and make every day a fashionable celebration!

Finished size: 5.5cm (2.15″) wide and 42cm (16.5″) long without ties. Each tie is 28cm (11″) long.
Gauge: 3cm (1.2″) x 2.3cm (0.9″) – one lace repeat.
Supplies
To knit this headband you will need the following supplies:
Yarn: ~15g (0.5oz) fine weight yarn (category #2). I used Schachenmayr Catania in the color “Rose gold” (00433).
If you don’t have the mentioned yarn at hand, here are similar yarn options:
- Scheepjes Catona
- Cascade Ultra Pima Fine
- MillaMia Naturally Soft Cotton
Needles: two 3mm (US 2.5) double-pointed needles or circular needles.
Notions:
- Tapestry needle
- Scissors
Abbreviations
- CO – cast on
- St (s) – stitch (es)
- K – knit
- P – purl
- K2tog – knit 2 stitches together
- Ssk – slip 2 stitches knitwise, put them back on the left needle, knit through back loops together
- Kfb – knit into the front and back of a stitch
- Yo – yarn over
- Rs – right side
- Ws – wrong side
- * * – repeat from * to * until the end of the row or the stated amount of times
MIDSUMMER HEADBAND KNITTING PATTERN
Cast on
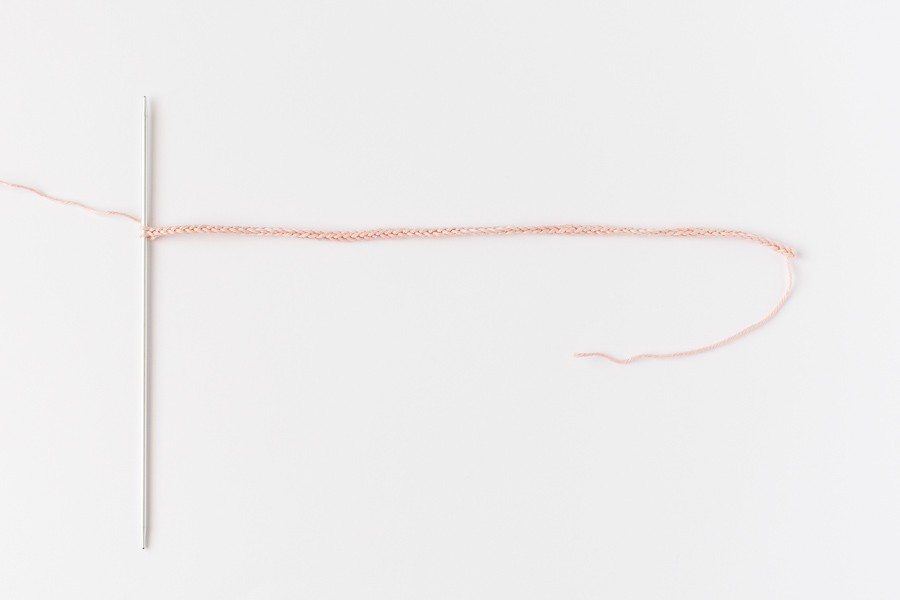
CO on 2 sts using the Long-tail cast-on method or the one you prefer.
First i-cord tie
Work the i-cord:
Knit 2 (DO NOT TURN!). With the RS still facing you, slide the stitches to the right end of the needle, and knit them (since you didn’t turn the needle the working yarn will be coming from the last st on the needle, not the first as usual).
Continue knitting 2 stitches without turning your work until the tie measures ~28 cm (11″) or your desired length.
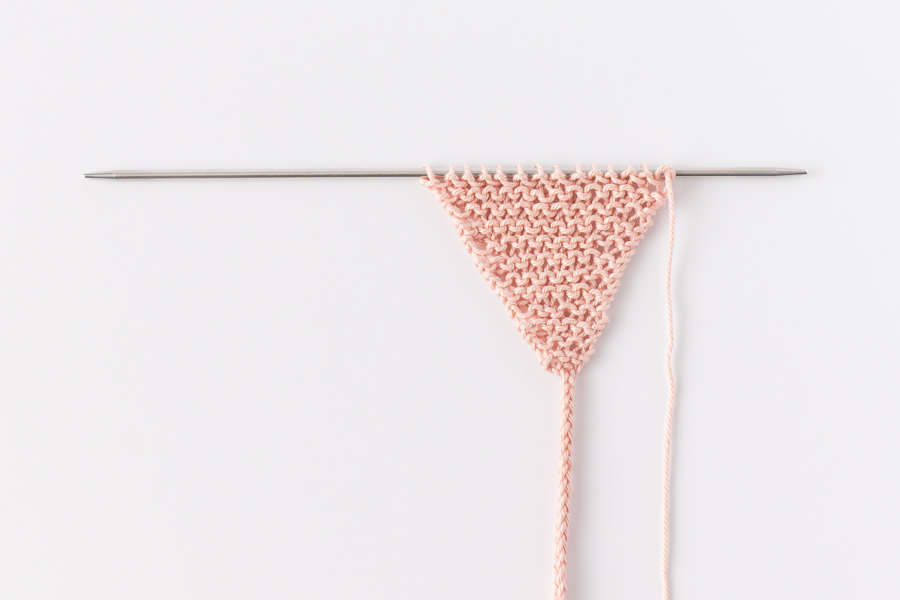
Garter stitch section (increases)
After you have knit the tie, TURN the work and continue knitting in rows gradually increasing the number of sts:
Row 1: Kfb, Kfb (4 sts)
Row 2-4: K all
Row 5: K1, Kfb2, K1 (6sts)
Row 6-8: K all
Row 9: K1, Kfb, K2, Kfb, K1 (8sts)
Row 10-12: K all
Row 13: K1, Kfb, K4, Kfb, K1 (10sts)
Row 14-16: K all
Row 17: K1, Kfb, K6, Kfb, K1 (12sts)
Row 18-20: K all
Row 21: K1, Kfb, K8, Kfb, K1 (14sts)
Row 22-24: K all
Body of the headband
Row 1: K2, P2, K3, K2tog, K1, Yo, P2, K2
Row 2: K4, P6, K4
Row 3: K2, P2, K2, K2tog, K1, Yo, K1, P2, K2
Row 4: K4, P6, K4
Row 5: K2, P2, K1, K2tog, K1, Yo, K2, P2, K2
Row 6: K4, P6, K4
Row 7: K2, P2, K2tog, K1, Yo, K3, P2, K2
Row 8: K4, P6, K4
Repeat rows 1-8 12 more times (a total of 13 repeats).
End the last pattern repeat with row 6 (RS).
Garter stitch section (decreases)
Row 1 (WS): K all
Row 2: K all
Row 3: K all
Row 4: K1, Ssk, K8, K2tog, K1 (12sts)
Row 5-7: K all
Row 8: K1, Ssk, K6, K2tog, K1 (10 sts)
Row 9-11: K all
Row 12: K1, Ssk, K4, K2tog, K1 (8 sts)
Row 13-15: K all
Row 16: K1, Ssk, K2, K2tog, K1 (6 sts)
Row 17-19: K all
Row 20: K1, Ssk, K2tog, K1 (4 sts)
Row 21-23: K all
Row 24: Ssk, K2tog (2 sts)
Second i-cord tie
Work the second i-cord tie just as you knit the first one. Knit until it measures ~28 cm (11″) or your desired length.
Bind off
Bind off sts knitwise:
K2, bring the first st over the second one. Cut the yarn leaving a 10cm / 5″ tail. Draw the yarn tail through the last stitch and pull it snug.
Finishing
Weave in all loose ends.
Wet block the finished item. This will transform the stitches, making them look smoother and neater.
Simply soak the knitted item in lukewarm water with some soak wash for 10-15 minutes. Lift it from the water and gently squeeze the excess water out. Next, lay it on a clean towel, and roll it up to remove moisture.
Pin the item to a blocking board or lay it on a clean and dry towel (make sure it doesn’t transfer color) and let it dry. Your knitting will look much better after this.