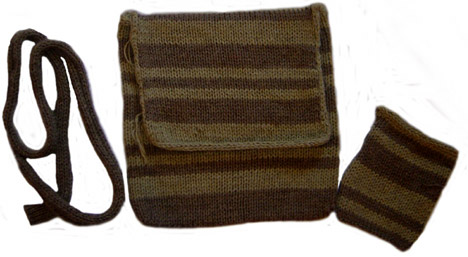
Knitted Messenger Bag
The knitted messenger bag is not just a fashion statement, but a versatile and practical accessory that adds a touch of charm to any outfit. With its cozy texture and trendy look, this bag is perfect for carrying your essentials while on the go. Whether you're heading to a coffee shop to meet a friend or running errands around town, this bag is sure to keep you organized and stylish. The best part? Its handmade design gives it a unique touch, making it a conversation starter wherever you go. So, grab your knitted messenger bag, sling it over your shoulder, and step out with confidence and flair!

FINISHED MEASUREMENTS
[laid flat]
Before felting
- Height: 17 inches
- Width: 16 inches
- Strap Length: 65 inches
After felting:
- Height: 12 inches
- Width: 13.5 inches
- Strap Length: 52 inches
MATERIALS
- Cascade 220 [100% Peruvian Wool; 220 yd/198m per 100g skein]
- [MC] Color: #4011; 3 skeins
- [CC] Color: #9460; 2 skeins
- 1 set US 13/9mm double-point needles
- 1 24-inch US 13/9mm circular needle
- Tapestry needle
- Stitch marker
- Stitch holder
GAUGE
Approx. 10 sts/14 rows = 4 inches in stockinette stitch with double strand of yarn
(exact gauge is not important)
PATTERN NOTES
I-Cord BO
With RS of work facing and using cable or twisted loop method, CO 3 sts. (Cast these new sts on in addition to sts already on needle.)
Next Row: Using a double-pointed needle, k2, ssk. (Last I-Cord st has been worked together with first picked-up st on needle.) Slide 3 sts just worked to other end of a double-pointed needle and bring yarn around back of work, ready to begin working the next row.
Repeat this row for each st to be bound off, working next st from circular needle tog with last st on double-pointed needle for each ssk.
DIRECTIONS
Note: Knit with two strands of yarn held together throughout.
Using circular needle and MC, loosely CO 38 sts.
Beg with a RS row, work 7 rows in stockinette st.
At end of last row, do not turn work but pick up and k 6 sts down adjacent edge of work, pick up and k 38 sts along CO edge, pick up and k 6 sts along rem edge of work. 88 sts on needle. Place marker and beg working in stockinette st in the round, working stripe patt as follows:
7 rows MC
7 rows CC
3 rows MC
3 rows CC
3 rows MC
7 rows CC
7 rows MC
3 rows CC
3 rows MC
3 rows CC
7 rows MC
7 rows CC
Next Round: Using CC, k38 sts with CC, BO rem sts using I-Cord BO. At end of round, place I-Cord sts on st holder.
Flap
Working back and forth in stockinette st on 38 rem sts, work stripe patt as follows:
2 rows MC
7 rows CC
7 rows MC
3 rows CC
3 rows MC
3 rows CC
7 rows MC
7 rows CC
Break yarn at end of last row. Place all sts on hold on double-pointed needles.
With WS facing, using CC and circular needle, beg at corner where flap attaches to bag (lower right corner when WS facing), pick up and p 30 sts along edge of flap (pick up 3 sts for every 4 rows), p held sts from double-pointed needles, pick up and p 30 sts down rem edge of flap, ending next to held sts from I-Cord BO. 98 sts on needle.
With RS facing, rejoin CC to held I-Cord sts and BO all sts around flap using I-Cord BO. When all sts have been bound off, sew end of I-Cord to CO end of I-Cord.
Strap
Using MC, CO 10 sts.
Work in stockinette st until work measures 65 inches.
BO all sts.
Pocket
Using MC, CO 24 sts.
Work in stockinette st, working stripe patt as follows
2 rows MC
3 rows CC
3 rows MC
7 rows CC
7 rows MC
Using CC, BO using I-Cord BO. BO I-Cord sts.
(You can make as many pockets as you have yarn for! Choose the spot on the bag where you'd like your pocket to go, count the stripes and knit accordingly.)
FINISHING
Secure the ends or weave them in. I just tied little knots to secure the yarn at the color changes, you can easily cut all these pieces off once the bag is felted and it won't unravel. Place satchel, strap and pocket in a tied (a rubber band works well) pillow case and put into a washing machine full of hot, soapy water. Agitate in the wash cycle until bag is felted to desired size and density. Watch carefully! The shrinking might be sudden -- check every couple of minutes to be safe.
Once your bag is felted, take it out and rinse it if necessary. Be sure to use hot water, the shock of cold water will cause it to shrink more. Roll it in a towel and squeeze out the excess water. Shape it by pulling and tugging, cut off all the yarn tails.
Rinse the pocket and strap. Let the pocket dry flat. You might want to run the strap through another wash cycle; the more felted it is, the less it will stretch. To ensure that my strap didn't curl, I rolled it tightly into a coil. Roll with the WS facing out. Fasten the coil with a rubber band and leave it to dry.
Stuff your bag to ensure that it will have the shape you desire when it dries. A box, towels or almost any rectangular thing of the appropriate size will work. I used a large phone book (tied in a plastic bag) to shape my bag. Place your bag on towels to dry, change the towels when they get too wet. Allow the bag a day or two to dry completely.
After your bag is dry, you are ready to sew on the pocket(s) and strap. All of the sewing can be done with matching or contrasting yarn, depending on the look you want. Take some sharp scissors and trim the edges of the pocket (but not the I-Cord edge) to make them nice and straight. Cut the strap to about 4 inches longer than the desired length. Place the ends of the strap about 2 inches below the top of the bag, right where the back becomes the flap -- this will keep the bag from tipping forward. Sew it on very securely with small, tight stitches, forming a 2-inch square. (See illustrations/photos.)
Position pockets as desired and sew then on using small, tight stitches, near the edges of the pocket.
Head out for adventure.

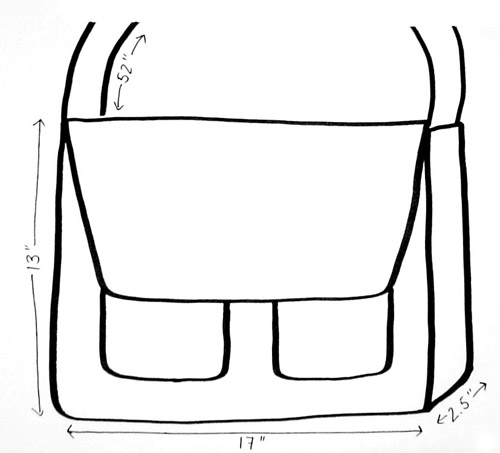
Larger Version:
Fits a larger laptop computer; sized for use as school bag or carry-on luggage
FINISHED MEASUREMENTS
[laid flat]
Before felting
- Height: 19 inches
- Width: 22 inches
Strap Length: 65 inches
After felting:
- Height: 13 inches
- Width: 17 inches
- Strap Length: 52 inches
- Gusset Depth: 2.5 inches
MATERIALS
- Cascade 220 [100% Peruvian Wool; 220 yd/198m per 100g skein]
- [MC] Color: #9402; 6 skeins
- [CC] Color: #8400; 2 skeins
- 1 set US 13/9mm double-point needles
- 1 24-inch US 13/9mm circular needle
- Tapestry needle
- Stitch marker
- Stitch holder
GAUGE
Approx. 10 sts/14 rows = 4 inches in stockinette stitch with double strand of yarn
(exact gauge is not important)
DIRECTIONS
Using circular needle and MC, loosely CO 52 sts.
Beg with a RS row, work 13 rows in stockinette st.
At end of last row, do not turn work but pick up and k 12 sts down adjacent edge of work, pick up and k 52 sts along CO edge, pick up and k 12 sts along rem edge of work. 128 sts on needle. Place marker and beg working in stockinette st in the round.Cont until work measures 18 inches from edge of base.
Next Round: Using MC k52, using CC BO rem sts using I-Cord BO. At end of round, place I-Cord sts on st holder.
Flap
Using MC, Work back and forth in stockinette st on 52 rem sts for 52 rows.
Break yarn at end of last row. Place all sts on hold on double-pointed needles.
With WS facing, using CC and circular needle, beg at corner where flap attaches to bag (lower right corner when WS facing), pick up and p 39 sts along edge of flap (pick up 3 sts for every 4 rows), p held sts from double-pointed needles, pick up and p 39 sts down rem edge of flap, ending next to held sts from I-Cord BO. 130 sts on needle.
With RS facing, rejoin CC to held I-Cord sts and BO all sts around flap using I-Cord BO. When all sts have been bound off, sew end of I-Cord to CO end of I-Cord.
Strap
Using MC, CO 12 sts.
Work in stockinette st until work measures 65 inches.
BO all sts.
Pockets (Make 2):
Using MC, CO 22 sts.
Work 30 rows in stockinette st.
Using CC, BO using I-Cord BO. BO I-Cord sts.
FINISHING
See directions for smaller bag.