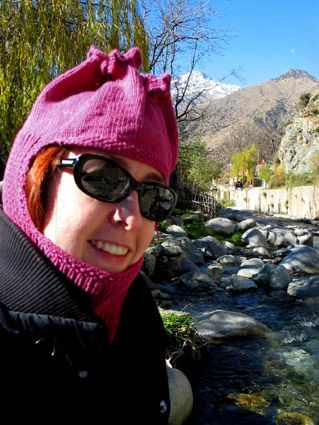
Knitted Adorable Balaclava
Knitted adorable Balaclavas are the perfect combination of cozy and cute! With their soft knitted fabric keeping you warm and toasty, and their adorable designs adding a touch of charm to your outfits, these Balaclavas are a must-have accessory. Whether you're hitting the slopes or just braving a chilly day, these delightful Balaclavas will not only keep you snug but also make you stand out in style. Embrace the colder weather with a smile and a sprinkle of charm with a knitted adorable Balaclava!
SIZE
Tighter with smaller face opening [Looser with larger face opening]
(Looser model shown)
FINISHED MEASUREMENTS
Length: 14.75 inches
Circumference (measured over stockinette stitch section): 22[23] inches
MATERIALS
Rowan Calmer [75% cotton/25% acrylic/microfibre; 178 yd/160m per 50gm skein]; color #477 Blush; 2 balls
1 set US size 7/4.5mm double-point needles
16 inch or 24 inch US size 7/4.5mm circular needle
Stitch markers
Tapestry needle
GAUGE
22 sts/30 rows = 4" in stockinette stitch
stitch patterns
1x1 Rib (Worked in the round OR back and forth over an even number of sts)
Row 1: [K1, p1] to end.
This row forms 1x1 rib.
Seed Stitch
Seed stitch is also worked by alternating k1 and p1, with this difference: if the next st on your needle was a p st on the previous row, knit it on this row. If the next st on your needle was a k st, purl it on this row. Knit and purl sts are alternated both horizontally and vertically.
I-cord
CO required number of sts onto a dpn. K all sts.
Next Row: Instead of turning the work around to work back on the WS, slide all sts to the other end of the needle, switch the needle back to your left hand, bring the yarn around the back of the work, and start knitting the sts again. After the first 2 sts, give the yarn a sharp tug.
Repeat this row to form I-cord.
After a few rows, the work will begin to form a tube.
DIRECTIONS
Using circular needle and cable CO, CO 120 [128] sts. Join to begin working in the round, being careful not to twist. Place marker to indicate beginning of round.
Work in 1x1 rib for 47 rows.
Next Round: Rib 47[44], place marker, work 26[40] sts in Seed Stitch, place marker, rib to end of round.
Work 2 more rounds in patts as set.
Form Face Opening
Next Round: Work 50[47] sts in patts as set, BO 20[34] sts, work across all sts rem on needle. 100[94] sts rem.
Work back and forth for 25 rows, maintaining 3 st Seed Stitch border, ending with a WS row.
Turn work so RS is facing and, using cable CO, CO 20[34] sts at beg of next row. 120[128] sts.
Work across all sts (working sts just CO in Seed Stitch), then join to resume working in the round.
Work 6 more rounds in patts as set.
Switch to stockinette st (k every round), and work 30 rounds more.
Eyelet Round: K4[5], yo, k2tog, [k10(11), yo, k2tog] to last 6[4] sts, k6[4].
Work 6 more rounds in stockinette stitch.
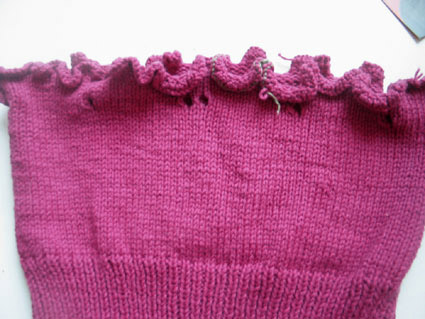
Frilled Edging
Next Round: K into front and back of each st (1 st increased in ea st). 240[256] sts.
Repeat this round once more. 480[512] sts.
BO all sts.
FINISHING
Sew in ends.
There will probably be a small gap at one corner of the top of the face opening; cut a small piece of yarn and use it to sew this gap closed.
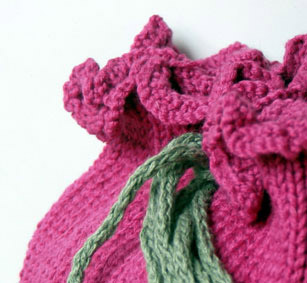
I-Cord
Cut a 3 meter (10 foot) length of yarn. SPLIT the yarn in half lengthwise (this is quite easy as you may have accidentally found!) -- using the resulting thinner yarn will give you a less bulky cord.
Using dpns, work a 3 st I-cord until only 3 or 4 inch tail of yarn remains. Thread yarn through sts and pull tight. Sew in ends.
Tip: Try working the cord in a contrasting color. The cord in the photographed model was worked in color #480 Peacock.
Starting at front, weave i-cord through eyelets. Put on head, venture into the cold!