Knitted Rectangular Garter Stitch Doily
If you're looking to add a touch of charm to your home decor, consider a Knitted Rectangular Garter Stitch Doily! This cozy and handmade piece can instantly elevate your table setting or any surface it adorns. The garter stitch design gives it a classic and timeless appeal, making it a delightful addition to your living space. The intricate details and soft texture of the knitted doily will surely bring warmth and coziness to any room. So why not treat yourself to this lovely creation and add a pop of handmade goodness to your home!
Materials
- yarn (for the grey piece I used about 60 grams of DK weight cotton yarn)
- appropriate knitting needles
- scrap yarn and a crochet hook for the provisional cast on
- tapestry needle for grafting and to weave in ends
Techniques
- Provisional CO
- Short rows with wrap and turn (w+t)
- Picking up and knit stitches from the side: Insert the needle into the front leg of the edge stitch from back to front and draw your working yarn through. In case of this pattern you only need to pick up one stitch at a time.
- Grafting in Garter Stitch: A technique to get an invisible (knitted) seam
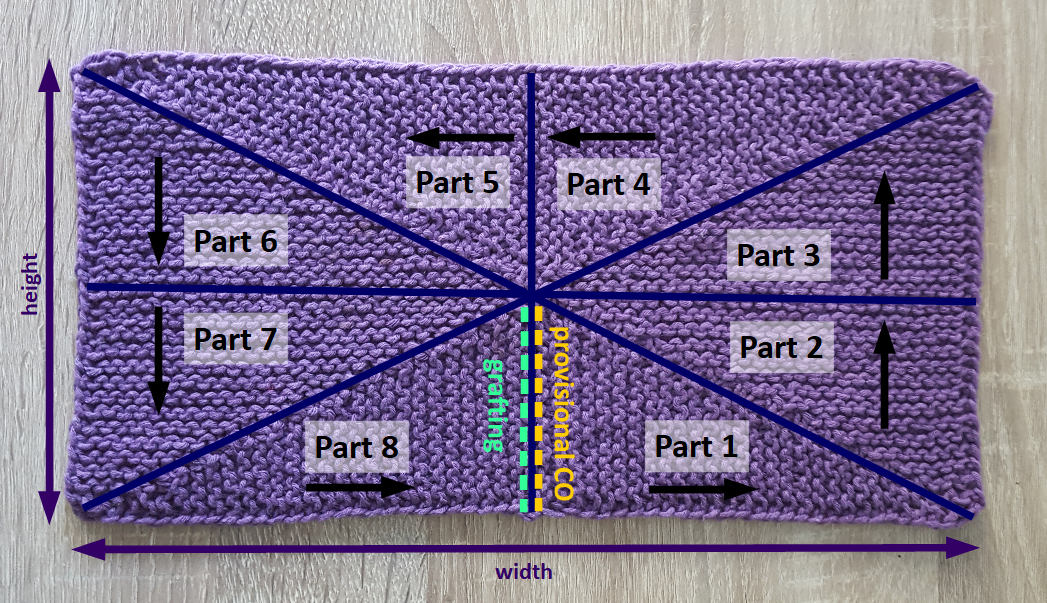
Construction
When knitting this piece you start with a provisional CO. During the first part, the rows are getting shorter (one stitch every two ridges). In part 2, the ridges are getting longer again (two stitches for every ridge). Parts 3 and 4 are parts 2 and 1 backwards. You have then knitted a square and turned your knitting by 180°.
Parts 5 to 8, are a repeat of parts 1 to 4.
After knitting around four corners and the two sides (CO and last row) are grafted in garter stitch.
The pattern is written in a way, that you can adapt it to the size you want. To calculate the final size, multiply the width of the sts you cast on by 2 for the height and by 4 for the width.
Instructions
Provisionally CO the calculated number of sts with scrap yarn and knit the first row with your working yarn. I did 22 sts for the grey piece and 18 sts for the purple one.
Part 1
Ridge 1: sl1, k up to last st, w+t, k to end
Ridge 2: sl1, k up to last wrap, turn (without wrapping), sl1, k to end
Ridge 3: sl1, k to 1 sts before last wrap, w+t, k to end
Repeat ridge 2 and 3 until your last row was only 1 st long.
Part 2
Ridge 1: sl1, w+t, k to end
Ridge 2: sl1, k1, pick up 1 st (from a slipped stitch), w+t, k to end
Ridge 3: sl1, k up to last wrapped stitch, k1, pick up 1 st, w+t, k to end
Repeat ridge 3 until all stitch on your needle are used.
You should by then have knitted as many ridges in part 2 as the number of stitches that you cast on in the beginning of part 1 - and your stitch count should be twice the number of your CO.
Part 3
Ridge 1: sl1, k to end, turn, sl1, k to end
Ridge 2: sl1, k up to last st, w+t, k to end
Ridge 3: sl1, k to 2 bef last wrap, w+t, k to end
Repeat ridge 3 until the last row is only 1 or 2 sts long
Part 4
Ridge 1: sl1, w+t, k1
Ridge 2: sl1, k2tog, turn, sl1, k to end
Ridge 3: sl1, k up to and including k2tog of last ridge, w+t, k to end
Ridge 4: sl1, k up to last wrap, k2tog, turn, k to end
Repeat ridges 3 and 4 until all sts on your needle are used.
In between Ridge: sl1, k to end, turn, sl1 k to end
Part 5
= Part 1
Part 6
= Part 2
Part 7
= Part 3
Part 8
= Part 4
Finishing:
Put the stitches from the provisional CO on the second needle - cut your yarn, but leave a tail long enough for grafting.
Graft in garter stitch.
If there is a small hole in the middle of the piece, use the end to sew it closed.
Weave in ends