Knitted Fingerless Mittens
Oh, how cozy and stylish knitted fingerless mittens can be! These versatile and practical accessories are perfect for keeping your hands warm while still allowing your fingers freedom to text, type, or simply show off your manicure. Whether you're heading out for a brisk autumn walk or just want to add a touch of warmth to your winter outfits, knitted fingerless mittens are a must-have accessory. Plus, they come in all sorts of colors and patterns, so you can easily find a pair that suits your style. Embrace the chilly weather with a pair of these adorable mittens and enjoy both fashion and function!
You will need:
- two colours of dk yarn
- 3.75mm knitting needles
- tapestry needle
- scissors
Pattern:
This fingerless mitten is made from a square of double-knitting. If you dislike double knitting you can always make up a design with stranded knitting (each to their own you strange, strange, person you).
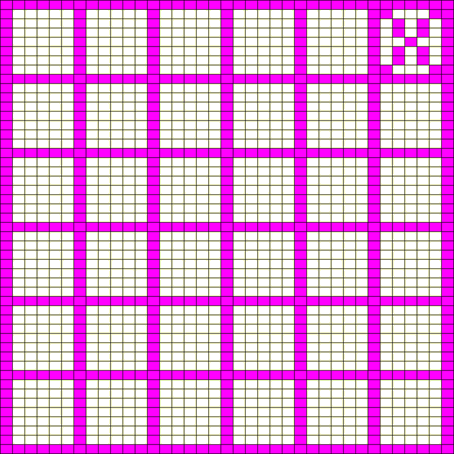
Here is the grid we will be working from. Each cell represents a single stitch. It is 37 sts wide x 49 sts high.

Design a pattern by shading in whole cells with one colour and leaving the rest blank. You can either save the image to your computer and fill squares digitally (no fancy software needed, programmes like paint work just fine).
Before you begin check the needle size by knitting a tension patch.
Wrap a tape measure around your palm and write down the circumference.
Divide this measurement by 3.7 and note down the result.
Begin a 10st tension patch. If its width does not match the result you wrote down go up or down a needle size and try again until it does.
Don't worry about the height of the tension patch. It's the width that needs to be correct to fit your hand.
Using the double-knitting technique, work through the grid once on the needle size you have chosen.
That's it. That's the pattern. I've done some design notes at the bottom of the page but if you want to get stuck right in go ahead.
Making Up:
Fold the knitted square in half. Sew up the open edge of the mitten leaving enough space for a thumb-hole.
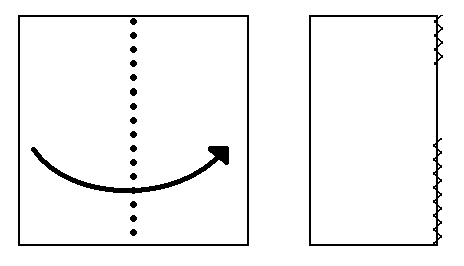
As a rule of thumb (haha) I sew up from the bottom edge to the halfway point, then down from the top for less than a quarter of the height of the mitten.
Design Notes:
Here's my test mitten design:
I'll grant you it's not very pretty but it's meant to serve a function rather than look good.
I've only used two colours because that's what's easiest in double-knitting. If you use more than two colours you have to use regular colour change techniques which I'm not even going to talk about, other than to say:
horizontal stripes = easy
vertical stripes = less easy
patterned changes within grids = uurrrrggh challenging
Here's the test mitten knitted up:
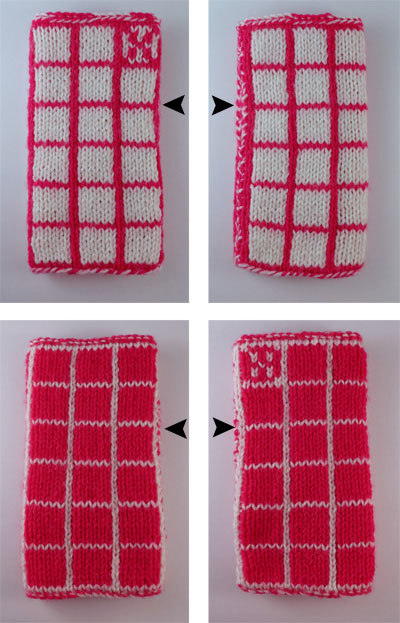
The top two photos show the front and back of the mitten. The bottom two photos show front and back of the inside out mitten (after all, double knitting is reversible). The black arrows indicate where the thumb-holes are.
Note that the X is only visible on the top left and bottom right mittens. If I knit a pair of mittens from the same design grid one will have to be worn with reverse colours or they won't appear symmetrical. The other option is to flip the design grid, but you have to remember to do that before you start knitting the second mitten.
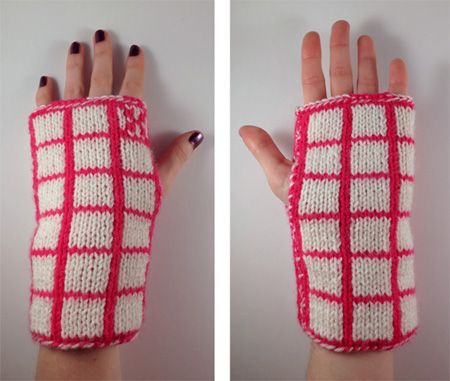
Here's the test mitten being worn:
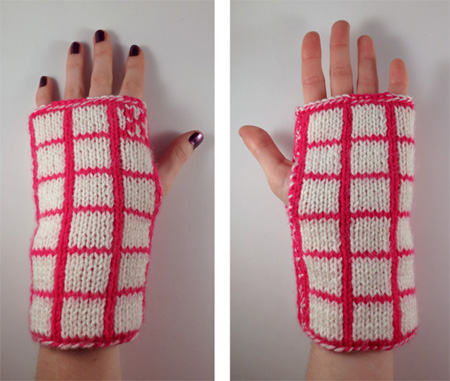
On the back of the hand you can see three complete white squares from thumb to little finger. Contrast that with the palm of the hand where you can only see two and a half of the white squares. The palm of the hand is flatter than the back. If you want a design feature to nestle in the palm of your hand it would need to be further towards the edge of the grid than is obvious at first glance.