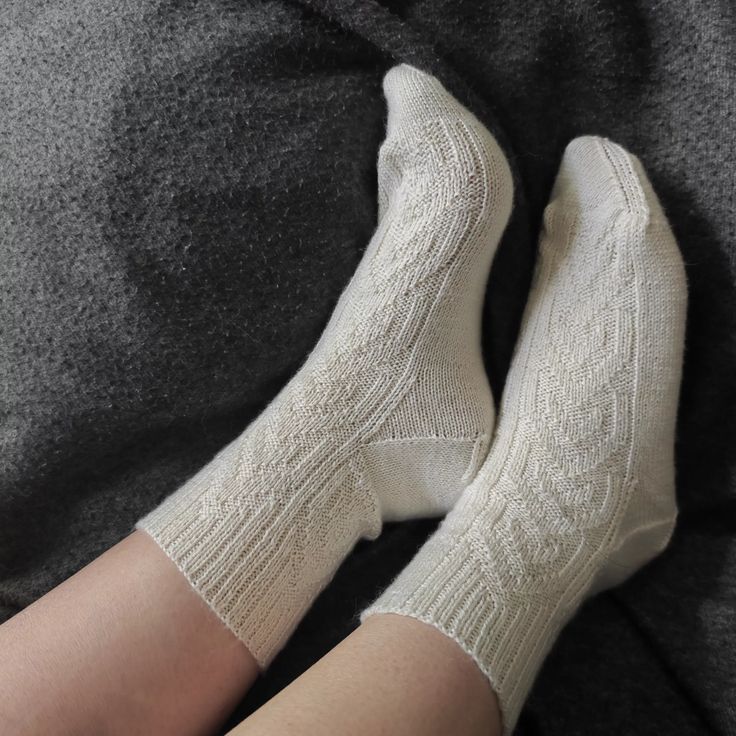
Knitted Treetop Socks
Imagine cozying up to the whimsical charm of knitted treetop socks - a delightful fusion of nature and comfort! These enchanting accessories are designed to bring warmth and a touch of magic to your feet, as if Mother Nature herself had a hand in their creation. With their earthy colors and intricate patterns, these socks are not just an accessory, but a statement piece that adds a dash of charm to any outfit. So, slip on a pair of knitted treetop socks and feel the natural warmth and coziness hug your feet with each step.
Material: Approx. 334 m/365 yards of baby alpaca, fingering weight. For substitution, I recommend choosing a flexible material like merino sock yarn.
Needles: 2 mm/US0 double-pointed needles or equivalent to achieve the correct gauge.
Gauge 10X10 cm or 4X4in: 40 stitches X 40 rows in pattern (see below)
Finished Sizes: EU38/40 or US6.5/8 or UK5/6.5 – 23 cm/9in foot length and 20cm/7.9in leg height.
The Instructions
Cast on 84 stitches with 2mm/US0 double-pointed needles.
Place a marker at the beginning of the round.
Purl one round.
Knit 10 rounds in 2/1 ribbing (2 knit and 1 purl) beginning and ending with one knit stitch
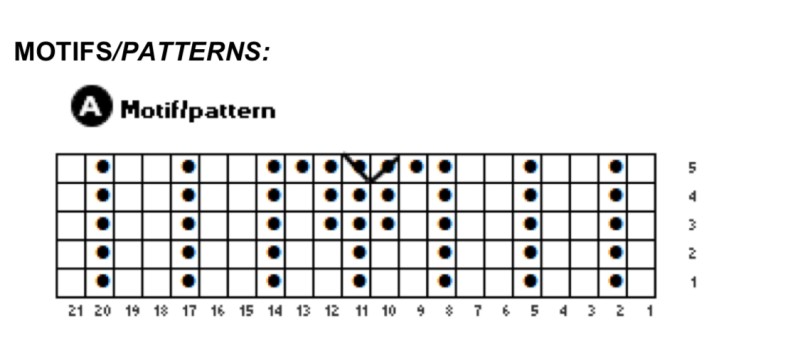
Knit pattern A, 4 times in width. Be careful : on the 5th round, decrease one stitch per pattern, ending up with 20 stitches per pattern, 80 stitches in total.
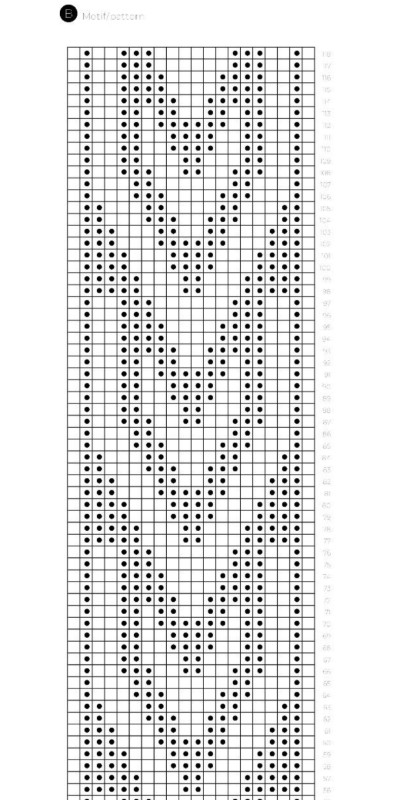
Then switch to pattern B, also repeated 4 times in width.
On the 49th round, about 9cm/3.5in, place a second marker of a different color to divide the work into two equal parts of 40 stitches.
Place the last 40 stitches (top of the foot) on a needle, stitch holder, or thread.
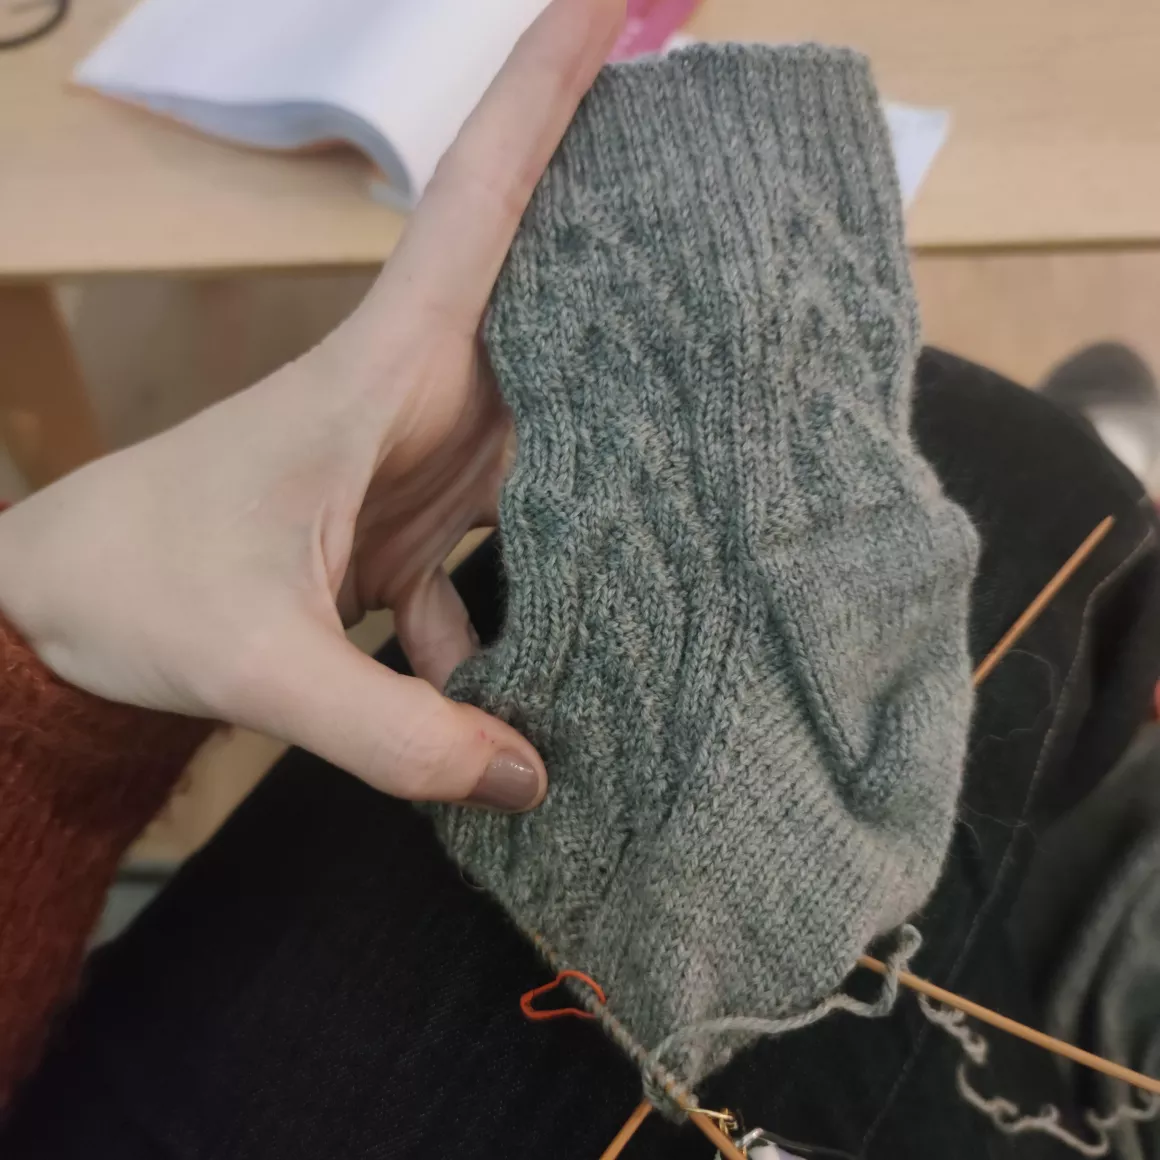
Continue by knitting only the first 40 stitches (heel) in stockinette stitch back and forth.
Stop when the heel band measures 5cm or 2.4in or 28 rows.
Place a marker between the two stitches at the center of the heel, after 20 stitches.
Work short rows as follows:
Knit until 10 stitches before the end of the row, slip one stitch as if to knit, knit the next stitch, then pass the unknit stitch over the second one. Turn.
Knit until 10 stitches before the end of the row, slip one stitch as if to purl, knit the next stitch, then pass the unknit stitch over the second one. Turn.
Knit until 9 stitches before the end of the row, slip one stitch as if to knit, knit the next stitch, then pass the unknit stitch over the second one. Turn.
Knit until 9 stitches before the end of the row, slip one stitch as if to purl, knit the next stitch, then pass the unknit stitch over the second one. Turn.
Knit until 8 stitches before the end of the row, slip one stitch as if to knit, knit the next stitch, then pass the unknit stitch over the second one. Turn.
Knit until 8 stitches before the end of the row, slip one stitch as if to purl, knit the next stitch, then pass the unknit stitch over the second one. Turn.
Continue like this until there are no more stitches remaining on the left needle on each side.
22 stitches remain.
Continue the heel on the right side by knitting all 22 heel stitches in stockinette, pick up 19 stitches on the side of the foot (about 2 stitches out of 3, depending on the number of heel rows), knit the top-of-foot stitches according to the pattern where you left off, and pick up 19 stitches on the side of the foot. You now have 100 stitches spread across the 4 needles.
Move the round-start marker to the center of the heel. The other three markers stay in place.
Knit one more round following pattern B for the top and stockinette for the rest.
Continue knitting like this, and at the same time, start the heel decreases:
Knit all but the top in stockinette. Decrease 1 stitch before the first side marker on the foot by knitting two stitches together. Knit the top in the pattern. Decrease 1 stitch after the second side marker on the foot by knitting two stitches together through the back loop (twisted).
Repeat decreases for 4 consecutive rounds. 92 stitches remain: 40 for the top, 15 for the sides, 22 for the bottom.
Knit one round without decreases, then repeat decreases every 2 rounds, a total of 6 times = 80 stitches.
After finishing the decreases on the sides of the heel, knit 44 rounds, or 17cm/6.7in, in stockinette for the bottom and pattern for the top.
Once the desired size is reached, knit all the stitches for one round.
Next round, begin the toe decreases:
[4 stitches before the first marker: knit 3 stitches together and 1 stitch in stockinette, then just after the first marker: knit 1 stitch in stockinette, slip 1 stitch, knit 2 stitches together and pass the unknit stitch over. Then work one round in plain stockinette.] This part is to be worked from the second marker for the other sock.
Repeat [to] 7 times in total, one round every 2 rounds. 52 stitches remain: 26 for the top and the same for the bottom.
Move the round-start marker to the middle of the bottom.
Now decrease one stitch before and after each marker.
[Three stitches before the first marker: knit 2 stitches together and 1 stitch in stockinette. After the first marker: knit 1 stitch in stockinette and slip 1 stitch, knit 1 stitch, and pass the unknit stitch over the next one. Three stitches before the second marker: knit 2 stitches together and 1 stitch in stockinette. After the second marker: knit 1 stitch in stockinette and slip 1 stitch, knit 1 stitch, and pass the unknit stitch over the next one.]
Repeat [to] 9 times in total. 16 stitches remain.
Knit the remaining stitches together 2 by 2 to make 8 stitches.
Cut the yarn, leaving about 15cm/6in, and thread it through the remaining stitches.
Tighten well and weave in the ends.
Make the second sock in the same way.
Finally, block the socks.
ATTENTION, these are anatomical socks that adapt to the shape of the foot. To make the second sock, the first toe decreases should be made starting from the second marker for the other foot. And there you have it – a fantastic pair of cute, comfortable socks perfectly adapted to the shape of your feet!