
Knitted Honeycomb Shawl
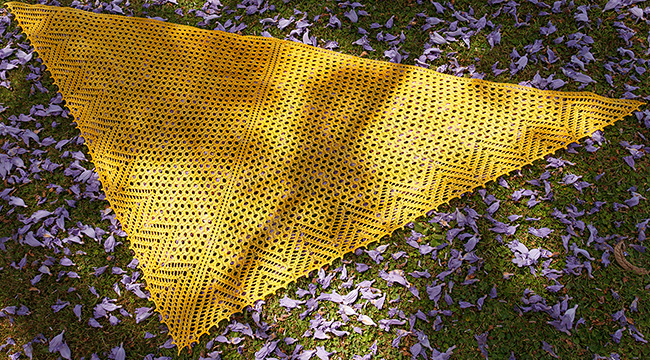
The Knitted Honeycomb Shawl is a cozy and stylish accessory that brings warmth and a touch of elegance to any outfit. With its intricate honeycomb stitch pattern and soft texture, this shawl is perfect for chilly evenings or adding a pop of color to your everyday look. Whether you're heading out for a gathering or simply curling up at home, the Knitted Honeycomb Shawl is sure to become your favorite go-to piece. Wrap yourself up in comfort and style with this versatile and charming shawl!
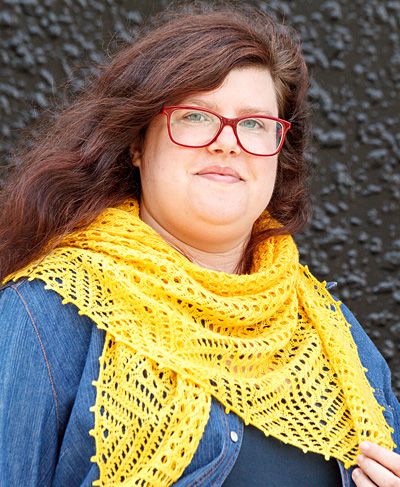
SIZE
One
FINISHED MEASUREMENTS
- Wingspan: 63 inches
- Depth: 29 inches
MATERIALS
Yarn
- Malabrigo Lace [100% Baby Merino wool; 470 yd per 50g skein]; color: Sauterne; 2 skeins
Recommended needle size
- [always use a needle size that gives you the gauge listed below — every knitter's gauge is unique]
- 32-inch US #3/3.25mm circular needle
Notions
- 8 stitch markers
- T-pins for blocking
- blocking wires (recommended)
- yarn needle
GAUGE
- 30 sts/39 rows = 4 inches in stockinette stitch after blocking
- 20 sts/34 rows = 4 inches in Body pattern stitch after blocking
PATTERN NOTES
Needles
Needles with sharper tips make the edging easier to work (I used Addi Lace).
Stitch markers
8 stitch markers are needed. 4 are placed in Setup Row 1, and the remaining 4 are placed in Transition Row 14.
Body Pattern
Row 1 [RS]: Yo, k1, (k2tog, yo twice, ssk) to 1 st before marker, k1, yo.
Row 2 [WS]: P4, (k1, p3) to marker.
Row 3 [RS]: Yo, knit to marker, yo.
Row 4 [WS]: Purl.
Transition Pattern
Row 1 [RS]: Yo, k1, (k2tog, yo twice, ssk) to 1 st before marker, k1, yo.
Row 2 [WS]: P4, (k1, p3) to marker.
Row 3 [RS]: Yo, k1, (k2tog, yo, k2, yo, ssk, k14) to 7 sts before marker, k2tog, yo, k2, yo, ssk, k1, yo.
Row 4 [WS]: Purl.
Row 5 [RS]: Repeat Row 1.
Row 6 [WS]: Repeat Row 2.
Row 7 [RS]: Yo, k1, [(k2tog, yo twice, ssk, k2) twice, k8] to 11 sts before marker, k2tog, yo twice, ssk, k2, k2tog, yo twice, ssk, k1, yo.
Row 8 [WS]: P4, k1, p5, (k1, p13, k1, p5) to 4 sts before marker, k1, p3.
Row 9 [RS]: Repeat Row 1.
Row 10 [WS]: Repeat Row 2.
Row 11 [RS]: Yo, k1, (k2tog, yo twice, ssk, k2tog, yo, k2, yo, ssk, k2tog, yo twice, ssk, k6) to 15 sts before marker, k2tog, yo twice, ssk, k2tog, yo, k2, yo, ssk, k2tog, yo twice, ssk, k1, yo.
Row 12 [WS]: P4, (k1, p9) to 4 sts before marker, k1, p3.
Row 13 [RS]: Repeat Row 1.
Row 14 [WS]: P4, k1, p3, k1, p1, pm, p2, (k1, p3) to 12 sts before marker, k1, p1, pm, p2, (k1, p3) to marker.
Border Pattern
Note: If you work from chart, the Edge Repeat is worked twice the first time through the 8 rows, three times the second time through, and four times on the final set of rows.
Row 1 [RS]: Yo, k1, (k2tog, yo twice, ssk) to 1 st before first marker, k1, *k1, (k2tog, yo twice, ssk) x 2, k2, (k2tog, yo twice, ssk) x 2, k1; repeat from * to second marker, k1, (k2tog, yo twice, ssk) to 1 st before spine/end of row marker, k1, yo.
Row 2 [WS]: P4, (k1, p3) to 3 sts before first marker, k1, p2, p3, (k1, p3, k1, p5) to 7 sts before second marker, k1, p3, k1, p2, p3, (k1, p3) to spine/end of row marker.
Row 3 [RS]: Yo, k1, (k2tog, yo twice, ssk) to 1 st before spine/end of row marker, k1, yo.
Row 4 [WS]: P4, (k1, p3) to spine/end of row marker.
Row 5 [RS]: Yo, k1, (k2tog, yo twice, ssk) to 3 sts before first marker, k2tog, yo, k1, slip marker, (k1, yo, ssk, k2tog, yo twice, ssk, k2tog, yo, k1) to second marker, k1, yo, ssk, (k2tog, yo twice, ssk) to 1 st before spine/end of row marker, k1, yo.
Row 6 [WS]: P4, (k1, p3) to 1 st before first marker, p1, p5, (k1, p9) to 5 sts before second marker, k1, p4, p5, (k1, p3) to spine/end of row marker.
Row 7 [RS]: Repeat Row 3.
Row 8 [WS]: Repeat Row 4.
CCO: Cable cast on.
Sl-L: Slip the stitch just worked back to left-hand needle.
Charts
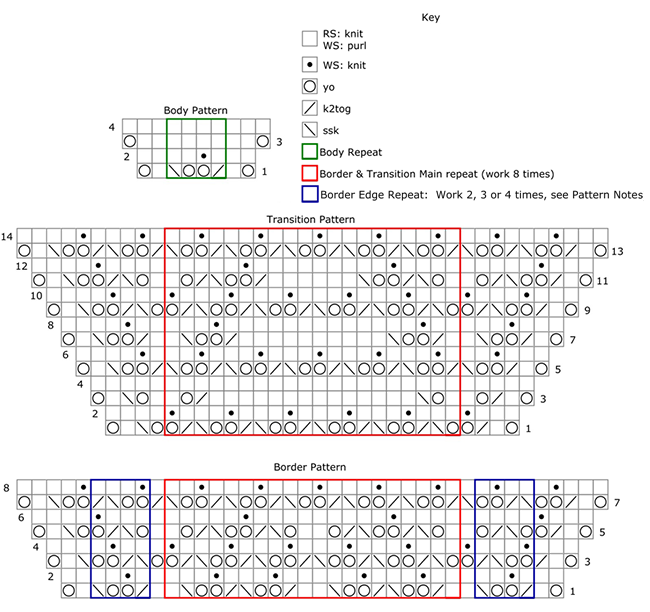
DIRECTIONS
Garter Tab
CO 2 sts using the Long Tail method, then knit 12 rows in garter stitch. Do not turn. Pick up and knit 6 sts from the side of your work, picking up 1 st in each garter ridge. Finally, pick up and knit 2 sts from your CO edge. 10 sts.
Next Row [WS]: (K2, p2) twice, k2.
Setup
Row 1 [RS]: (K2, pm, yo, k2, yo, pm) twice, k2. 14 sts.
Row 2 [WS]: (K2, p4) twice, k2.
Row 3 [RS]: (K2, yo, k4, yo) twice, k2. 18 sts.
Row 4 [WS]: (K2, p6) twice, k2.
Body
Row 1 [RS]: K2, work Body Pattern to spine marker, slip marker, k2, slip marker, work Body Pattern to last 2 sts, k2. 4 sts increased.
Row 2 [WS]: K2, work Body Pattern to spine marker, slip marker, k2, slip marker, work Body Pattern to last 2 sts, k2.
Continue as set until you have worked the 4-row repeat of the Body Pattern 40 times total. 338 sts.
Transition
Row 1 [RS]: K2, work Transition Pattern to next marker, slip marker, k2, slip marker, work Transition Pattern to last 2 sts, k2. 4 sts increased.
Row 2 [WS]: K2, work Transition Pattern to next marker, slip marker, k2, slip marker, work Transition Pattern to last 2 sts, k2
Continue as set until you have worked all 14 rows of the Transition Pattern. 366 sts.
Border
Row 1 [RS]: K2, work Border Pattern to spine marker, slip marker, k2, slip marker, work Border Pattern to last 2 sts, k2. 4 sts increased.
Row 2 [WS]: K2, work Border Pattern to spine marker, slip marker, k2, slip marker, work Border Pattern to last 2 sts, k2.
Continue as set until you have worked all 8 rows of the Border Pattern twice in full, and Rows 1-6 of a third repeat. 410 sts.
Final Row [RS]: K2, slip marker, yo, k to marker, yo, slip marker, k2, slip marker, yo, k to marker, yo, slip marker, k2. 414 sts.
Picot Bind Off
Note: A few picots at each end and at the center of the bind off are 1 st closer together than the rest. When working BO6 and BO7, keep track by counting each stitch you lift over.
Work across as follows: K1, (sl-L, CCO2, BO6) twice, (sl-L, CCO2, BO7) to 7 sts before marker, (sl-L, CCO2, BO6) 4 times, (sl-L, CCO2, BO7) to 9 sts from end of row, (sl-L, CCO2, BO6) twice, sl-L, CCO2, BO3.
Break yarn.
FINISHING
Weave in the ends, and wet block your shawl. If using blocking wires, thread them through each picot in the bind off. Allow to dry completely.