Knitted Garter Stitch Headband
The knitted garter stitch headband is a cozy and stylish accessory perfect for keeping your ears warm during chilly days. Its soft and stretchy design makes it comfortable to wear for all-day use, whether you're running errands or going for a stroll. With a wide range of colors to choose from, you can easily match it with your wardrobe. This versatile headband is a fun and quick knitting project, great for both beginners and seasoned knitters looking for a relaxing and rewarding craft. Treat yourself to a handmade headband that combines warmth and fashion effortlessly!

Materials
- Yarn: 15-30 yds worsted weight yarn
- Needles: US size 9 (5.5 mm) knitting needles or size needed to match gauge
Notions:
- Scissors
- Yarn needle
Project Level:
Beginner: Knit stitches with one seam
Sizes:
Width: 1.25 inches
Gauge:
16 sts x 32 rows = 4 inches
Gauge is not critical for this pattern.
Instructions
Cast on 6 stitches.
For a wider headband, cast on more stitches to desired width. This will affect yarn usage.
Row 1: Knit all stitches. Turn your work to start the next row by switching your needles to the opposite hands.
Repeat Row 1 to desired length or until headband fits snuggly around your head when slightly stretched. Use size chart above for recommended lengths.
Bind off and cut the yarn, leaving a 12-inch tail for sewing.
Seaming
If desired, twist headband once before seaming. If you prefer a flat headband, do not twist.
Thread the 12-inch tail into the yarn needle and sew together cast-on and bind-off edges with a whip stitch as shown below.
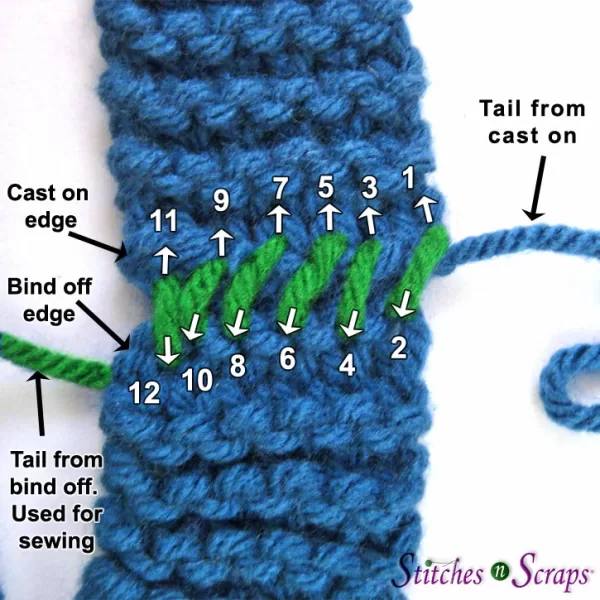
Using the numbers on the image as a guide, bring the needle up at the first stitch on the cast-on edge (1) then down at matching stitch on bind-off edge (2). Repeat this for each pair of stitches across the edges, pulling the seam snug as you go.
Weaving in Ends
Sew the rest of the tail into the existing stitches to hide it, changing direction once or twice to secure it better. Trim the end close to your work. Repeat with the starting tail from the cast-on edge.