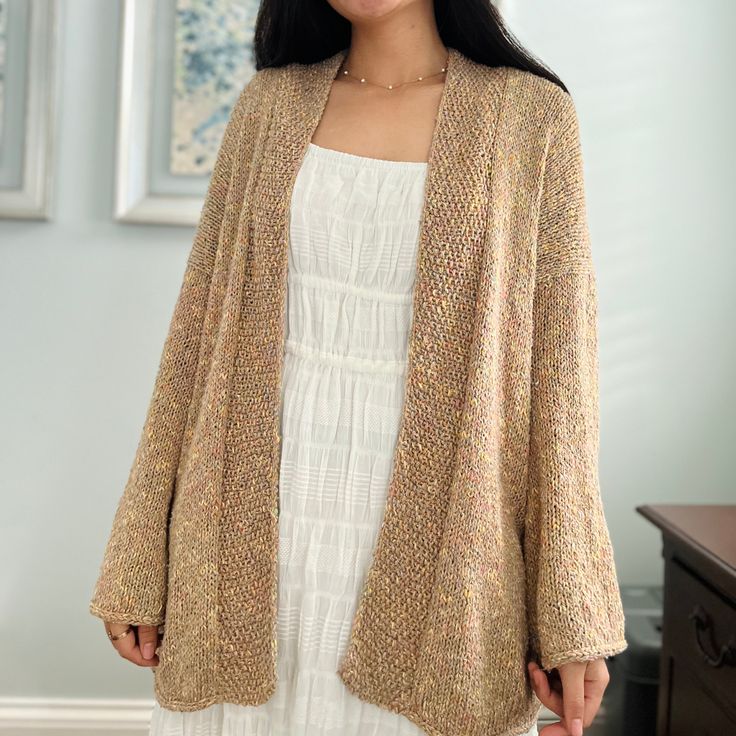
Knitted Adorable Cardigan
Oh, how cute and cozy a knitted adorable cardigan can be! It's like a warm hug you can wear, perfect for adding a touch of charm to any outfit. The intricate patterns and soft texture make it not just a piece of clothing, but a delightful fashion statement. Whether you're out for a walk in the crisp autumn air or snuggled up by the fire on a chilly night, a knitted cardigan is the ultimate companion for staying stylish and snug. Just slip it on, and instantly feel the warmth and joy it brings!
Materials for the knitted cardigan pattern
- #4 Medium weight yarn. I used Tahki Yarns Whidbey in color wildflower
- US 9/5.5 mm 16″ circular needles for the sleeves.
- US 9/5.5 mm 48-50″ circular needles for the for the body and collar, if you have a little shorter or longer cord it’s okay.
- Scissors
- Yarn needle
Stitches Used & Code
- CO = Cast on
- BO = Bind off
- K = Knit
- P = Purl
- ST = Stitch(es)
- SK = Skip
- REP = Repeat
- RS = Right side
- WS = Wrong side
- ” = Inches
Skill: Easy
Notes:
- The pattern is written in English US terminology
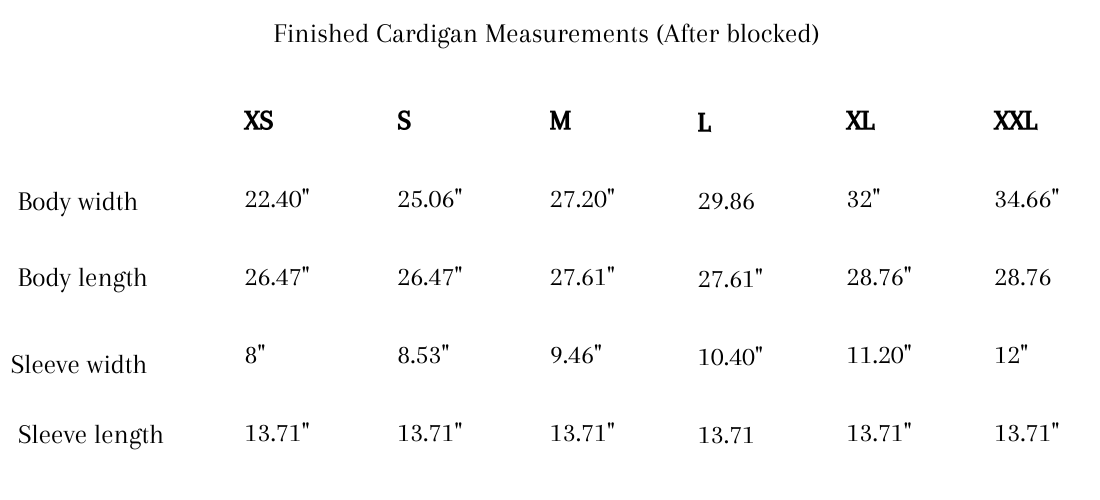
- The pattern is made as US women’s sizes XS(S, M, L, XL, XXL)
- In this picture I have demonstrated with size Small
Gauge blocked: 15 ST X 21 Rows = 4″
Yarn needed: 990( 1060, 1140, 1210, 1290, 1360) Yards
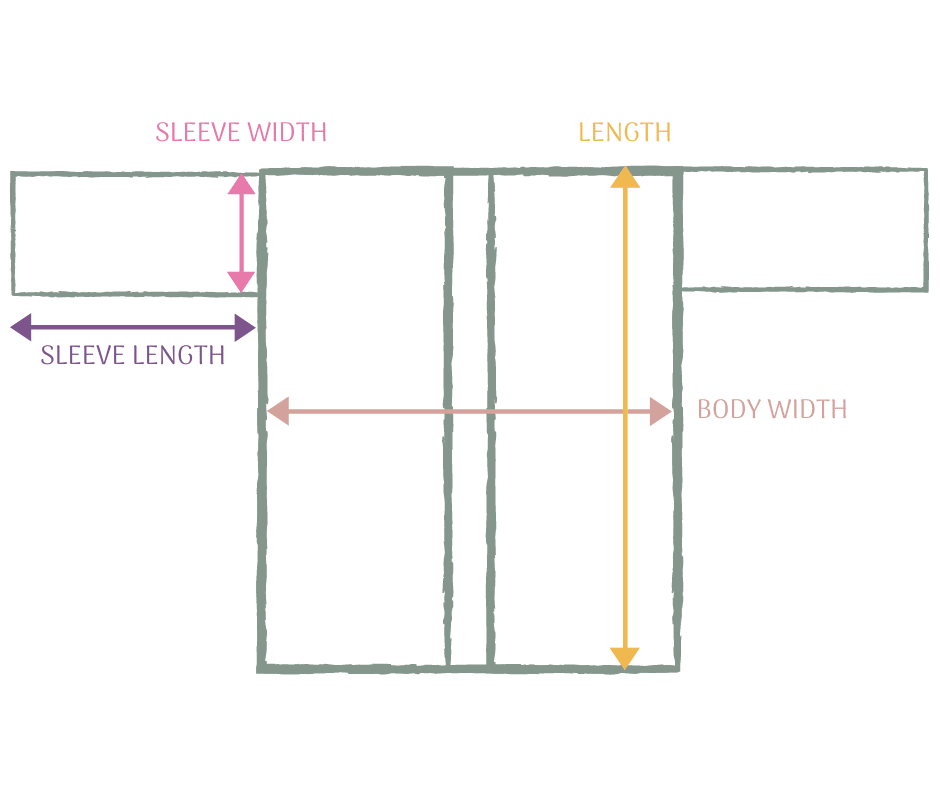
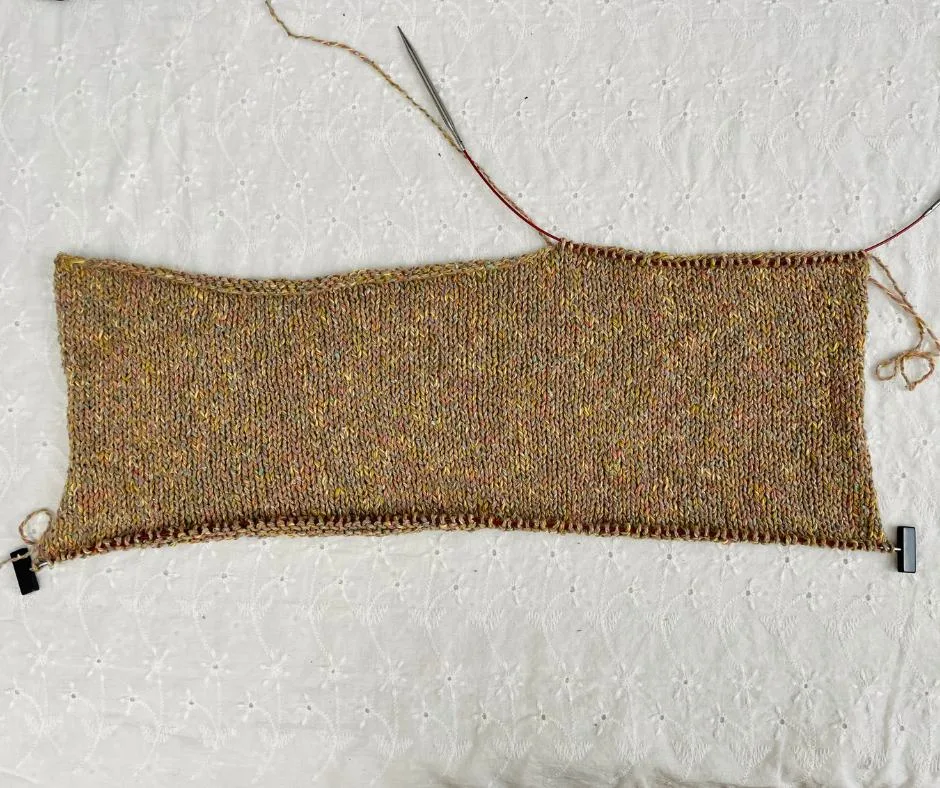
Upper Back
Note: For the upper back we’re going to work back and forth in the row.
CO 82(90, 98, 106, 114, 122) ST
Row 1 (WS): P all ST across. Total of 82(90, 98, 106, 114, 122) ST
Row 2 (RS): K all ST across. Total of 82(90, 98, 106, 114, 122) ST
Row 3: P all ST across. Total of 82(90, 98, 106, 114, 122) ST
REP Row 2 and Row 3: 20(21, 23, 25, 27, 29) more times. You’ll have a total of 43(45, 49, 53, 57, 61) rows.
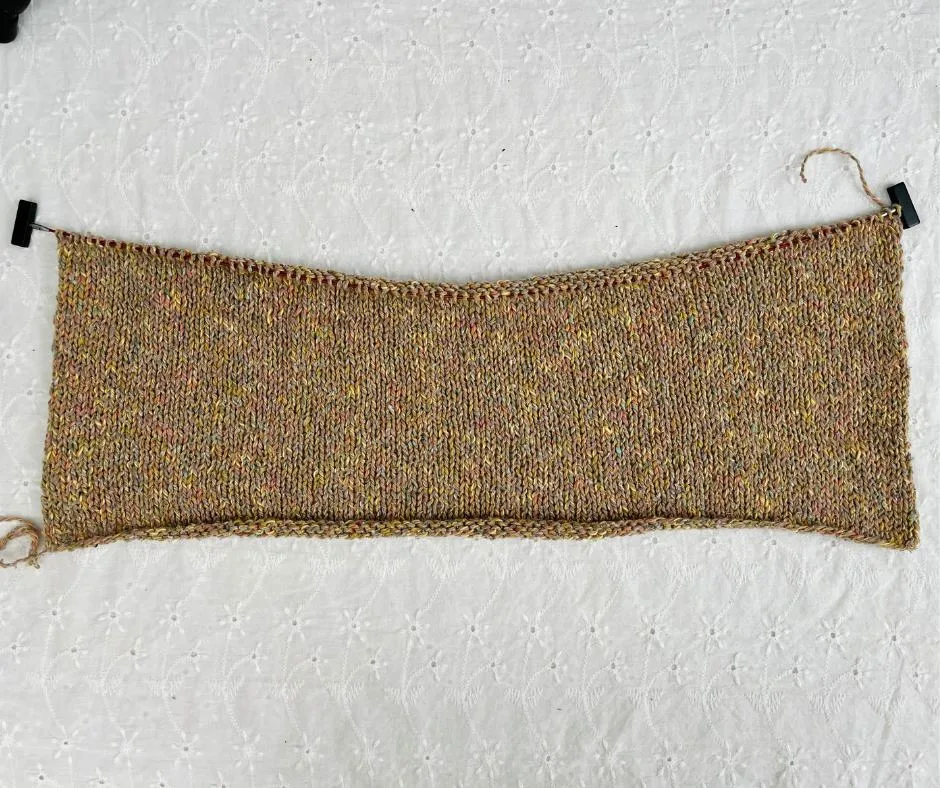
The end of row 43(45, 49, 53, 57, 61) cut the yarn and place all ST on hold. Check picture below
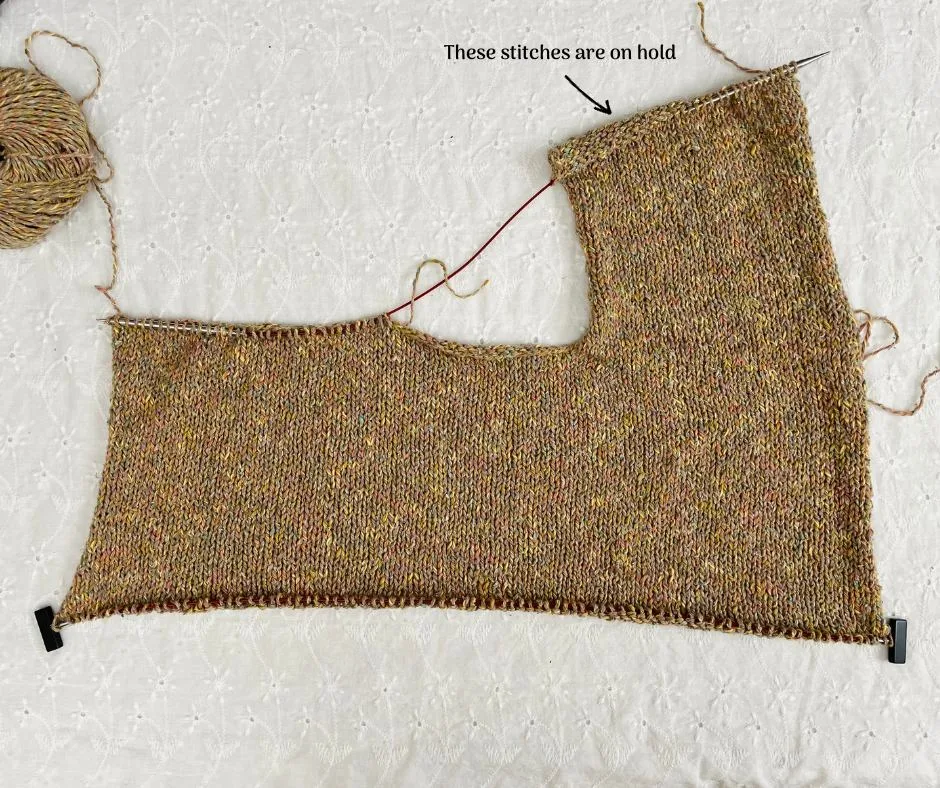
Upper Right Front (When you’re wearing it)
Note: For the upper right front we’re going to work back and forth in the row.
Setup row: We’re going to pick up the stitches at the upper back CO edge for the upper right front. With your upper back RS facing up, then pick up 31(35, 38, 42, 45, 49) ST on the right hand side corner of the upper back CO edge. Check picture below
Row 1 (WS): P all ST across. Total of 31(35, 38, 42, 45, 49) ST
Row 2 (RS): K all ST across. Total of 31(35, 38, 42, 45, 49) ST
Row 3: P all ST across. Total of 31(35, 38, 42, 45, 49) ST
REP Row 2 and Row 3: 20(21, 23, 25, 27, 29) more times. You’ll have a total of 43(45, 49, 53, 57, 61) rows.
The end of row 43(45, 49, 53, 57, 61) cut the yarn and place all ST on hold.
Upper Left Front (When you’re wearing it)
Note: For the upper left front we’re going to work back and forth in the row.
Setup row: We’re going to pick up the stitches at the upper back CO edge for the upper left front. With your work RS facing up, then pick up the last 31(35, 38, 42, 45, 49) ST on the left hand side corner of the upper back CO edge. Check picture below
Row 1 (WS): P all ST across. Total of 31(35, 38, 42, 45, 49) ST
Row 2 (RS): K all ST across. Total of 31(35, 38, 42, 45, 49) ST
Row 3: P all ST across. Total of 31(35, 38, 42, 45, 49) ST
REP Row 2 and Row 3: 20(21, 23, 25, 27, 29) more times. You’ll have a total of 43(45, 49, 53, 57, 61) rows. Check picture below.
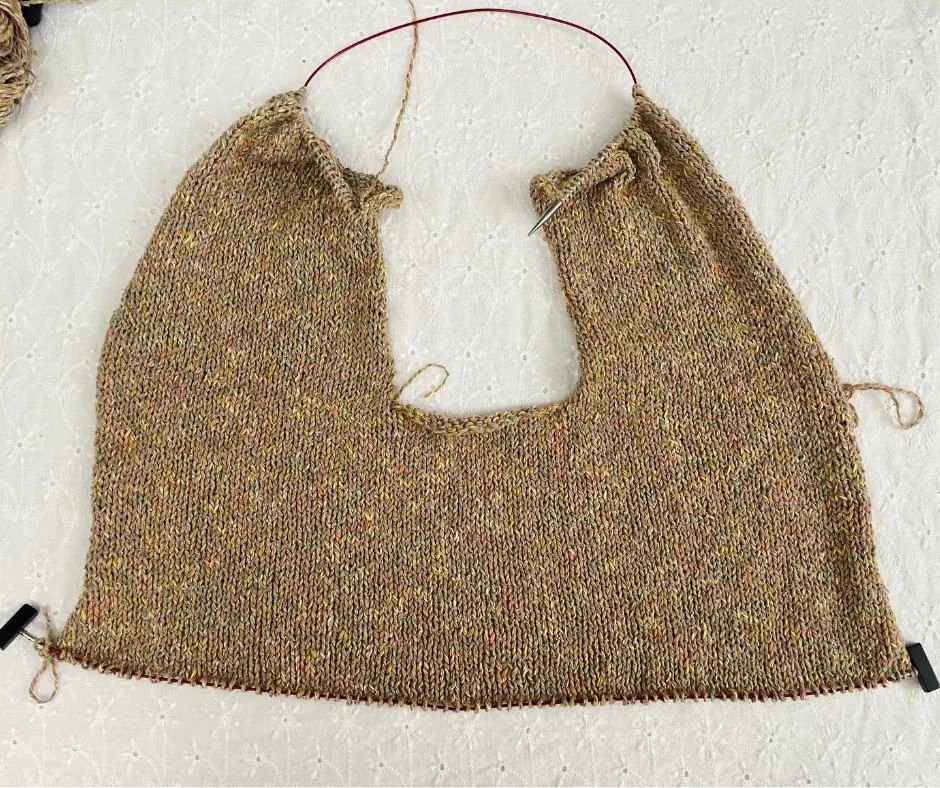
Body
Now we’re going to join the upper fronts and back together. Place all stitches that you have on hold back on to the cord then we will start knitting. We’re going to work in the row back and forth for the body part.
Setup row: With the working yarn on the upper left front, then K across the upper left front, CO 1(3, 4, 5, 6, 7) ST for the underarm, K across the upper back, CO 1(3, 4, 5, 6, 7) ST for the underarm, K across the upper right front. Total of 148(166, 182, 200, 216, 234) ST. Check picture below
Row 1 (WS): P all ST across. Total of 148(166, 182, 200, 216, 234) ST
Row 2 (RS): K all ST across. Total of 148(166, 182, 200, 216, 234) ST
Row 3: P all ST across. Total of 148(166, 182, 200, 216, 234) ST
REP Row 2 and Row 3: 44(44, 44, 44, 44, 44) more times. You’ll have a total of 91(91, 91, 91, 91, 91) rows. Then BO all stitches, I used an I-Cord BO. Read the instructions below on how to make an I-Cord BO
*If you’d like a shorter cardigan, just repeat row 2 and 3 less times. If you’d like a longer cardigan, just keep repeating row 2 and 3 more times.
How to make an I-Cord BO:
Step 1: On the right side of the work, CO 3 ST, I like to use a knitted CO method.
Step 2: K 2 ST, K the next 2 ST together through the back loops.
Step 3: Place all 3 ST that on the right needle back on to the left needle.
REP Step 2 and Step 3 across and you should have 3 ST left at the end, K all 3 ST together through the back loops. Cut the yarn and weave the end
Collar
We’re going to pickup the stitches for the collar starting from the right bottom corner (when you’re wearing it), then around the neckline area, then on the left side all the way down to the bottom left corner (when you’re wearing it). We’re going to work back and forth in the row for the collar. Read the instructions below on how to pickup the stitches.
Setup row: *Pickup 2 ST, SK 1 ST* REP from *TO* until you reach the shoulder corner, pickup 1 ST at the corner, pickup every ST across the neckline area, pickup 1 ST at the shoulder corner, pickup 2 ST, *SK 1 ST, pickup 2 ST* REP from *TO* across the left front until you reach the bottom left corner. Total of 206(206, 216, 216, 226, 226) ST. If you have a couple more or less stitches it’s ok but be sure that you have an even number of stitches.
Row 1 (WS): *K 1, P 1* REP from *TO* across. Total of 206(206, 216, 216, 226, 226) ST
Row 2 (RS): *P 1, K 1* REP from *TO* across. Total of 206(206, 216, 216, 226, 226) ST
REP Row 1 and Row 2: 9(9, 9, 9, 9, 9) more times. You’ll have a total of 20(20, 20, 20, 20, 20) rows
Row 21: *K 1, P 1* REP from *TO* across. Total of 206(206, 216, 216, 226, 226) ST
Next we’re going to BO, I used a regular BO method.
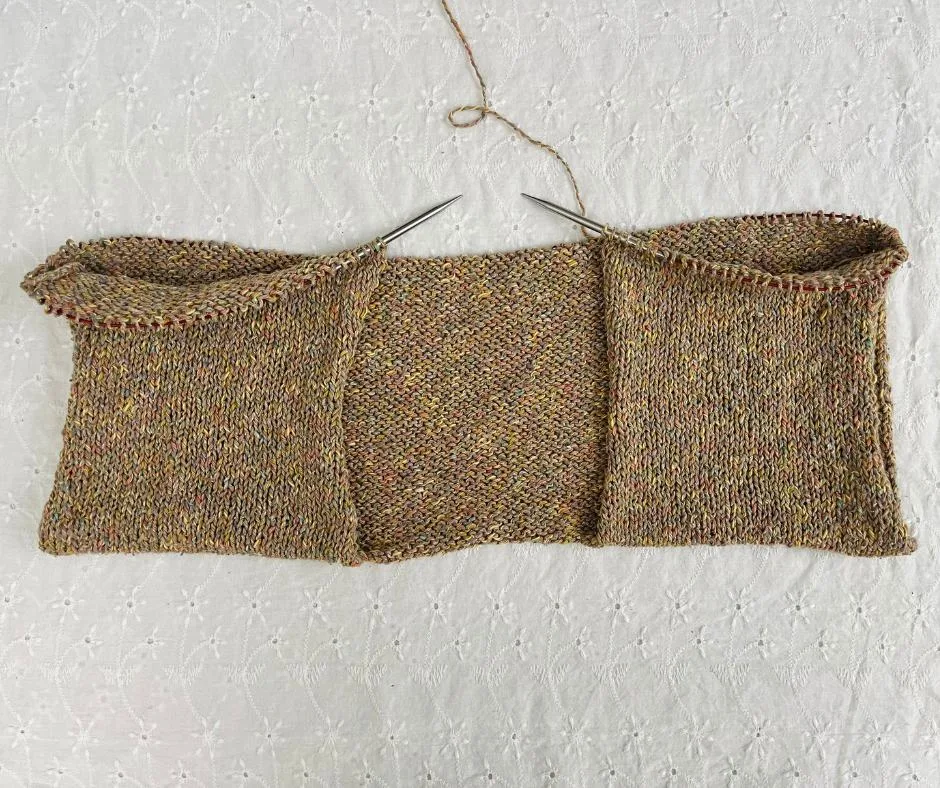
Sleeves
Note: Using 16″ circular needles, we’re going to work in the round on the right side. Make sure to place the marker at the beginning of each round.
Setup row: With your work RS facing out. Pickup stitches around the arm hole edge, starting from the underarm. Pickup every stitches that you CO at the underarm area, then *Pickup 2 ST, SK 1 ST* REP from *TO* around, make sure that the underarm doesn’t have a big hole, if so you can pickup more stitches to avoid it. Total of 60(64, 71, 78, 84, 90) ST. If you have a couple more or less stitches it’s ok but be sure that you have the same amount of stitches on both sleeves.
Round 1 – Round 72: K all ST around. Total of 60(64, 71, 78, 84, 90) ST
All sizes have the same amount of rounds. If you’d like a shorter sleeve, just make less rounds. If you’d like a longer sleeve, just keep adding more rounds.
Then BO all stitches, I used an I-Cord BO. We’re going to BO the same as we BO at the bottom of the cardigan but the only difference is we’re going to sew the end of the I-Cord to the beginning of the I-Cord together.