

Knitted Beautiful Blanket
Oh, a knitted beautiful blanket is like a warm hug on a chilly day! Picture cozy evenings snuggled up with a cup of hot cocoa, wrapped in its soft embrace. The intricate patterns and vibrant colors make it not just a blanket, but a work of art crafted with love and care. It's the perfect companion for movie nights or lazy Sundays, adding a touch of comfort and style to any room. So, grab your favorite book or show, and let this knitted beauty keep you warm and happy!
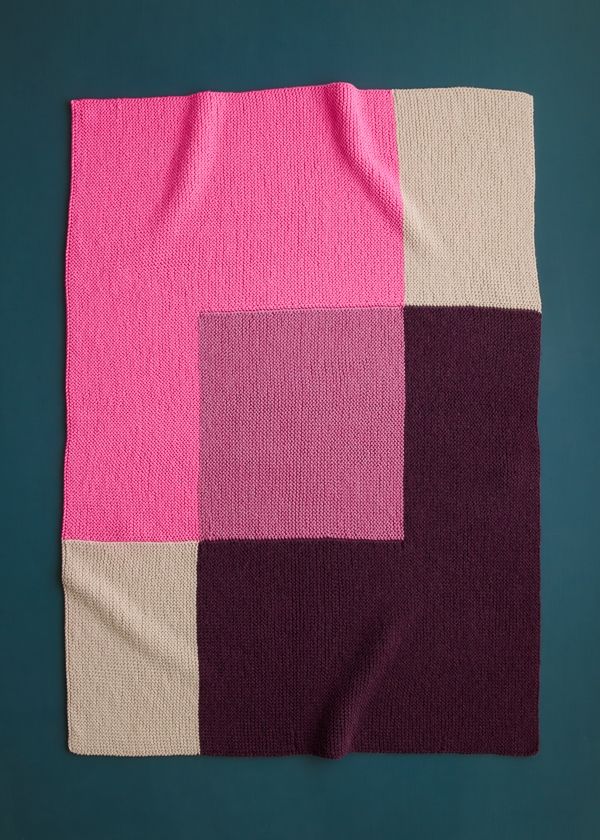
Materials:
You will need
- Yarn
- US 7 (4.5 mm), 40-inch circular knitting needles
GAUGE
19 stitches and 38 rows (19 ridges) = 4 inches in garter stitch
NOTE: The Throw size uses almost all of Colors B and C. To avoid running short, be sure to check your gauge by swatching with Color D, and keep tails short.
SIZES
Crib (Throw)
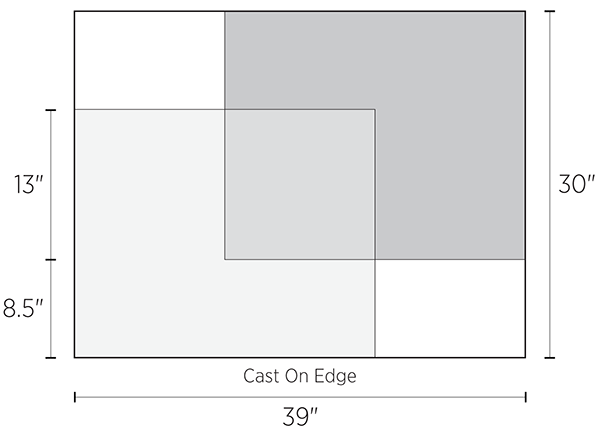
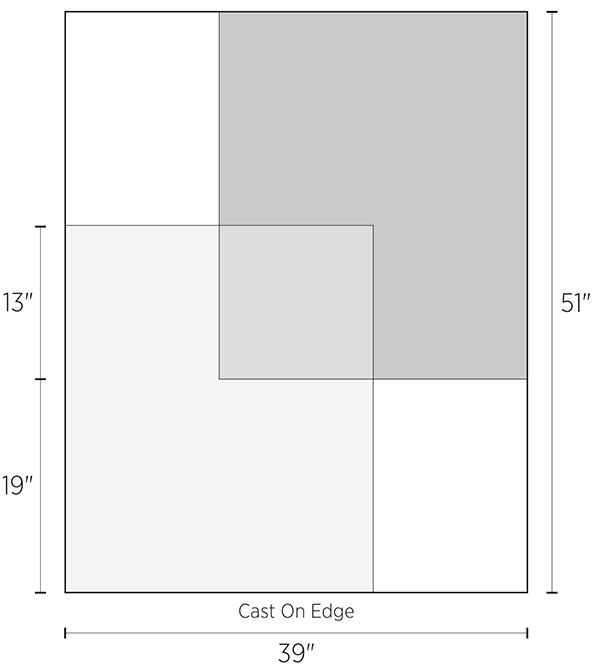
Finished Dimensions: 39 inches wide x 30 inches tall (39 inches wide x 51 inches tall)
Samples: We knit the Crib size.
NOTES
SLIP STITCHES
Slip all slipped stitches knitwise with yarn in back.
INTARSIA
The colorwork in this project is done with a technique called “intarsia.” Each row involves either two or three balls of yarn, which is much easier than it may sound!
CONSTRUCTION
CRIB
THROW
PATTERN
BEGIN WITH TWO COLORS
Using a basic Long Tail Cast On, cast 186 stitches onto needles as follows…
With Color B, cast on 124 stitches, drop Color B without cutting it; then with Color A, cast 62 stitches onto the same needle.
NOTE: At this point, the two colors are not attached to each other, but as you work intarsia they will be!
Working Intarsia (see Notes) at every color change…
Row 1 (right side): With Color A, k62; with Color B, knit to end of row.
Row 2 (wrong side): With Color B, slip 1 (see Notes), k123; with Color A, knit to end of row.
Row 3: With Color A, slip 1, k61; with Color B, knit to end of row.
Repeat Rows 2 and 3 until piece measures 8½ (19) inches from cast-on edge, ending with Row 2. [41 (90) garter ridges on right side]
Cut both yarns.
CONTINUE WITH THREE COLORS
Still working Intarsia at every color change…
Row 1 (right side): Join Color C and k62; join Color D and k62; join Color B and knit to end of row.
Row 2 (wrong side): With Color B, slip 1, k61; with Color D, k62; with Color C, knit to end of row.
Row 3: With Color C, slip 1, k61; with Color D, k62; with Color B, knit to end of row.
Repeat Rows 2 and 3 for 13 inches or until piece measures 21½ (32) inches from cast-on edge, ending with Row 2. [103 (152) total garter ridges on right side]
Cut Colors B and D.
CONTINUE WITH TWO COLORS
Working Intarsia at every color change…
Row 1 (right side): With Color C, slip 1, k123; join Color A and knit to end of row.
Row 2 (wrong side): With Color A, slip 1, k61; with Color C, knit to end of row.
Row 3: With Color C, slip 1, k123; with Color A, knit to end of row.
Repeat Rows 2 and 3 for 8½ (19) inches or until piece measures 30 (51) inches from cast-on edge, ending with Row 3. [143 (241) total garter ridges on right side]
Bind Off (wrong side): With Color A, loosely bind off knitwise to end of Color A stitches (one Color A stitch will remain on the right needle), cut Color A; with Color C, continue to bind off knitwise to end of row, cut Color C and pull through remaining stitch.
FINISHING
Weave in the ends, closing gap between colors on cast-on row, and gently wet block as desired.