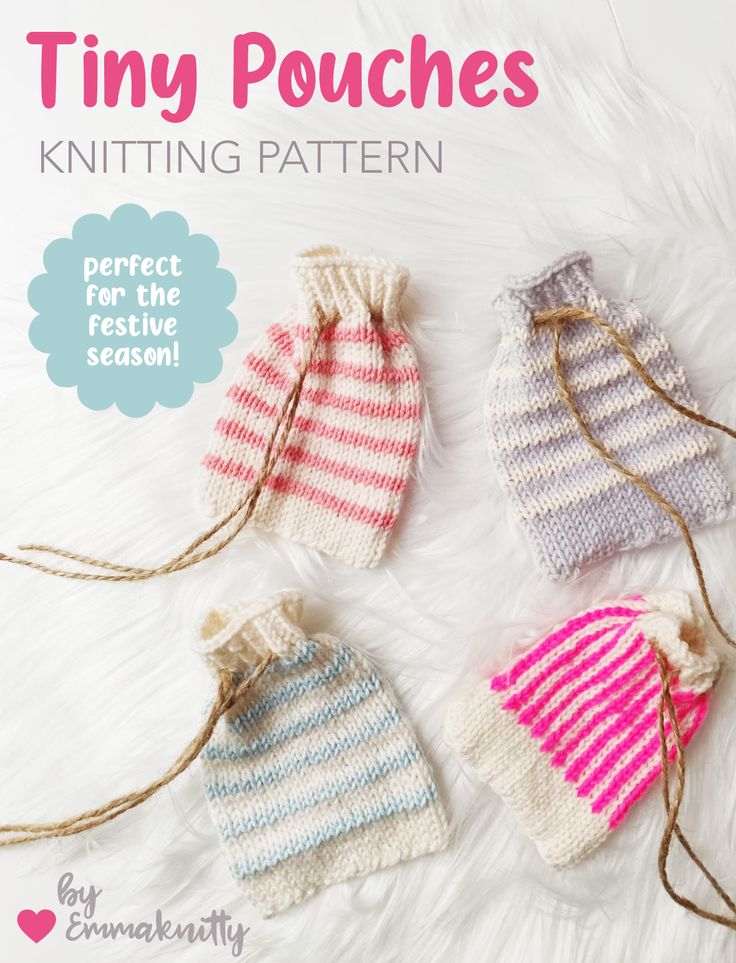
Knitted Tiny Pouches
Knitted tiny pouches are not just adorable, they're also incredibly practical! Whether you use them to store small trinkets, keep your earbuds from tangling, or simply as a cute accessory, these little wonders are sure to bring a smile to your face. The intricate detail and cozy feel of the knitted fabric make them a joy to hold and use. Plus, they make great gifts for friends and family, spreading warmth and charm wherever they go. So, grab a few of these tiny pouches and add a touch of handmade happiness to your day!
LEVEL: intermediate or very confident beginner.
Yarn and materials:
Less than 25g of DK weight yarn in two colours, ideally in wool for the MC (main colour) and cotton for the CC (contrast colour). I used a selection of Ricorumi yarns (in the shades Apricot, Light Blue, White and Neon Fuchsia) for the CC and Hobbii Friends Wool (in the shades White and Light Gray) for the MC. You’ll also need jute cord for the drawstring tie.
3.5 mm longer-length circular knitting needles, a stitch marker, scissors, yarn needle.
Gauge: N/A
Size: 10 / 7.5 cm (for my samples. If you knit a bigger size your measurements will vary).
Skills: Knitting on circular needles using the magic loop method, knit stitch (k), knit through the back loop (tbl), purl stitch (p), invisible join in the round, changing colours in the round, Fair Isle colour work (for the Vertical Stripes pouch), cast on and bind off, weaving in ends.
Tips: When changing colours do not break the yarn, but drop it, work with the new colour and pick the old colour up again when you reach the next colour change round. This limits the amount of ends we need to weave in when we’re done.
For the Vertical Stripes version of the pouch you will need to know how to do colour work using two colours (Fair Isle).
Changing the size of the pouch is really easy – simply cast on more stitches in a multiple of two until you’re happy and work more rounds until it’s as tall as you want.
Methods (knit from the bottom up):
Style one: Horizontal Stripes.
In MC, cast on 41 sts and join invisibly by decreasing one st (40 sts). Place marker or use the yarn tail to indicate the beginning of the round.
Rds 1 – 8: Work in the magic loop and knit 8 rds plain.
Rd 9-10: Ch to CC, k every st around.
Rds 11 – 13: Ch to MC, k every st around.
Rd 14-15: Ch to CC, k every st around.
Rds 16 – 18: Ch to MC, k every st around.
Rd 19-20: Ch to CC, k every st around.
Rds 21 – 23: Ch to MC, k every st around.
Rd 24-25: Ch to CC, k every st around.
Rds 26 – 28: Ch to MC, k every st around.
Rd 29-30: Ch to CC, k every st around.
Rds 31 – 33: Ch to MC, k every st around.
Rd 34-35: Ch to CC, k every st around.
Rd 36 – 40: *k1tbl, p1 to end
Bind off all sts.
Style two: Vertical Stripes.
Note: due to the nature of stranded colour work your pouch may pucker or pull in slightly. To combat this, consider knitting a little looser than usual and/or wet block and shape after you finish. The best way to reshape it is to saturate the pouch, out your hand inside and gently pull the pouch outwards. Lay it flat to dry as usual.
In MC, cast on 41 sts and join invisibly by decreasing one st (40 sts). Place marker or use the yarn tail to indicate the beginning of the round.
Rds 1 – 8: Work in the magic loop and knit 8 rds plain.
Rds 9 – 27: k1 MC, k1 CC to end.
Rd 28 – 33: *k1tbl, p1 to end
Bind off all sts.
Seam the bottom (cast on edge) carefully. Wet or steam block your work. This step can be skipped but it is worth doing! Blocking evens your stitches out nicely and gives a more finished look.
After your pouch is dry, weave your jute cord around the top of the pouch into the final knit round just under where the ribbing starts. Once you’re finished, all you need to do is fill your pouch with gifts and enjoy!