Knitted Adorable Buttonette Hat
The Knitted Adorable Buttonette Hat is hands down one of the cutest and coziest accessories you could ever own! This charming hat combines style and warmth effortlessly, making you look absolutely adorable while keeping you snug during chilly days. The delicate knitted texture and the sweet little buttonette detail add a touch of charm that will surely make heads turn. Trust me, once you put on this hat, you'll never want to take it off!
Yarn
146 [174, 224] yd/134 [160, 206] m
36yd/33m for a 6x6in/15x15cm St.St swatch
DK weight, plied yarn.
Needles & Notions
Set 3mm/UK11/US2½ DPNs/Circular or size needed to obtain gauge
Pair 3mm/UK11/US2½ straight needles or size needed to obtain gauge
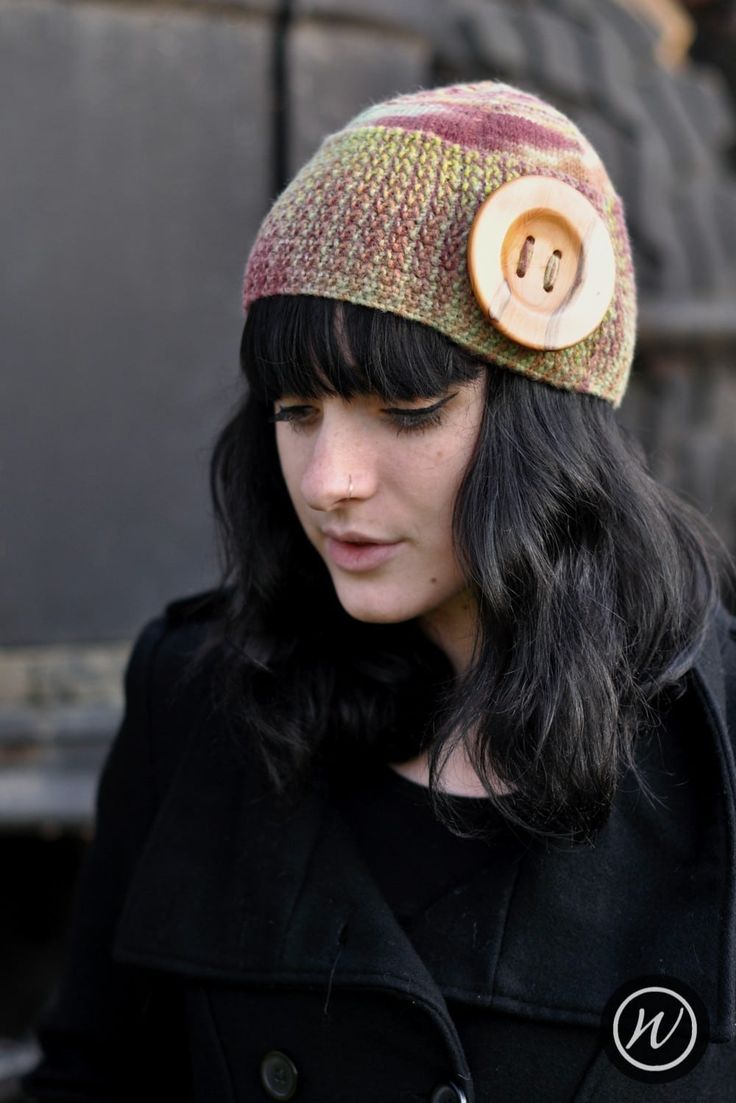
1 x Tree Gems 3.25in/8cm button
Stitch marker as necessary
Tapestry needle
Sample Details
Shown in Skein Queen Plushness [300yd/275m per 100g; 80% Wool, 10% Angora, 10% Cashmere]
Shown in size 22in/56cm on model with 21.5in/54.5cm circumference head
Gauge
24 sts x 36 rows to 4in/10cm on 3mm needles over St.St
23 sts x 32 rows to 4in/10cm on 3mm needles over Moss (Seed) St.
Sizes
To fit sizes: 18 [20, 22] in/ 45.75 [51, 56] cm
Finished size: 16 [18, 20] in/ 40.75 [45.75, 51] cm
Skills Required
Knitting in the round
Increases and Decreases
Picking up Stitches
Draw-through Bind-off
Blocking a Hand Knit Hat
Abbreviations
K: knit
P: purl
rpt: repeat
R/rnd(s): rounds
st(s): stitch(es)
k2tog: knit next 2 sts together
How To
Using preferred cast-on method, cast on 23 [25, 29] sts
Brim
Next row: K1, *P1, K1; rpt from * to end
Repeat this row until work measures 19 [21, 23] in/48.25 [53.25, 58.5] cm then cast-off and break yarn.
Note: brim depth should be 4 [4.5, 5] in/10 [11.5, 12.75] cm. If your stitch gauge differs from that given, adjust the no. of sts cast on for the band to ensure the correct depth. Alternatively, additional depth can be added to the Body prior to the Crown shaping.
To form the Brim, bring ends of strip together and overlap by 3in/7.5cm. Slip stitch edges together on the reverse in preparation for picking up the stitches for the body. Ensure the flap is secure top and bottom, as well as on the inside, as it needs to be sturdy to support the button.
Body
Pick up and knit 96 [108, 120] sts around the top edge of Brim (6 sts for each 1in/2.5cm of brim)
Join in the round, being careful not to twist sts.
Place stitch marker to indicate start of round.
If your brim is shallower than the measurements given in the note above, work stocking stitch in the round, by knitting every stitch, until Body of the Hat, including the Brim band, measures 4 [4.5, 5] in/10.25 [11.5, 12.75] cm.
Crown
18in size jump to Rnd 7, 20in size jump to Rnd 4, 22in size start at Rnd 1.
Rnd 1: *K18, k2tog; rpt from * to end [114 sts]
Rnd 2: *K17, k2tog; rpt from * to end [108 sts]
Rnd 3: Knit all sts
Rnd 4: *K16, k2tog; rpt from * to end [102 sts]
Rnd 5: *K15, k2tog; rpt from * to end [96 sts]
Rnd 6: Knit all sts
Rnd 7: *K14, k2tog; rpt from * to end [90 sts]
Rnd 8: *K13, k2tog; rpt from * to end [84 sts]
Rnd 9: Knit all sts
Rnd 10: *K12, k2tog; rpt from * to end [78 sts]
Rnd 11: *K11, k2tog; rpt from * to end [72 sts]
Rnd 12: Knit all sts
Rnd 13: *K10, k2tog; rpt from * to end [66 sts]
Rnd 14: *K9, k2tog; rpt from * to end [60 sts]
Rnd 15: Knit all sts
Rnd 16: *K8, k2tog; rpt from * to end [54 sts]
Rnd 17: *K7, k2tog; rpt from * to end [48 sts]
Rnd 18: Knit all sts
Rnd 19: *K6, k2tog; rpt from * to end [42 sts]
Rnd 20: *K5, k2tog; rpt from * to end [36 sts]
Rnd 21: Knit all sts
Rnd 22: *K4, k2tog; rpt from * to end [30 sts]
Rnd 23: *K3, k2tog; rpt from * to end [24 sts]
Rnd 24: Knit all sts
Rnd 25: *K2, k2tog; rpt from * to end [18 sts]
Rnd 26: *K1, k2tog; rpt from * to end [12 sts]
Rnd 27: *k2tog; rpt from * to end [6 sts]
Break yarn and draw through remaining 6 sts, tighten to close.
Finishing
Weave in all ends. Blocking isn’t necessary but a gentle blocking will be fine should the shaping need it. It is advisable to block the Hat before sewing on the button, and likewise, to preserve the finish on the wood, remove the button before future washes.
Firmly sew button to flap, at the point where the flap is overlapped and double thickness, and position it so that the spacing around the button is even, as shown in the photograph – it wants to be the same distance from the top and bottom of the flap, as it does from the visible flap edge.