Knitted Mini Santa Stocking
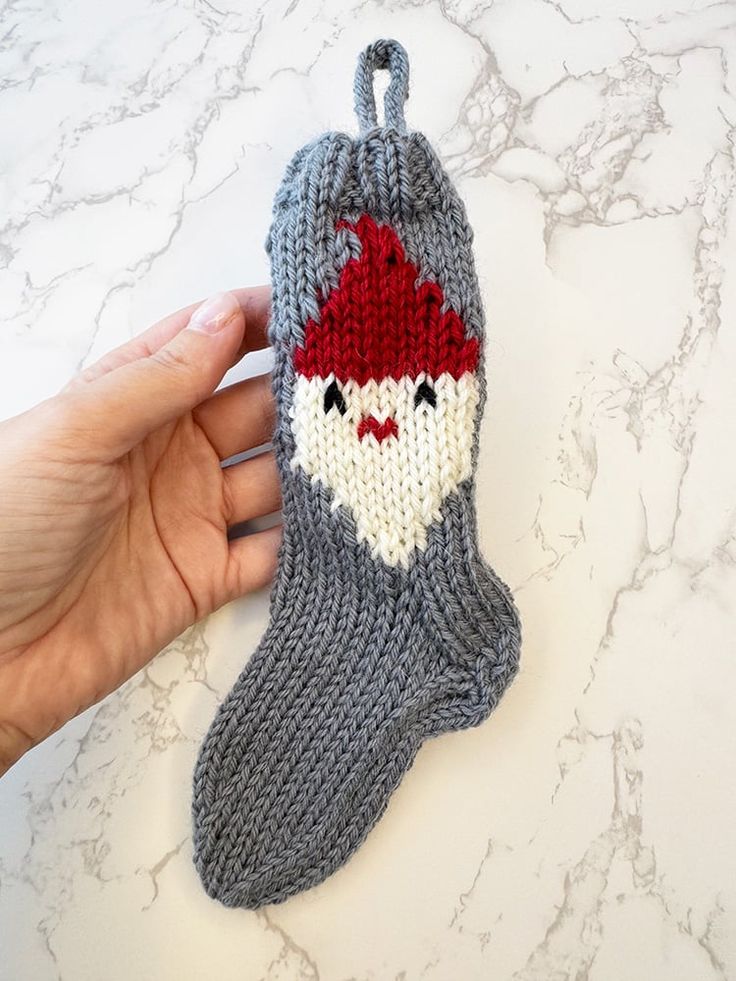
Isn't the Knitted Mini Santa Stocking just the cutest addition to your holiday decor? This adorable little stocking is perfect for adding a touch of festive charm to any space. Imagine how lovely it would look hanging by the fireplace or adorning a doorknob. Its classic red and white colors and intricate knitted details make it such a whimsical and heartwarming decor piece. Whether you fill it with sweet treats or leave it empty as a delightful decoration, this Knitted Mini Santa Stocking is sure to bring joy and cheer to your home this holiday season!
Materials
To bring this simple knit pattern to life, gather the following supplies:
Yarn
- DK/light worsted/8 Ply yarn.
- Amount of yarn – around 20g/80 meters.
- I used DK yarn Drops Lima in Gray (8465), Red (3609), and White (0100) with scraps of black DK yarn for the eyes.
- You could use any yarn weight and needle size for this project, but it will affect the sock’s finished size.
Knitting Needle Size
- 4 mm (US 6) circular needles or double-pointed needles.
- Use sock circulars or use the magic loop method with a longer cable.
Notions
- Tapestry needle for sewing up and weaving in ends.
- Scissors.
- Tape Measure.
Knitting Abbreviations
- CO – Cast on
- BO – Bind off
- Cont – Continue
- DPNs – Double-pointed needles
- K – Knit
- K2tog – Knit the next two stitches together to decrease
- P – Purl
- P2tog – Purl the next two stitches together to decrease
- Sl1 – Slip one stitch
- St(s) Stitch(es)
- SSK – Slip, Slip, Knit
- Rep – Repeat
- RS – Right side
- WS – Wrong side
- 2×2 ribbing – K2, P2, every round.
Pattern Instructions
Cuff:
CO 24 stitches using the color of your choice (Color A). Divide stitches evenly across 3 DPNs or arrange for the magic loop.
Join to knit in the round, being careful not to twist.
Work in K2, P2 ribbing for 6 rounds.
Leg:
Switch to stockinette stitch (knit every stitch in the round) and work for 2 rounds.
Then, divide the sts to work the color chart across 10 stitches.
Work 2 rounds in color A.

Heel Flap (worked flat):
Knit 12 stitches onto one needle (this will be the heel flap; leave the remaining stitches on hold).
Make sure the Santa face is on the side of the work; 6 stitches will include part of the colorwork, and 6 will not.
Work back and forth on these 12 stitches:
- Row 1 (RS): Sl1, K1 repeat to end.
- Row 2 (WS): Sl1, P to end.
Repeat these 2 rows for a total of 8 rows.
Turn Heel:
Row 1 (RS): K7, K2tog, K1, turn.
Row 2 (WS): Sl1, P3, P2tog, P1, turn.
Row 3: Sl1, K4, K2tog, K1, turn.
Row 4: Sl1, P5, P2tog, P1, turn.
Row 5: Sl1, K3, K2tog, K1, turn
Row 6: Sl1, P2, P2tog, P1, turn, (6 stitches remain).
Gusset:
Knit across the heel stitches.
Pick up and knit 6 stitches along the side of the heel flap.
Knit across the stitches on hold for the instep.
Pick up and knit 6 stitches along the other side of the heel flap.
Knit half of the heel stitches onto the next needle to reposition (you’ll now be back in the round).
Arrange stitches evenly on 3 needles (DPNs) or across 2 if using circulars.
You should have 30 stitches total.
Gusset Decreases:
Round 1: Knit.
Round 2: Knit to last 2 stitches of first needle, K2tog.
Knit across instep stitches.
On last needle, SSK, knit to end.
Repeat these 2 rounds until you’re back to 24 stitches total.
Foot:
Knit in the round until the foot measures 3 inches from the heel.
Toe:
Round 1: K4, K2tog repeat to end (20 sts remain).
Round 2: Knit.
Round 3: K3, K2tog repeat to end (16 sts remain).
Round 4: Knit.
Round 5: K2, K2tog repeat to end (12 sts remain).
Round 6: Knit.
Round 7: K1, K2tog repeat to end (8 sts remain).
Cut yarn, leaving a tail.
Thread the tail through the remaining stitches and pull tight to close.
Finishing:
Weave in all ends.
Add a hanging loop with a knitted length or a small knitted i-cord (optional).
Decorate with embroidery, pompoms, or small appliques if desired!
Hanging Loop:
CO 30 sts, bind off.
Sew to the inner top side of the sock (see photos for reference).
Tips for Success
- Plan Your Colorwork: Keep your yarn organized when working with the color chart to ensure clean transitions.
- Mind the Gauge: Check your gauge before starting to ensure your stocking turns out the perfect size.
- Add Your Personal Touch: Incorporate initials or special embellishments to make each stocking unique for your family member.