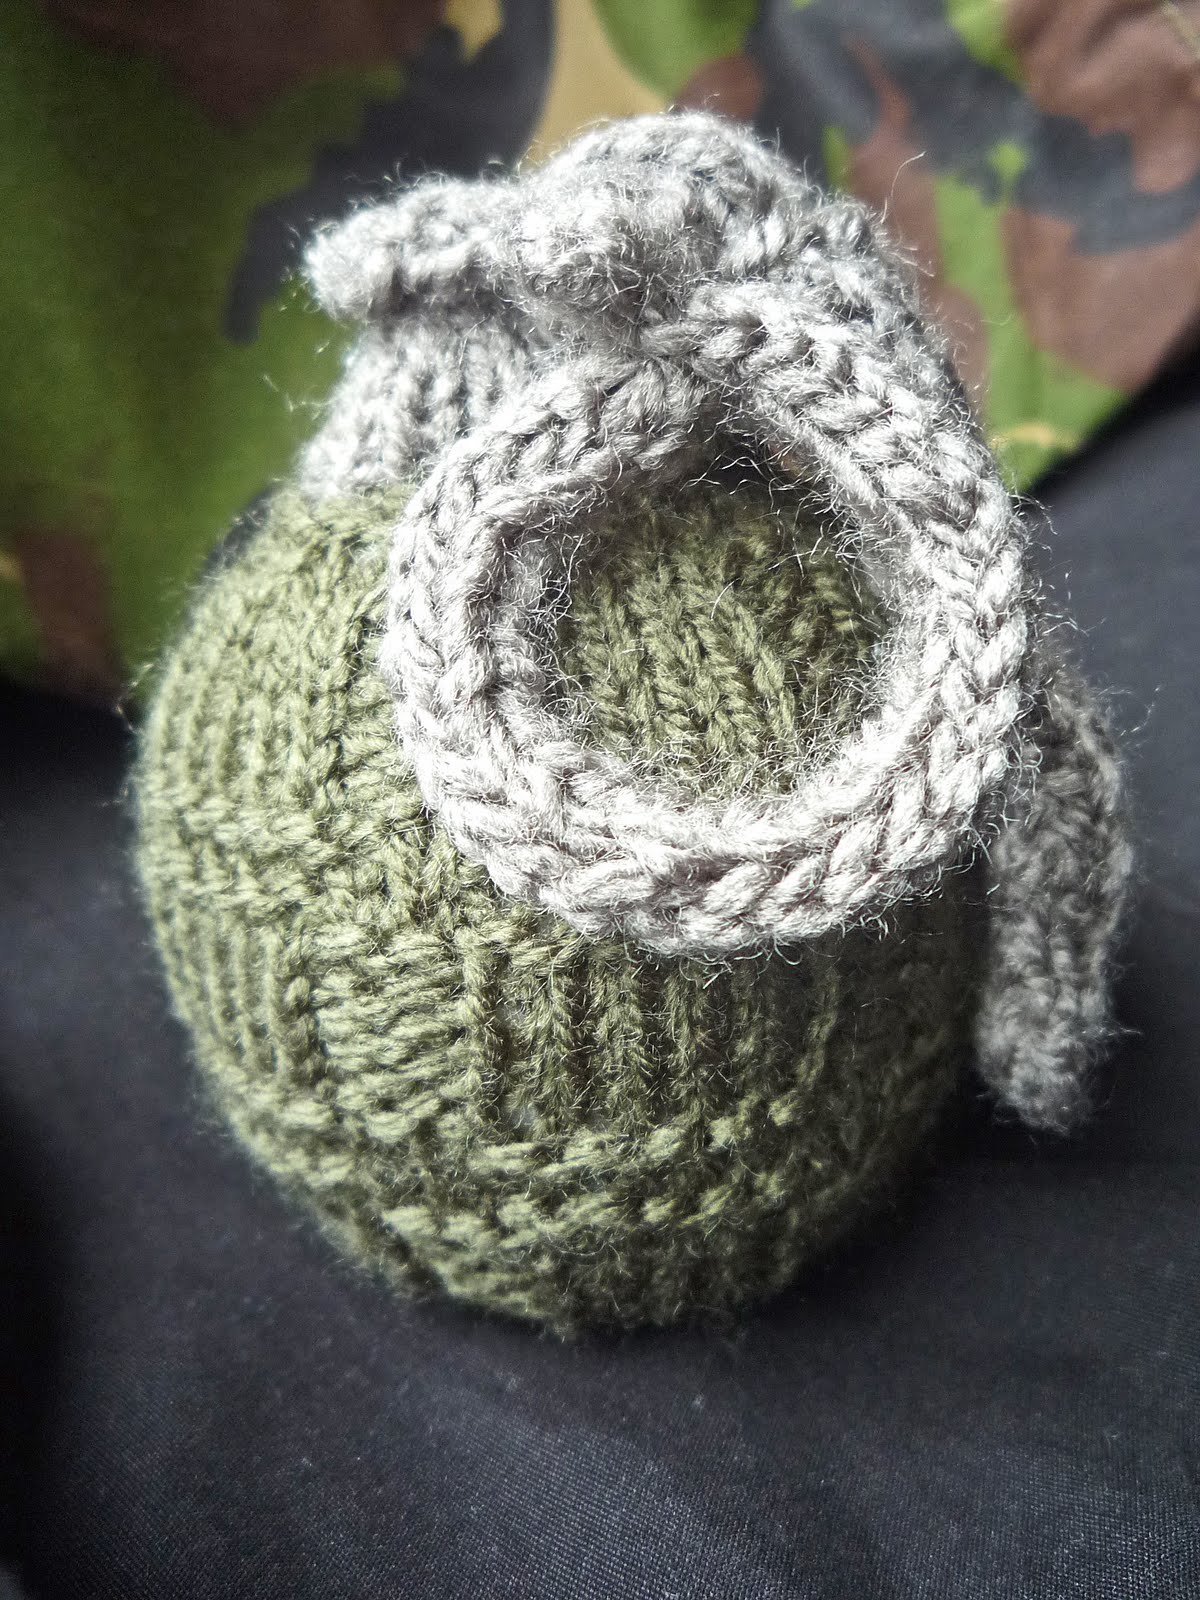
Knitted Beautiful Grenade
Ah, the knitted beautiful grenade – what a unique and charming combination of creativity and intrigue! Imagining something typically associated with power and destruction, like a grenade, transformed into a soft and intricate knitted form is truly fascinating. It blends the unexpected with the familiar, creating a whimsical and thought-provoking piece of art. The attention to detail and the craftsmanship that goes into creating such a piece must be truly remarkable. It's like a playful twist on a serious object, making it quirky and delightful. One can't help but appreciate the creativity and skill behind the creation of such a whimsical item. It's a testament to the endless possibilities of art and craftsmanship, proving that even the most ordinary objects can be reimagined in extraordinary ways.
Materials
double pointed needles – 3.00mm (US size 3)
double knitting yarn (8ply) – green & grey
grey sewing thread & sewing needle
tapestry needle
drinking straw
polyester toy stuffing
sewing machine (optional)
Abbreviations
pwt - pull wool through (thread the yarn through the remaining stitches and pull tight to fasten)
GRENADE CHAMBER 4 dpns (3.00m / US 3)
Cast on 6 sts in green yarn.
Divide sts evenly between the three needles.
Rd 1 : k.
Rd 2 : kfb into each st (12 sts).
Rd 3 : k.
Rd 4 : kfb into each st (24 sts).
Rd 5 : k.
Rd 6 : (k1, kfb) rpt to end of rd (36 sts).
Rd 7: k.
Rd 8 : (k4, p2) rpt to end of rd.
Rds 9 – 11 : rpt Rd 8 - three times.
Rd 12 : (k3, kfb, p2) rpt to end of rd (42 sts).
Rd 13 : (p5, k2) rpt to end of rd.
Rd 14 : k.
Rd 15 : (p5, k2) rpt to end of rd.
Rd 16 : (k5, p2) rpt to end of rd.
Rd 17 - 20 : rpt Rd 16 – 4 times.
Rd 21 : (p5, k2) rpt to end of rd.
Rd 22 : k.
Rd 23 : (p5, k2) rpt to end of rd.
Rds 24 – 28 : rpt Rds : 16 – 20.
Rd 29 : (k1, k2tog) rpt to end of rd (28 sts).
Rd 30 : k.
Rd 31 : (p2tog) rpt to end of rd (14 sts). Break off green yarn and join grey yarn.
Next 5 rds : k.
Rd 37 : p.
Add more stuffing, push down with finger or knitting needle until grenade feels firm.
Rd 38 : (k2tog) (7 sts).
Rd 39 : k. pwt (see the Abbreviations above)
PIN two needles(3.00m / US 3)
Cast on 5 sts in grey yarn
Work stocking st until work measures 3.5cms /1.25ins
starting with a k row and ending with a p row.
Cast off knitwise.
With knit side facing up pick up 4 sts along the side.
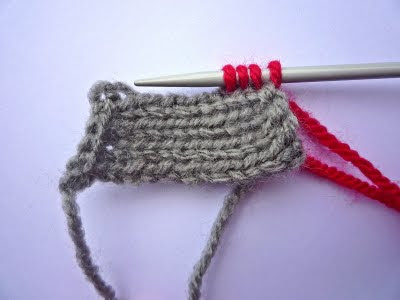
Continue with i-cord until cord measures10cms /4ins. pwt.
HANDLE two needles (3.00m / US 3)
Cast on 7 sts in grey yarn.
ROW 1 : k.
ROW 2 : p to end of row.
Continue with another 8 rows starting with a k row and ending with a p row.
ROW 11 : p.
ROW 12 : p.
Continue with stocking st for another 10 rows starting with a k row and ending with a p row.
ROW 23 : sl1, k1, psso, k to last 2 sts, k2tog (5 sts).
ROW 24 : p.
Continue with stocking st for another 4 rows starting with a k row and ending with a p row.
ROW 29 : sl1, k1, psso, k1, k2tog (3 sts).
ROW 30 : p.
Continue with stocking st for another 4 rows starting with a k row and ending with a p row.
ROW 35 : p. MID POINT
ROW 36 : p.
Continue with stocking st for another 4 rows starting with a k row and ending with a p row.
ROW 41 : kfb, kfb, k1 (5 sts).
ROW 42 : p.
Continue with stocking st for another 4 rows starting with a k row and ending with a p row.
ROW 47 : kfb, k2, kfb, k1 (7 sts).
ROW 48 : p.
Continue with stocking st for another 10 rows starting with a k row and ending with a p row.
NEXT ROW : p.
NEXT ROW : p.
Continue with stocking st for another 10 rows starting with a k row and ending with a p row.
Cast off.
Assembling Grenade
My preferred method of seaming knitted pieces of this size is to use a sewing needle and sewing thread in a matching colour.
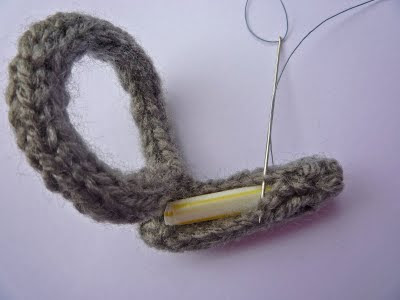
Pin - Cut two pieces of a drinking straw 2.5cms / 1inch long.
Slice one of the pieces lengthwise and insert inside the other straw.
With the end yarn of i-cord, join the end of the cord to the base of the i-cord to form a loop.
Place straw inside knitted rectangle and sew side seams with sewing thread and ends to enclose straw.
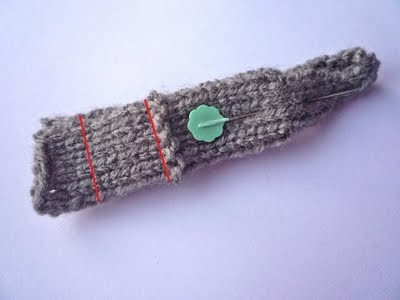
Channel for pin - Fold the handle piece to form a double layer. Sew a seam at the top just before the purl row. Use a sewing machine for this seam or backstitch. Go over the seam two or three times for extra strength. Leave a gap of about 2cms/ 0.75ins (to insert the pin) and sew a similar line of stitches. See photo below - sew the two seams along the two red lines. The channel / gap for the pin to be inserted, is between the two red lines
Sew round the edge of the handle, with sewing thread, leaving a gap at the channel where the pin is to be inserted.
Attach the handle to the top of the grenade.
Sew a few stitches halfway down the handle attaching it to the grenade chamber.