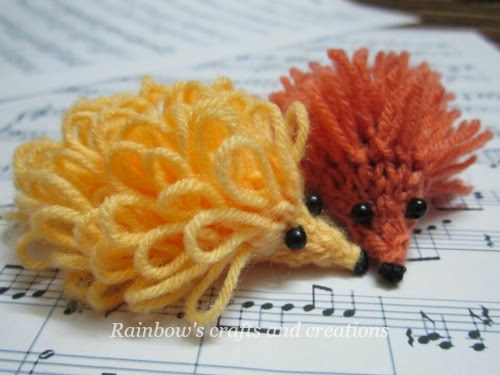
Knitted Adorable Porcupine
The Knitted Adorable Porcupine is a charming and cuddly creation that warms the hearts of both young and old alike. With its soft, yarn-covered spikes and adorable button eyes, it exudes a uniquely delightful appeal. Crafted with love and attention to detail, this lovable knitted porcupine makes for a perfect companion or a whimsical addition to any space. Whether perched on a bookshelf, nestled on a bed, or gifted to a special someone, this charming creation never fails to bring a smile to those who encounter it. Its endearing charm and handmade allure make it a truly special and heartwarming addition to any collection.
materials:
1. colored yarn (100% acrylic, weight 40g )
2. a pair of double-pointed needles (2mm)
3. two small black beads
4. black thread
5. scraps of yarn
knitting abbreviations :
K - knit
Kfb - knit front and back
K2tog - knit two together
lp - loop stitch
Instruction:
Don't turn your work to the back every time you have finished knitting one row. Slide all the stitches along the right needle from the left to the right needle tip and then transfer this needle to your left hand. It is seem that the tail is coming from the wrong end. Actually, it is right. Pull the yarn across the back of the stitches and knit the next row. Make sure to pull the first and last stitch tightly. You can knit through the back loop for the first and last stitch of every row if you want to get a tighter and neater stitch at the closed up point.
cast on 4 stitches
row 1 : K4
row 2 : K4
row 3 : K1, Kfb2, K1
row 4 : K2, Kfb2, K2
row 5 : K1, Kfb2, lp2, Kfb2, K1
row 6 : K3, Kfb, lp4, Kfb, K3
row 7 : K3, Kfb, lp6, Kfb, K3
row 8 : K3, lp10, K3
Repeat row 8 four times.
Then, stuff up the body with scraps of yarn and continue knitting (refer to the photo below).
row 13 : K1, K2tog2, lp6, K2tog2, K1
row 14 : knit a row
row 15 : K2, K2tog4, K2
row 16 : K8
row 17 : K8
row 18 : K2tog4
row 19 : K1, K2tog, K1
row 20 : Knit one stitch and then slip this stitch back onto the left needle. Pass the next 2 stitches over the top of this stitch and off the needle and knit the first stitch again. Now, pull the yarn to tighten up and fasten off. You can trim the loops of the porcupine to get a different look.
Now, weave in ends and sew the nose and eyes in place. Done.

- After you have finished knitting row 12, you will get a cone shape as shown in the photo no.1
- Take some unwanted yarn or scraps of yarn and simply tied in a bundle.
- Stuff up the cone (the body) with the bundle of yarn. It looks full now. Then, continue your knitting to row 20.