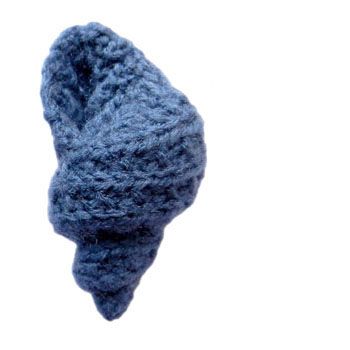
Knitted Whelk Shell
Oh, the knitted whelk shell is a fascinating piece of craftsmanship that truly showcases the beauty of the ocean! Each stitch of yarn lovingly creates the intricate patterns and textures of this whimsical creation, resembling the spiraled shell of a whelk. The attention to detail and the skillful handiwork involved in knitting such a unique item are truly commendable. It's as if the artist has captured a piece of the sea's magic and woven it into this charming miniature masterpiece. Displaying a knitted whelk shell is sure to spark joy and curiosity in anyone who sees it, making it a delightful addition to any decor or a thoughtful gift for a fellow ocean admirer.
You will need:
- scraps of double knit
- toy stuffing
- 4 x double ended knitting needles (3mm)
- tapestry needle
- scissors
Pattern:
Cast on 20 stitches and join into the round.
- Round 1: [k1, p1] repeat to end.
- Round 2: k2tog, k –
- Round 3: [p1, k1] repeat to end.
- Round 4: k2tog, k –
- Rounds 5-8: as rounds 1-4 (16)
- Round 9: [k1, p1] repeat to end.
- Round 10: k –
- Round 11: [k1, p1] repeat to end.
- Round 12: k2tog, k –
- Round 13: [p1, k1] repeat to end.
- Round 14: k –
- Round 15: [p1, k1] repeat to end.
- Round 16: k2tog, k –
Repeat rounds 9-16 until 6 sts remain.
Thread yarn through remaining stitches and pull tight.
Making Up:
Making up is the tricky bit in this pattern as we have to twist the knitting into a tight spiral.
Loosely stuff the knitted cone, leaving about 3cm empty space at the large end. Shape as follows:
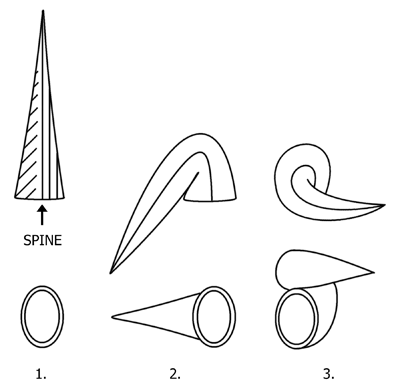
- Hold the cone so that the start/end of the rounds are on top. We are going to refer to the line along the top as the spine.
- Bend the end of the cone around to the left and towards you. Use the bend in the tube to trap the toy stuffing in place.
- Keeping the spine on top shift the cone up so that it sits on top of the open end. Sew into place.
Continue to bend, sewing the spine to the underside of the cone until you run out of knitting. When completely twisted the shell should look something like the diagram below.
If any toy stuffing is visible pull out small amounts until the bend hides it completely. (If the shell is going to be handled a lot, add a couple of extra stitches at the first bend of the shell so that the stuffing can't escape.)
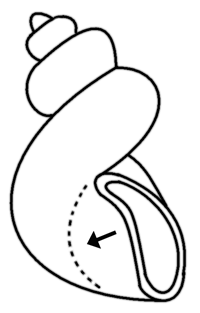
Open out the mouth of the shell by tugging the cast on edge to the side and sewing against the body of the shell. The new position of the edge is shown as a dotted line in the diagram.
Lose any remaining loose ends in the body of the shell.