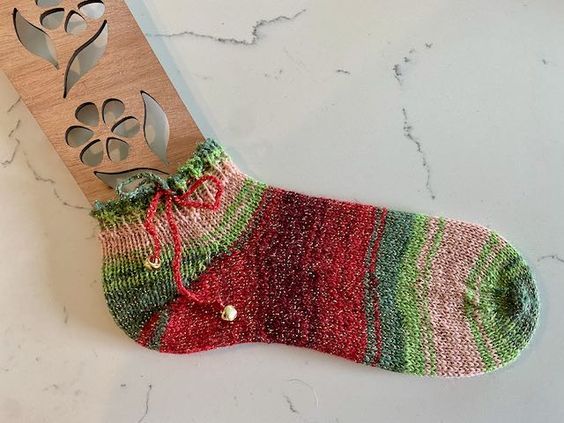
Knitted Christmas Socks
Embracing the cozy spirit of the holiday season, knitted Christmas socks add a touch of warmth and charm to any winter wardrobe. These festive socks come in a variety of patterns and colors, perfect for spreading yuletide joy. Whether adorned with reindeer, snowflakes, or jolly Santas, each pair carries a sense of nostalgia and tradition. Wearing knitted Christmas socks isn't just about style - it's about wrapping your feet in a special kind of holiday magic. So, kick back, relax, and let your toes wiggle happily in the comforting embrace of these delightful socks.

You will need:
– 1 ball 4ply sock yarn – I used this from Hobbii
– 3mm needles for socks… these can be dpns or circular depending on how you wish to knit
– Darning needle
– Tiny bells
– Crochet hook
Cast on 56 stitches with a picot cast on. To do this you need to first cast on 5 stitches, then knit and cast off 2… cast on 4, knit and cast off 2…. continue this until you get to 56 stitches. It takes a while but it makes for a pretty top of the sock.
Rib 4 rows with a Knit 1, Purl 1 rib.
Over the next row, knit 2 together, yarn over – repeat over the row. This will make a row of holes for threading the tie through later.
Rib 6 more rows with a Knit 1, Purl 1. On the first row resuming the ribbing, make sure you knit all the yarn overs as stitches.
Knit 10 rows in straight stockinette stitch
Here you have reached the only really challenging piece of the sock – the German short row heel. Time for some stitch markers. Place one at the start of your row, and another at 28 stitches – the halfway point. Using just the first 28 stitches for this heel turn, place 2 more stitch markers – one after 9 stitches, another after 19 stitches – so you should have on this 28, the stitches broken into 3 sections of 9, 10 and 9 stitches respectively.
Knit 50 rows.
Shaping the toes.
This is also relatively easy. Use the stitch markers to stay clear in which is the top and bottom of the sock.
1. Knit 1, ssk, knit to the last 3 before the marker, k2tog, knit 1, slip marker at this halfway point, and repeat the stitches from the start of the row (decreases the whole row to 52 stitches, 26 on each side, which is a decrease of 2 on each side, 4 in total)
2. Knit whole row.
3. Knit 1, ssk, knit to the last 3 before the marker, k2tog, knit 1, slip marker at this halfway point, and repeat the stitches from the start of the row (decreases the whole row to 48 stitches, 24 on each side)
4. Knit whole row. (You’ll see the pattern forming)
5. Knit 1, ssk, knit to the last 3 before the marker, k2tog, knit 1, slip marker at this halfway point, and repeat the stitches from the start of the row (decreases the whole row to 44 stitches, 22 on each side, which is a decrease of 2 on each side, 4 in total)
6. Knit whole row.
7. Knit 1, ssk, knit to the last 3 before the marker, k2tog, knit 1, slip marker at this halfway point, and repeat the stitches from the start of the row (decreases the whole row to 40 stitches, 20 on each side, which is a decrease of 2 on each side, 4 in total)
8. Knit whole row.
9. Knit 1, ssk, knit to the last 3 before the marker, k2tog, knit 1, slip marker at this halfway point, and repeat the stitches from the start of the row (decreases the whole row to 36 stitches, 18 on each side, which is a decrease of 2 on each side, 4 in total)
10. Knit whole row.
11. Knit 1, ssk, knit to the last 3 before the marker, k2tog, knit 1, slip marker at this halfway point, and repeat the stitches from the start of the row (decreases the whole row to 32 stitches, 16 on each side, which is a decrease of 2 on each side, 4 in total)
12. Knit whole row.
13. Knit 1, ssk, knit to the last 3 before the marker, k2tog, knit 1, slip marker at this halfway point, and repeat the stitches from the start of the row (decreases the whole row to 28 stitches, 14 on each side, which is a decrease of 2 on each side, 4 in total)
14. Knit whole row.
Now the Kitchener stitch bind off of the toe section. You need to place your stitches on 2 needles – one for the front and one for the back. Using a darning needle, use the Kitchener stitch to bind this up. Here is the best tutorial I have found on the Kitchener stitch.
Using your crochet hook chain a length of yarn long enough to go around your ankle, and tie in a bow. Thread this through the holes. Stitch a bell on each end of the tie.